How to Use Backgrounds to Make Your Subject Pop

Introduction: The Power of Backgrounds in Photography

In photography, backgrounds are more than just backdrops; they are storytelling tools that provide context and depth to the subject. This guide explores how to effectively use backgrounds to enhance the narrative quality of your photographs.

Understanding the Role of Backgrounds

A well-chosen background can complement the subject, adding meaning and layers to the story you want to tell. It can set the mood, provide a sense of place, and even offer insights into the subject’s personality or emotions.

Creative Process: Selecting and Utilizing Backgrounds

  • Observing Your Surroundings: Pay attention to the environment around your subject. Look for elements that can add to the narrative of your image.
  • Choosing Complementary Backgrounds: Select backgrounds that complement your subject without overpowering it. Consider how color, texture, and patterns can interact with your subject.
  • Balancing Subject and Background: Ensure that the background doesn’t distract from the subject. Use depth of field and composition techniques to maintain a balance.

Tips for Photographers

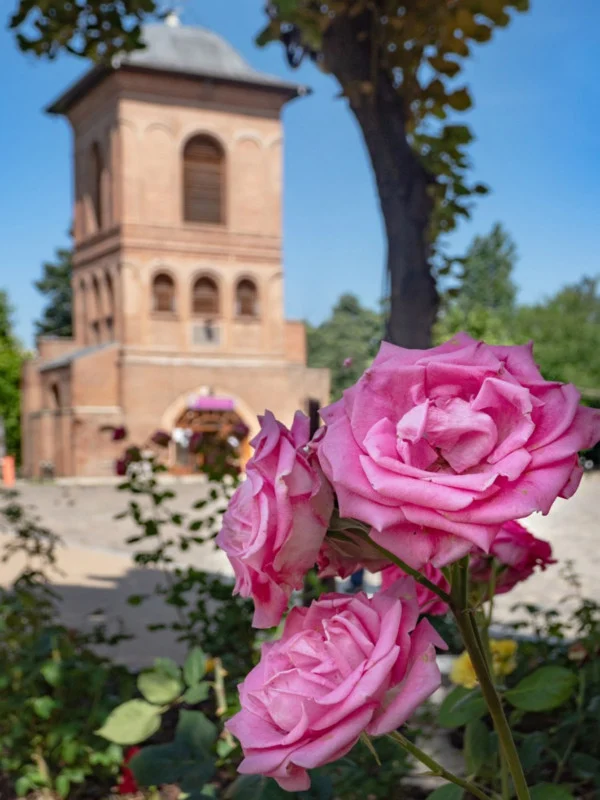
  1. Depth of Field Control: Use a shallow depth of field to blur the background and keep the focus on the subject while still providing contextual clues.
  2. Look for Natural Frames: Use elements in the background to naturally frame your subject and draw attention to it.
  3. Consider Lighting: Observe how different lighting conditions affect the background and use it to create the desired mood or effect.
  4. Background as a Storyteller: Think about what the background says about your subject. A busy street can tell a different story than a tranquil park.

Advanced Techniques in Background Utilization

  • Layering: Create layers in your composition by positioning subjects at different distances from the camera, using the background to add depth.
  • Reflective Surfaces: Utilize mirrors, glass, or water in your background to add an interesting dimension to your images.
  • Negative Space: Sometimes, a minimalistic background can be a powerful tool, using negative space to emphasize the subject.

Practical Applications in Various Genres

  • Portrait Photography: Use backgrounds that reflect the personality or mood of the subject, like an artist in a studio or a musician in a concert hall.
  • Landscape Photography: Let the background tell the story of the location, highlighting the unique features of the landscape.
  • Street Photography: Capture candid moments against the backdrop of urban life, using the environment to add context to human interactions.

Conclusion: Crafting Images with Contextual Depth

By effectively using backgrounds, photographers can transform their images from simple shots to compelling stories. A background that provides context and complements the subject can elevate the narrative depth of your photographs.

Golden Ratio in photography composition.

How to Use the Golden Ratio for Beautiful Composition

Introduction: Exploring the Golden Ratio

The Golden Ratio, a mathematical ratio of 1:1.618, has been revered as the ‘Divine Proportion’ and is considered the secret to creating aesthetically pleasing compositions. In photography, applying the Golden Ratio can lead to beautifully balanced and naturally appealing images.

Understanding the Golden Ratio

The Golden Ratio can be represented by the Fibonacci Spiral or Phi Grid, providing a framework for placing key elements within a composition. It suggests that images are most pleasing when their compositional elements align with these ratios.

Golden Ratio in photography composition.

Creative Process: Utilizing the Golden Ratio

  • Fibonacci Spiral: Visualize the Fibonacci Spiral in your frame and place the main subject at the smallest part of the spiral. This placement naturally draws the viewer’s eye through the image.
  • Phi Grid: Use the Phi Grid, similar to the Rule of Thirds grid, but with lines placed according to the Golden Ratio. Position important elements along these lines or at their intersections.
  • Balancing Elements: Arrange secondary elements in your scene to balance the main subject according to the Golden Ratio, creating a harmonious composition.

Tips for Photographers

  1. Practice Visualization: Regularly practice visualizing the Golden Ratio overlay in different scenes to enhance your compositional skills.
  2. Use Editing Software: Many photo editing tools offer Golden Ratio overlays that can be used during post-processing to refine your composition.
  3. Nature’s Patterns: Look for natural occurrences of the Golden Ratio in the environment, like in the spirals of shells or the arrangement of leaves.
  4. Subtle Application: The use of the Golden Ratio doesn’t have to be exact or overt; subtle applications often lead to the most aesthetically pleasing compositions.

Advanced Techniques in Golden Ratio Photography

  • Dynamic Landscapes: Use the Golden Ratio to guide the placement of horizons, trees, or pathways in landscape photography.
  • Portrait Framing: Position the subject’s face or eyes at the focal point of the Golden Ratio for a natural, pleasing portrait.
  • Architectural Symmetry: Apply the Golden Ratio to capture the symmetry and proportions in architectural photography.

Practical Applications in Various Genres

  • Macro Photography: Frame your macro subjects, such as flowers or insects, following the Golden Ratio for a natural, balanced look.
  • Street Photography: Apply the Golden Ratio to arrange elements in street scenes, creating a sense of movement and harmony.
  • Abstract Photography: Use the Golden Ratio to create intriguing abstract compositions that draw the viewer’s eye.

Conclusion: Mastering the Art of Composition

The Golden Ratio is more than a mathematical formula; it’s a pathway to creating deeply satisfying and visually appealing photographs. Its application can elevate the impact and beauty of your compositions, resonating with viewers on a subconscious level.

First Golden Spiral demonstration in Photoshop.

Tutorial: Using the Golden Spiral for Composition in Photoshop

Step 1: Open Your Image

  1. Load the Image: Begin by opening the image you want to edit in Photoshop. Make sure you’re on the right layer if your project has multiple layers.

Step 2: Selecting the Crop Tool

  1. Accessing the Crop Tool: Locate the Crop Tool in Photoshop’s toolbar, typically on the left side of the screen. The icon resembles two intersecting right angles. Click on it or press C on your keyboard to select it.
Second Golden Spiral application in Photoshop.

Step 3: Changing the Grid to Golden Spiral

  1. Accessing Crop Tool Options: With the Crop Tool active, look at the options bar at the top of the Photoshop window.

  2. Selecting the Golden Spiral Grid: Click on the overlay options, which might be set to ‘Rule of Thirds’ by default. From the dropdown menu, select the ‘Golden Spiral’ (or ‘Fibonacci Spiral’) option. This changes the crop grid to the Golden Spiral layout.

Advanced Golden Spiral demonstration in Photoshop.

Step 4: Adjusting the Composition Using the Golden Spiral

  1. Positioning the Golden Spiral: Click and drag the corners of the crop frame to adjust your composition. The goal is to align the elements of your photo with the curve of the Golden Spiral. This often involves placing the main subject at the smallest part of the spiral, where the eye is naturally drawn.

  2. Rotating the Spiral: You can change the orientation of the Golden Spiral by clicking on the cycle orientation icon in the options bar or by pressing Shift + O. This rotates the spiral, allowing you to align it with various elements in your image depending on its layout.

  3. Applying the Crop: Once you’re satisfied with the composition, press Enter or click the checkmark at the top of the window to apply the crop. This will adjust your image to fit the new composition based on the Golden Spiral.

Advanced Golden Spiral method in Photoshop.

Conclusion

The Golden Spiral is a classic composition tool derived from the Fibonacci sequence, often used to create aesthetically pleasing and naturally balanced photos. By using Photoshop’s Crop Tool with the Golden Spiral overlay, you can easily adjust your images to follow this pattern, enhancing their visual impact and appeal.

O Carroll, B. (2016). 28 Composition Techniques That Will Improve Your Photos.

References

O Carroll, B. (2016). 28 Composition Techniques That Will Improve Your Photos. [online] PetaPixel. Available at:

https://petapixel.com/photography-composition-techniques/

[Accessed 14 December]

First demonstration of Golden Triangles in Photoshop.

Why Golden Triangles Create Beautiful Visual Stories

Introduction: The Geometry of Golden Triangles

Golden Triangles is an advanced compositional technique that involves dividing the frame into a series of triangles of differing sizes, based on diagonals, to create dynamic and balanced images. This technique is particularly effective for adding a sense of movement, direction, and harmony to photographs.

Understanding Golden Triangles

The principle behind Golden Triangles is to use diagonal lines that intersect at right angles, forming triangles within the image frame. These triangles guide the viewer’s eye through the composition, leading to a visually satisfying experience.

Creative Process: Implementing Golden Triangles

  • Visualizing Diagonals and Triangles: Start by imagining diagonal lines across your frame. Where these lines intersect, form triangles to place your compositional elements.
  • Balancing the Frame: Use the triangles as a guide to balance the elements in your scene – placing subjects, objects, or areas of contrast within or along these triangles.
  • Dynamic Composition: Look for natural formations or arrange your subjects in a way that aligns with these diagonal lines and triangles.

Tips for Photographers

  1. Practice Visualization: Regularly practice visualizing the golden triangle grid in various scenes to become adept at identifying compositional opportunities.
  2. Use Grids in Post-Processing: Many editing software tools allow you to overlay grids. Use a golden triangle grid during post-processing to refine your composition.
  3. Combine with Other Rules: Don’t hesitate to combine golden triangles with other compositional rules like the Rule of Thirds or leading lines for more complex compositions.
  4. Flexibility is Key: The golden triangles guideline is not rigid; use it flexibly and creatively to suit the needs of your scene.

Advanced Techniques in Golden Triangle Composition

  • Asymmetry for Interest: Use the asymmetrical nature of golden triangles to create more dynamic and interesting compositions.
  • Contrast and Color: Utilize contrasts in color, light, and shadow within the triangles to guide the viewer’s eye and add depth.
  • Layering Elements: Incorporate different elements in each triangle to create a layered, multi-dimensional effect in your photos.

Practical Applications in Various Genres

  • Landscape Photography: Use the lines of the golden triangles to align natural features like rivers, mountain ridges, or trees.
  • Urban and Architectural Photography: Apply this technique to align architectural elements and urban landscapes for a dynamic composition.
  • Portrait Photography: Position your subject along the diagonal lines or within the triangles to create a more engaging portrait.

Conclusion: Elevating Your Compositional Approach

The Golden Triangles technique is a valuable tool for photographers seeking to elevate their compositional approach. It offers a way to create images that are both dynamic and harmonious, engaging the viewer through thoughtful arrangement of visual elements.

First demonstration of Golden Triangles in Photoshop.

Tutorial: Using Golden Triangles for Composition in Photoshop

Step 1: Open Your Image

  1. Load the Image: Start by opening the image you wish to edit in Photoshop. Ensure you are working on the appropriate layer if your project has multiple layers.

Step 2: Accessing the Crop Tool

  1. Selecting the Crop Tool: Find the Crop Tool in the Photoshop toolbar, usually located on the left side of the screen. The icon looks like two intersecting right angles. Click on it or press the C key on your keyboard to activate it.
Golden Triangles technique in Photoshop.

Step 3: Setting Up Golden Triangles Grid

  1. Accessing Crop Tool Options: With the Crop Tool active, direct your attention to the options bar at the top of the Photoshop window.

  2. Changing to Golden Triangles Grid: Look for the overlay options, typically set to the ‘Rule of Thirds’ by default. Click on this option and from the dropdown menu, select ‘Golden Triangles’. This will change the overlay grid on your image to the Golden Triangles layout.

Advanced Golden Triangles usage in Photoshop.

Step 4: Composing with Golden Triangles

  1. Adjusting the Image to the Grid: Click and drag the corners of the crop frame to adjust your composition. Aim to align the key elements of your photo along the lines of the triangles or at their points of intersection. This technique helps in creating dynamic and balanced compositions.

  2. Rotating the Grid for Different Compositions: You can change the orientation of the Golden Triangles by cycling through different options. This can be done by pressing Shift + O while the Crop Tool is active. This allows you to explore various compositional possibilities with the triangles aligning differently with your image.

  3. Finalizing the Composition: After adjusting the image to your satisfaction according to the Golden Triangles grid, apply the crop. Press Enter or click the checkmark at the top of the window to confirm your changes.

Creative application of Golden Triangles in Photoshop.

Conclusion

Golden Triangles are an effective compositional tool, especially useful for creating tension, energy, and balance in a photograph. This technique, based on diagonal lines and asymmetrical balance, can add a dynamic element to your compositions. Photoshop’s Crop Tool with the Golden Triangles grid makes it easy to apply this principle to enhance the visual impact of your images.

O Carroll, B. (2016). 28 Composition Techniques That Will Improve Your Photos.

References

O Carroll, B. (2016). 28 Composition Techniques That Will Improve Your Photos. [online] PetaPixel. Available at:

https://petapixel.com/photography-composition-techniques/

[Accessed 14 December]

Historical and contemporary Bucharest juxtaposition.

How to Create Striking Contrast with Juxtaposition in Photos

Introduction: The Art of Juxtaposition

Juxtaposition in photography is a powerful compositional technique where two or more contrasting elements are placed together in a frame to tell a story or highlight a relationship. This guide will explore how to use juxtaposition to create depth, interest, and emotional impact in your photographs.

Understanding Juxtaposition

Juxtaposition is about creating a dialogue between contrasting elements. These elements can differ in color, shape, size, texture, or conceptual meaning. The contrast between these elements can produce a striking image that engages the viewer and provokes thought.

Historical and contemporary Bucharest juxtaposition.

O Carroll, B. (2016). 28 Composition Techniques That Will Improve Your Photos.

Creative Process: Crafting Images with Juxtaposition

  • Identifying Contrasting Elements: Look for elements that offer a stark contrast to each other. This could be an old building next to a modern one, a single person in a crowded space, or a splash of color in a monochromatic scene.
  • Framing and Composition: Frame your shot in a way that emphasizes the relationship between the juxtaposed elements. Consider the placement and balance of these elements within the frame.
  • Capturing the Right Moment: Sometimes, juxtaposition is about capturing the perfect moment where contrasting elements come together harmoniously or ironically.

Tips for Photographers

  1. Seek Out Unusual Pairings: The more unexpected the pairing, the stronger the visual impact. Keep an eye out for unusual combinations in everyday life.
  2. Use Color Contrast: Contrasting colors can create a vivid juxtaposition and draw the viewer’s eye.
  3. Play with Scale and Proportion: Juxtaposing a small object with a large one can create an interesting contrast in scale.
  4. Consider the Background: A simple background can often make the juxtaposed elements stand out more.

Advanced Techniques in Juxtaposition Photography

  • Conceptual Juxtaposition: Beyond physical contrasts, juxtapose ideas, themes, or moods for a deeper narrative.
  • Layering: Use foreground and background elements to create a juxtaposition, adding depth to the image.
  • Reflections and Shadows: Utilize reflections and shadows to create a juxtaposition between reality and illusion.

Practical Applications in Various Genres

  • Street Photography: Capture contrasting human behaviors or urban vs. natural elements.
  • Portrait Photography: Juxtapose the subject with contrasting backgrounds or props to convey personality or mood.
  • Landscape Photography: Contrast natural landscapes with man-made elements or environmental changes.

Conclusion: Enhancing Visual Stories

Juxtaposition is more than just a compositional tool; it’s a narrative device. It challenges photographers to look deeper, think creatively, and tell stories that provoke and resonate.

References

O Carroll, B. (2016). 28 Composition Techniques That Will Improve Your Photos. [online] PetaPixel. Available at:

https://petapixel.com/photography-composition-techniques/

[Accessed 13 December]

How to Balance Elements for Better Photo Composition

Introduction: The Essence of Balance in Photography

Achieving balance in photography is crucial for creating visually appealing and harmonious images. This guide focuses on the concept of visual equilibrium, where elements in a scene are arranged to create a sense of stability and aesthetic harmony, enhancing the overall impact of the photograph.

Understanding Visual Equilibrium

Visual equilibrium involves strategically placing subjects and objects within the frame to distribute visual weight evenly. This balance can be symmetrical or asymmetrical, with each type offering different aesthetic qualities and emotional impacts.

Creative Process: Crafting Balanced Compositions

  • Identifying the Elements: Start by assessing the elements in your scene that contribute to the visual weight, such as color, size, texture, and position.
  • Symmetry vs. Asymmetry: Decide whether a symmetrical or asymmetrical balance suits your scene better. Symmetry offers a sense of order and calm, while asymmetry can create dynamic tension and interest.
  • Experimenting with Placement: Move around your subject, change your angles, and rearrange elements if possible to find the most balanced composition.

Tips for Photographers

  1. Use the Rule of Thirds: Apply the Rule of Thirds to place key elements at intersection points or along the lines for a balanced composition.
  2. Mind the Negative Space: Pay attention to negative space, as it can significantly affect the balance of your composition.
  3. Color and Contrast: Use contrasting colors and tones to balance lighter and darker areas of your image.
  4. Review and Adjust: Frequently review your composition through your viewfinder or display screen to ensure balance and make necessary adjustments.

Advanced Techniques in Achieving Balance

  • Juxtaposition: Place contrasting elements against each other to achieve balance and create a focal point.
  • Leading Lines: Use leading lines to guide the viewer’s eye across the image, helping to balance the composition.
  • Texture and Patterns: Balance smooth areas with textured ones, or repetitive patterns with plain spaces, to add visual interest.

Practical Applications in Various Genres

  • Landscape Photography: Balance the sky with the land, or a dominant feature with open space.
  • Portrait Photography: Balance the subject with the background, ensuring neither overpowers the other.
  • Street Photography: Find scenes where elements naturally balance each other, like a lone figure against a busy background.

Conclusion: Harmonizing Your Photographic Art

Mastering the balance of elements in photography is key to creating images that are visually pleasing and emotionally engaging. By understanding and practicing visual equilibrium, photographers can enhance the storytelling and impact of their work.

O Carroll, B. (2016). 28 Composition Techniques That Will Improve Your Photos.

References

O Carroll, B. (2016). 28 Composition Techniques That Will Improve Your Photos. [online] PetaPixel. Available at:

https://petapixel.com/photography-composition-techniques/

Aviva Stadium with Rule of Space.

How to Use the Rule of Space for Natural-Looking Photos

Introduction: The Dynamics of the Rule of Space

The Rule of Space in photography is a powerful compositional technique that involves using space in the direction that a subject is facing or moving. This approach adds a sense of motion and narrative to your images, creating a more engaging and dynamic composition.

Understanding the Rule of Space

The Rule of Space is about anticipating movement and direction in a still image. It involves leaving empty space in the frame in the direction a subject is looking or moving towards, which can be a person, an animal, a vehicle, or even a gaze.

Aviva Stadium with Rule of Space.

O Carroll, B. (2016). 28 Composition Techniques That Will Improve Your Photos.

Creative Process: Implementing the Rule of Space

  • Identifying Directional Cues: Observe your subject and determine the direction of movement or the point of focus. This could be the direction a person is looking, walking, or an object is moving.
  • Framing with Purpose: Frame your shot to include space in front of your subject. This space should be proportional to the intensity of the movement or gaze.
  • Balancing the Composition: While including space, ensure that the overall composition is balanced and the subject is not lost in the frame.

Tips for Photographers

  1. Understand Subject Dynamics: Study your subject’s behavior or movement patterns to better anticipate where to leave space.
  2. Use Leading Lines: Combine the Rule of Space with leading lines to enhance the sense of direction and movement.
  3. Experiment with Negative Space: Use negative space effectively to emphasize the direction in which the subject is heading or looking.
  4. Adjusting Position: Sometimes, repositioning yourself can change the dynamic of the space and create a more compelling composition.

Advanced Techniques in Using the Rule of Space

  • Motion Blur: Experiment with motion blur to emphasize the movement, making the directional space more impactful.
  • Juxtaposition: Place another subject in the negative space to create a juxtaposition that adds depth to the narrative.
  • Layering Elements: Incorporate multiple layers in your composition to add depth, using the Rule of Space to guide the viewer through these layers.

Practical Applications in Various Genres

  • Sports and Wildlife Photography: Capture athletes or animals in motion, leaving space in their movement direction.
  • Street Photography: Document people in urban settings, considering the direction of their movement or gaze.
  • Landscape Photography: Use natural elements like rivers or paths to guide the eye, applying the Rule of Space to lead towards a focal point.

Conclusion: Expanding the Visual Narrative

The Rule of Space is more than a compositional guideline; it’s a storytelling tool that adds life and movement to your images. It encourages viewers to engage with the photo, imagining what lies beyond the frame.

References

O Carroll, B. (2016). 28 Composition Techniques That Will Improve Your Photos. [online] PetaPixel. Available at:

https://petapixel.com/photography-composition-techniques/

[Accessed 13 December]

Emotional color combinations in Stratford.

How To Use Color In Photography For Powerful Results

Introduction: The Power of Colors in Photography

Colors have a profound impact on the aesthetic and emotional appeal of photographs. Understanding color theory and how different colors interact can significantly enhance the visual storytelling of your images. This guide delves into the use of color combinations in photography, providing insights into creating harmony and contrast to evoke specific moods and themes.

Understanding Color Theory

Color theory is a set of principles used to create harmonious color combinations. In photography, this involves understanding the color wheel, complementary colors, analogous colors, and the psychological impact of different hues and shades.

Color theory in Central London architecture.

Creative Process: Crafting Colorful Compositions

  • Studying the Color Wheel: Familiarize yourself with the color wheel, identifying complementary (opposite colors) and analogous (adjacent colors) schemes.
  • Observing Your Environment: Look for natural and artificial color combinations around you. Notice how different colors interact and the emotions they evoke.
  • Experimenting with Colors: Play with various color combinations in your compositions. Experiment with dominant and accent colors to create balance.

Tips for Photographers

  1. Use Complementary Colors: Complementing colors, being opposites on the color wheel, create high contrast and vibrancy when used together.
  2. Explore Analogous Colors: Analogous colors, which sit next to each other on the color wheel, offer a more harmonious and cohesive look.
  3. Consider Color Temperature: Warm colors (reds, oranges) evoke different feelings compared to cool colors (blues, greens). Use them to set the mood of your image.
  4. Mind the Color Balance: Pay attention to how much of each color is present in the frame. Too much of a dominant color can overwhelm the viewer.

Advanced Techniques in Color Theory

  • Color Isolation: Isolate a single color against a more neutral background for a striking effect.
  • Monochromatic Themes: Experiment with monochromatic color schemes, using various shades of a single color to create depth and interest.
  • Post-Processing for Color Enhancement: Utilize post-processing tools to adjust saturation, luminance, and hue to fine-tune your color compositions.

Practical Applications in Various Genres

  • Landscape Photography: Use color theory to enhance natural scenes, balancing sky blues with earthy tones, or capturing the vibrant colors of a sunset.
  • Portrait Photography: Consider the colors in your background and clothing to complement or contrast with your subject’s features.
  • Street Photography: Capture the colorful dynamics of urban life, using colors to highlight focal points and lead the viewer’s eye.

Conclusion: Painting with Light and Colors

Color theory in photography is akin to painting with light and colors. It’s about creating a visual harmony that resonates with viewers, evoking emotions and telling stories through hues and shades.

Bird’s Eye View: How to Capture Stunning Overhead Shots

Introduction: Exploring the Heights of Photography

Shooting from above, or capturing a bird’s eye view, offers a dramatically different perspective that can turn ordinary scenes into extraordinary images. This approach provides a unique vantage point, revealing patterns, textures, and relationships that are not visible from the ground.

The Appeal of Bird’s Eye View Photography

A bird’s eye view can simplify chaotic scenes, provide new insights into familiar subjects, and showcase the beauty of patterns and symmetry from an elevated perspective. It’s a powerful way to tell stories and capture the scale and context of a scene.

Creative Process: Achieving Impactful High-Angle Shots

  • Finding the Right Location: Look for locations that offer a broad and unobstructed view from above. High buildings, hills, or even flights can be great starting points.
  • Subject and Composition: Identify your subject and how best to frame it from above. Consider elements like symmetry, patterns, and leading lines that are enhanced by this perspective.
  • Equipment Considerations: If using a drone, ensure it’s equipped with a high-quality camera. For handheld photography, use a zoom lens for greater flexibility.

Tips for Photographers

  1. Safety First: Always prioritize safety, especially when shooting from high places or using drones.
  2. Optimize Weather Conditions: Clear days are ideal for sharp, vivid aerial shots, while overcast conditions can offer softer, more diffused lighting.
  3. Experiment with Heights and Angles: Different heights can dramatically change the composition and impact of your photo. Experiment to find the most compelling angle.
  4. Consider Time of Day: The position of the sun can greatly affect the look and feel of your shot. Early morning and late afternoon often provide the most dramatic lighting.

Advanced Techniques in Bird’s Eye View Photography

  • Panoramic Views: Stitch together multiple shots for a panoramic view of your scene.
  • Motion Blur: Experiment with motion blur to add a dynamic element to your high-angle shots, especially in urban settings.
  • Post-Processing: Enhance details, adjust perspectives, and correct distortions in post-processing to refine your aerial images.

Practical Applications in Various Genres

  • Landscape Photography: Capture the grandeur of natural landscapes, showcasing their vastness and beauty from above.
  • Urban Photography: Offer a new perspective on cityscapes, highlighting the geometry and patterns of urban planning.
  • Event Photography: Use high-angle shots to capture the scale and energy of events and gatherings.

Conclusion: A New Perspective in Photography

Shooting from above opens up a world of creative possibilities, allowing photographers to depict familiar scenes in unfamiliar ways. It challenges photographers to think differently about composition, perspective, and storytelling.

Unique upward view at Goodge Street.

Low Angle Photography: How To Create Powerful Heroic Shots

Introduction: The Power of Low-Angle Photography

Shooting from below is a dynamic approach to photography that involves taking pictures from a lower vantage point, looking up at your subject. This angle can drastically change the viewer’s perception, adding drama, grandeur, or even a sense of awe to your images.

Understanding Low-Angle Shots

Low-angle shots are not just about crouching down; they’re about reimagining the world from a different point of view. This perspective can make ordinary subjects look imposing and give a sense of scale and importance that standard eye-level shots might not achieve.

Unique upward view at Goodge Street.

Creative Process: Mastering the Low-Angle Shot

  • Choosing Your Subject: Look for subjects that benefit from an exaggerated sense of scale or importance. Buildings, trees, and statues are great examples.
  • Positioning and Angle: Experiment with various positions, aiming to shoot upwards at an angle that captures the essence of the subject.
  • Incorporating the Sky: Use the sky as a background to isolate your subject and add a sense of space and openness.

Tips for Photographers

  1. Lens Choice: Wide-angle lenses are ideal for low-angle shooting as they can capture more of the scene and exaggerate perspective.
  2. Focus on Foreground Elements: Incorporate interesting foreground elements to add depth to your low-angle photographs.
  3. Mind the Background: Be aware of what’s in your background. A clear sky can make a great backdrop, while a cluttered background can distract from your subject.
  4. Stability Is Key: Use a tripod or stabilize your camera against a solid surface to avoid camera shake, especially in low light conditions.

Advanced Techniques in Low-Angle Photography

  • Reflections: Look for puddles, glass, or other reflective surfaces to add an extra dimension to your low-angle shots.
  • Silhouettes: Shooting against the light can create striking silhouettes that add drama to your low-angle images.
  • Architectural Dynamics: Use low angles to capture the lines and curves of buildings, creating dynamic architectural shots.

Practical Applications in Various Genres

  • Architectural Photography: Emphasize the height and grandeur of buildings.
  • Nature and Wildlife: Capture the scale and majesty of natural landscapes or the imposing presence of wildlife.
  • Street Photography: Add an element of intrigue to everyday scenes, capturing them from a unique, upward perspective.

Conclusion: Elevating Your Photographic Perspective

Shooting from below allows photographers to explore a world of unique perspectives and compelling compositions. It challenges the norms of photography and encourages a fresh, creative approach to capturing images.

How to Make Your Subject Pop with Isolation

Introduction: The Art of Isolating Your Subject

Isolating the subject is a powerful photographic technique that involves focusing on a single element within the frame to draw the viewer’s attention. This method is effective in creating striking images that convey a clear message or emotion, emphasizing the subject with minimal distractions.

Understanding Subject Isolation

Subject isolation is about making your main subject the unmistakable focal point of your photograph. This can be achieved through various means, such as using depth of field, contrast, lighting, or compositional techniques. It’s a way to ‘declutter’ the image and make your subject stand out.

Creative Process: Achieving Clarity in Focus

  • Identifying Your Subject: Clearly define what the main subject of your image is. It could be a person, an object, a landscape feature, etc.
  • Choosing the Right Background: Look for backgrounds that are unobtrusive and don’t compete with your subject for attention. Simple or blurred backgrounds often work best.
  • Utilizing Lighting: Use lighting to illuminate your subject. Side lighting or backlighting can be particularly effective in separating the subject from the background.

Tips for Photographers

  1. Depth of Field Mastery: Use a wide aperture to create a shallow depth of field, blurring the background and foreground to isolate the subject.
  2. Framing Techniques: Frame your subject using natural or architectural elements to draw the viewer’s eye directly to the subject.
  3. Color and Contrast: Utilize color contrasts to make your subject stand out. A brightly colored subject against a muted background can be very effective.
  4. Selective Focus: Use manual focus or selective autofocus points to ensure your subject is the sharpest element in your image.

Advanced Techniques in Subject Isolation

  • Bokeh Effect: Master the art of bokeh – a Japanese term for the aesthetic quality of the blur produced in the out-of-focus parts of an image.
  • Post-Processing: Enhance subject isolation in post-processing by adjusting brightness, contrast, or sharpness around the subject.
  • Use of Negative Space: Incorporate negative space effectively to emphasize isolation and bring focus to your subject.

Practical Applications in Various Genres

  • Portrait Photography: Isolate the subject to capture the essence of their personality and emotions.
  • Wildlife Photography: Use subject isolation to focus on a single animal, highlighting its features or behaviors.
  • Street Photography: Isolate individuals or specific interactions to tell a story or capture a moment in time.

Conclusion: Mastering the Focal Point

Isolating the subject is a skill that elevates the impact of your photography, allowing viewers to connect more deeply with the focal point of your image. It requires a combination of technical knowledge and creative vision to execute effectively.