Monochrome tones in Casablanca architecture.

How to Create Timeless, Emotional Photos in Black and White

Introduction: The Timeless Elegance of Black and White

Black and white photography is more than just an absence of color; it’s a different perspective on the world. This guide explores how black and white can simplify compositions, direct focus to the subject, and create a strong emotional impact.

Understanding Black and White Composition

Black and white photography strips away the distraction of color, allowing viewers to focus on other aspects of the photo, such as texture, shape, light, and shadow. It brings out the raw essence of the scene or subject, emphasizing contrasts and subtleties.

Color and black & white comparison in Casablanca.

Creative Process: Crafting Black and White Images

  • Visualizing in Monochrome: Train your eye to see the world in gradients of gray. Look for scenes with strong contrasts or interesting textures that would translate well into black and white.
  • Focus on Lighting: Lighting plays a crucial role in black and white photography. High contrast lighting can create dramatic images, while soft, even lighting can convey subtlety and nuance.
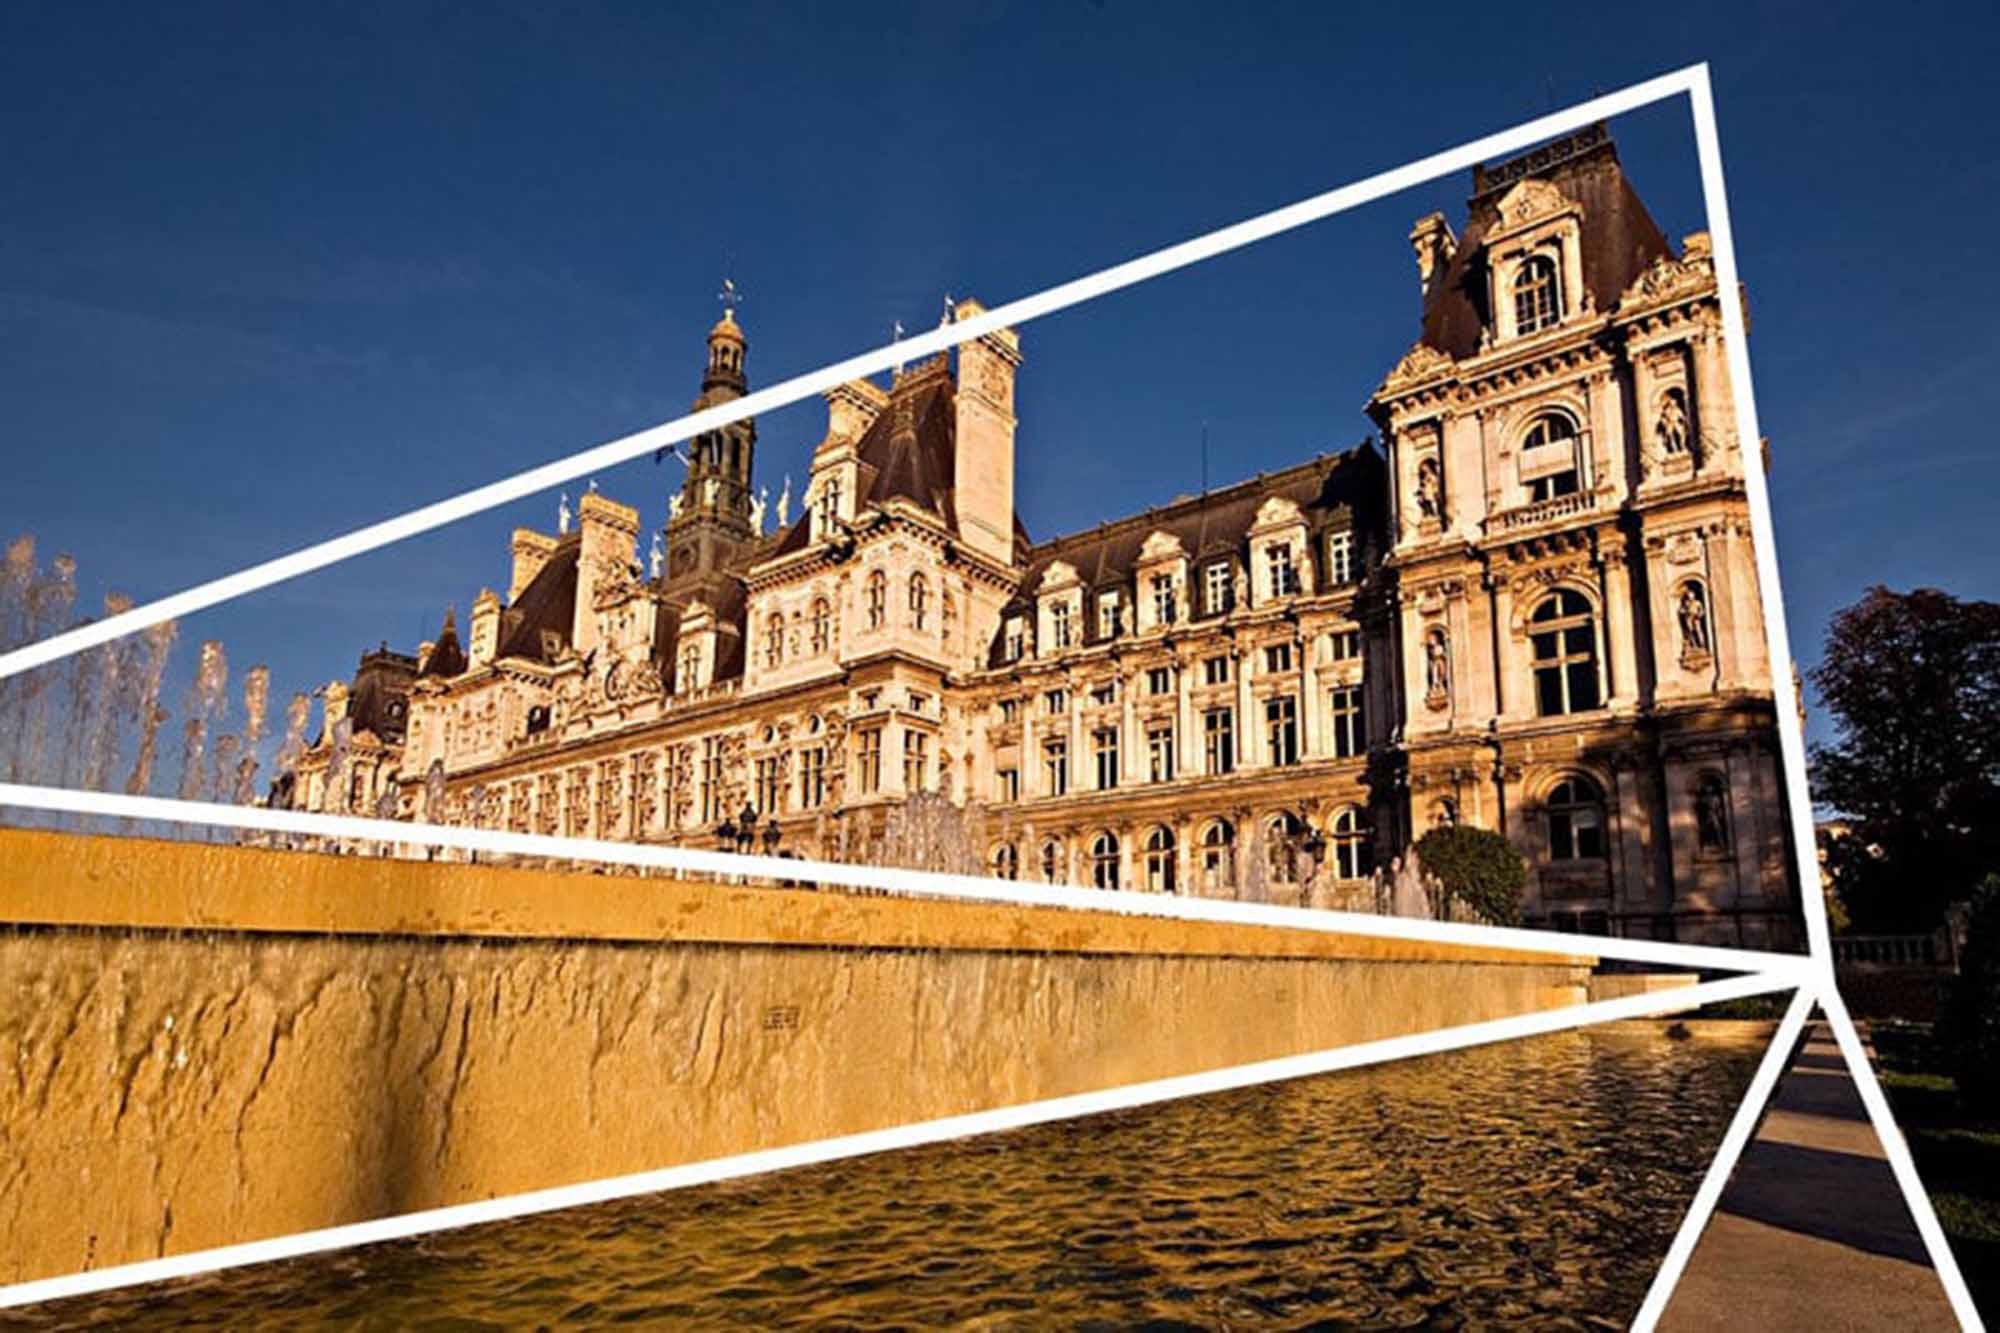
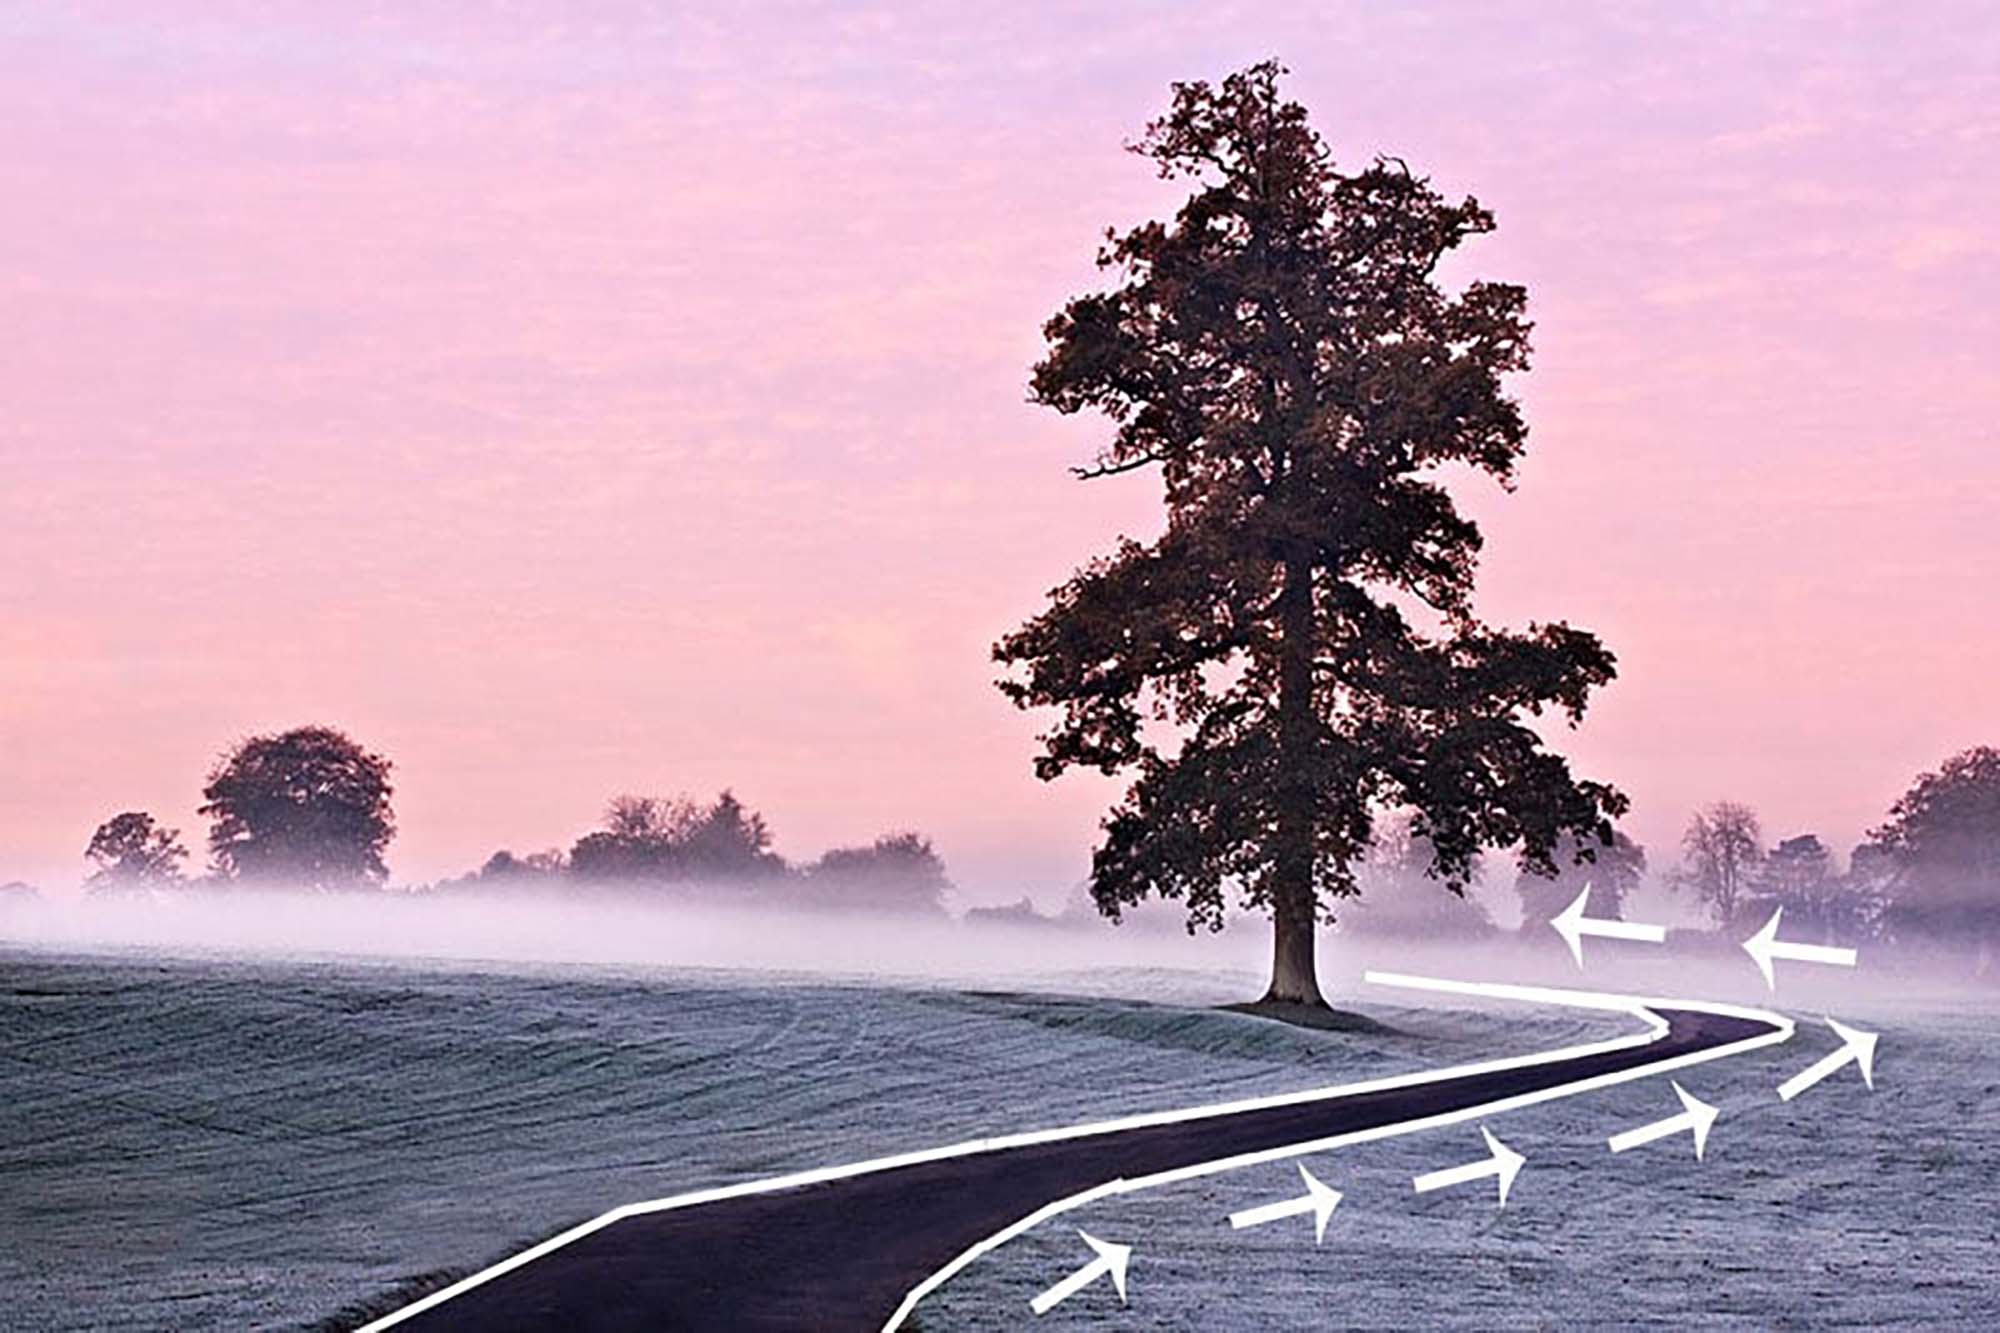
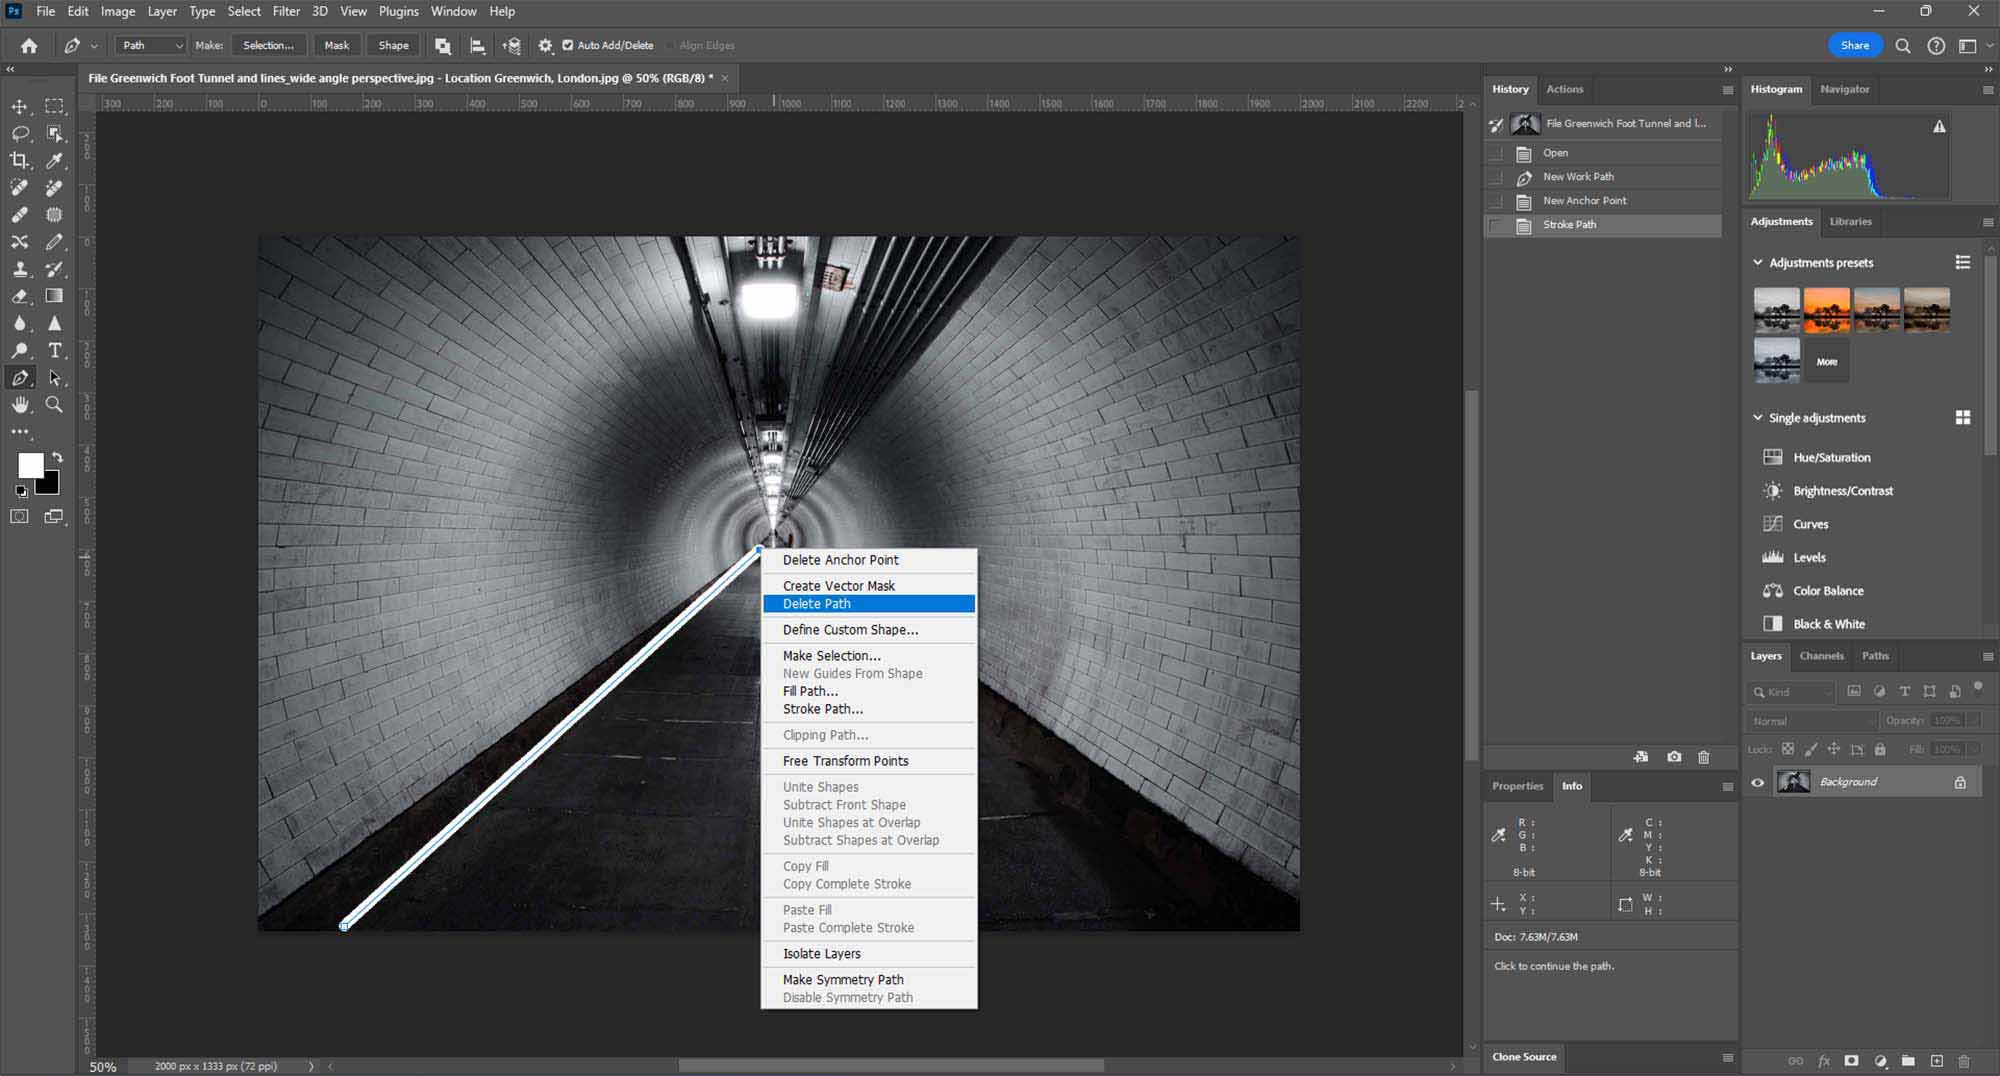
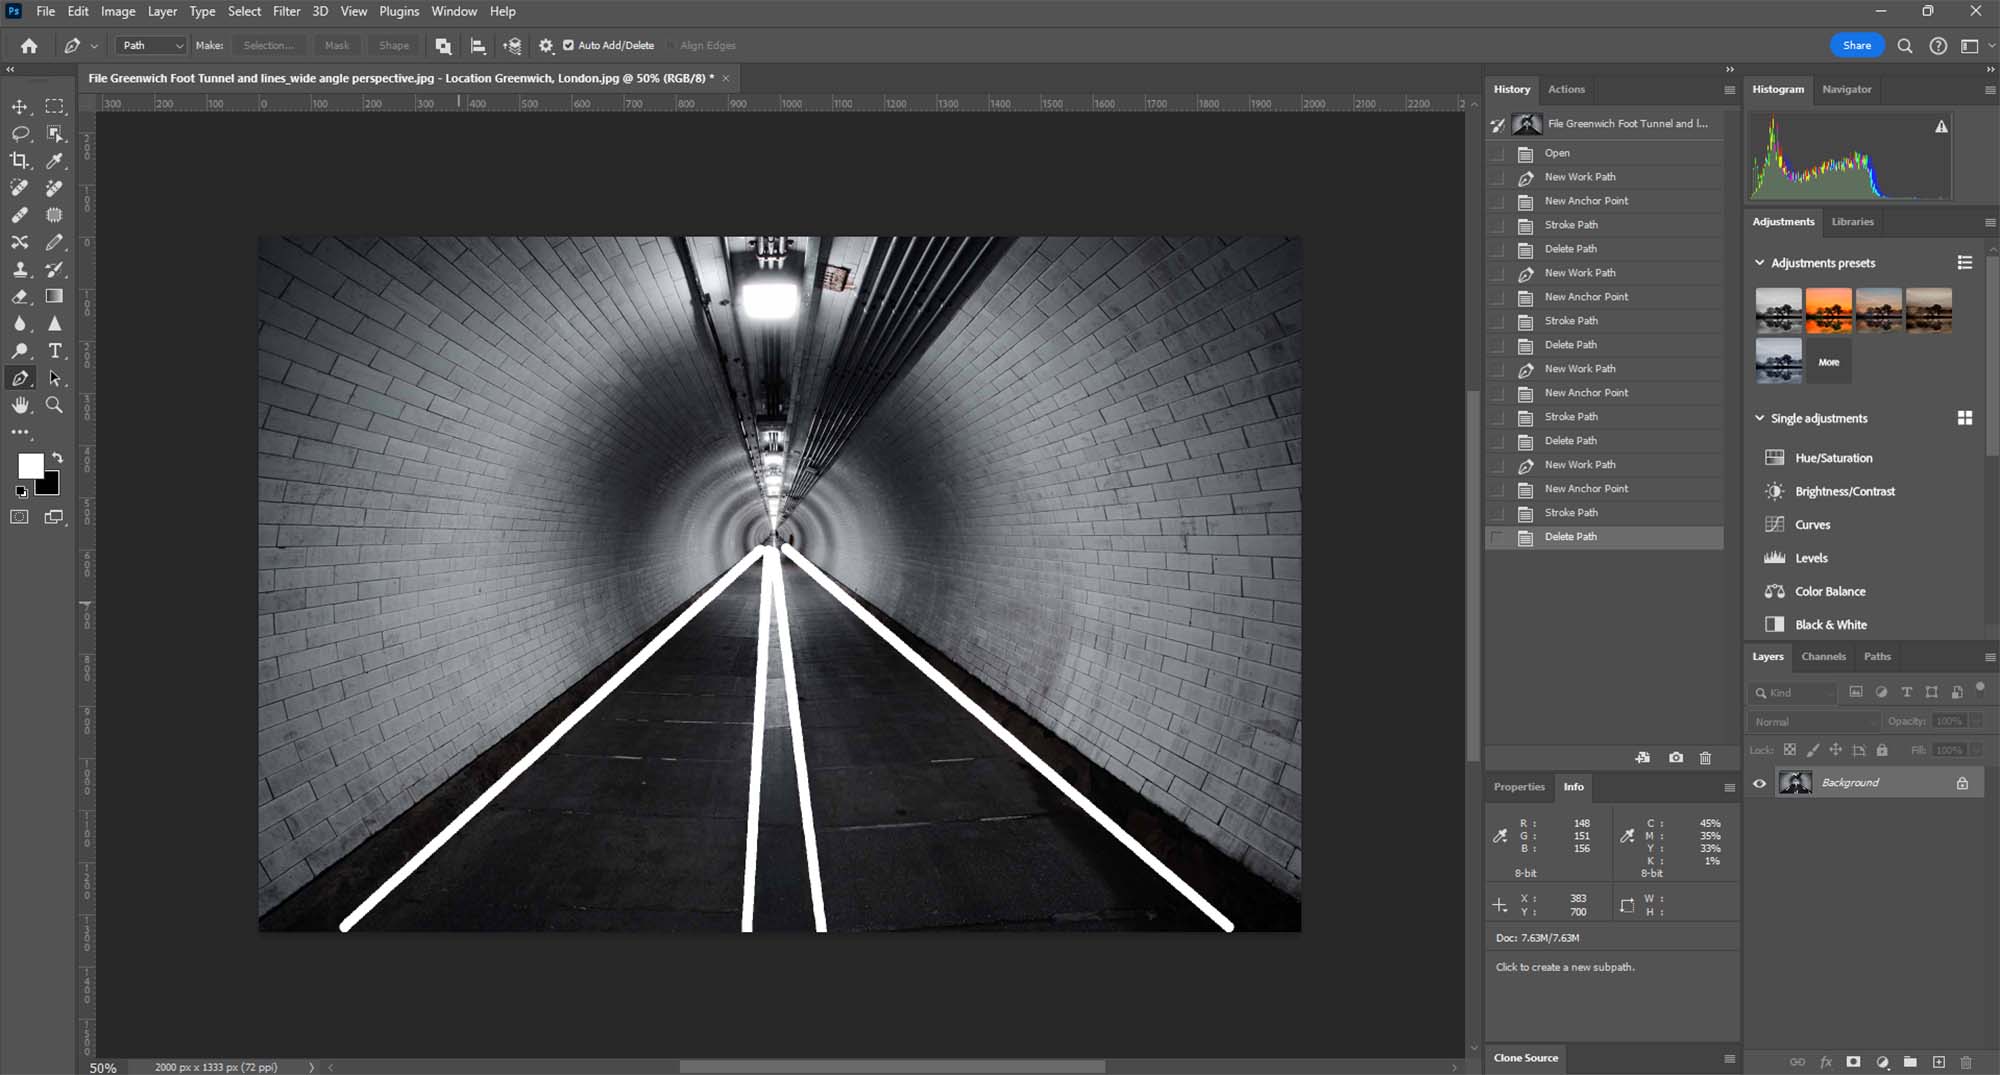
  • Composition and Framing: Pay attention to the composition, using elements like lines, shapes, and textures to guide the viewer’s eye.

Tips for Photographers

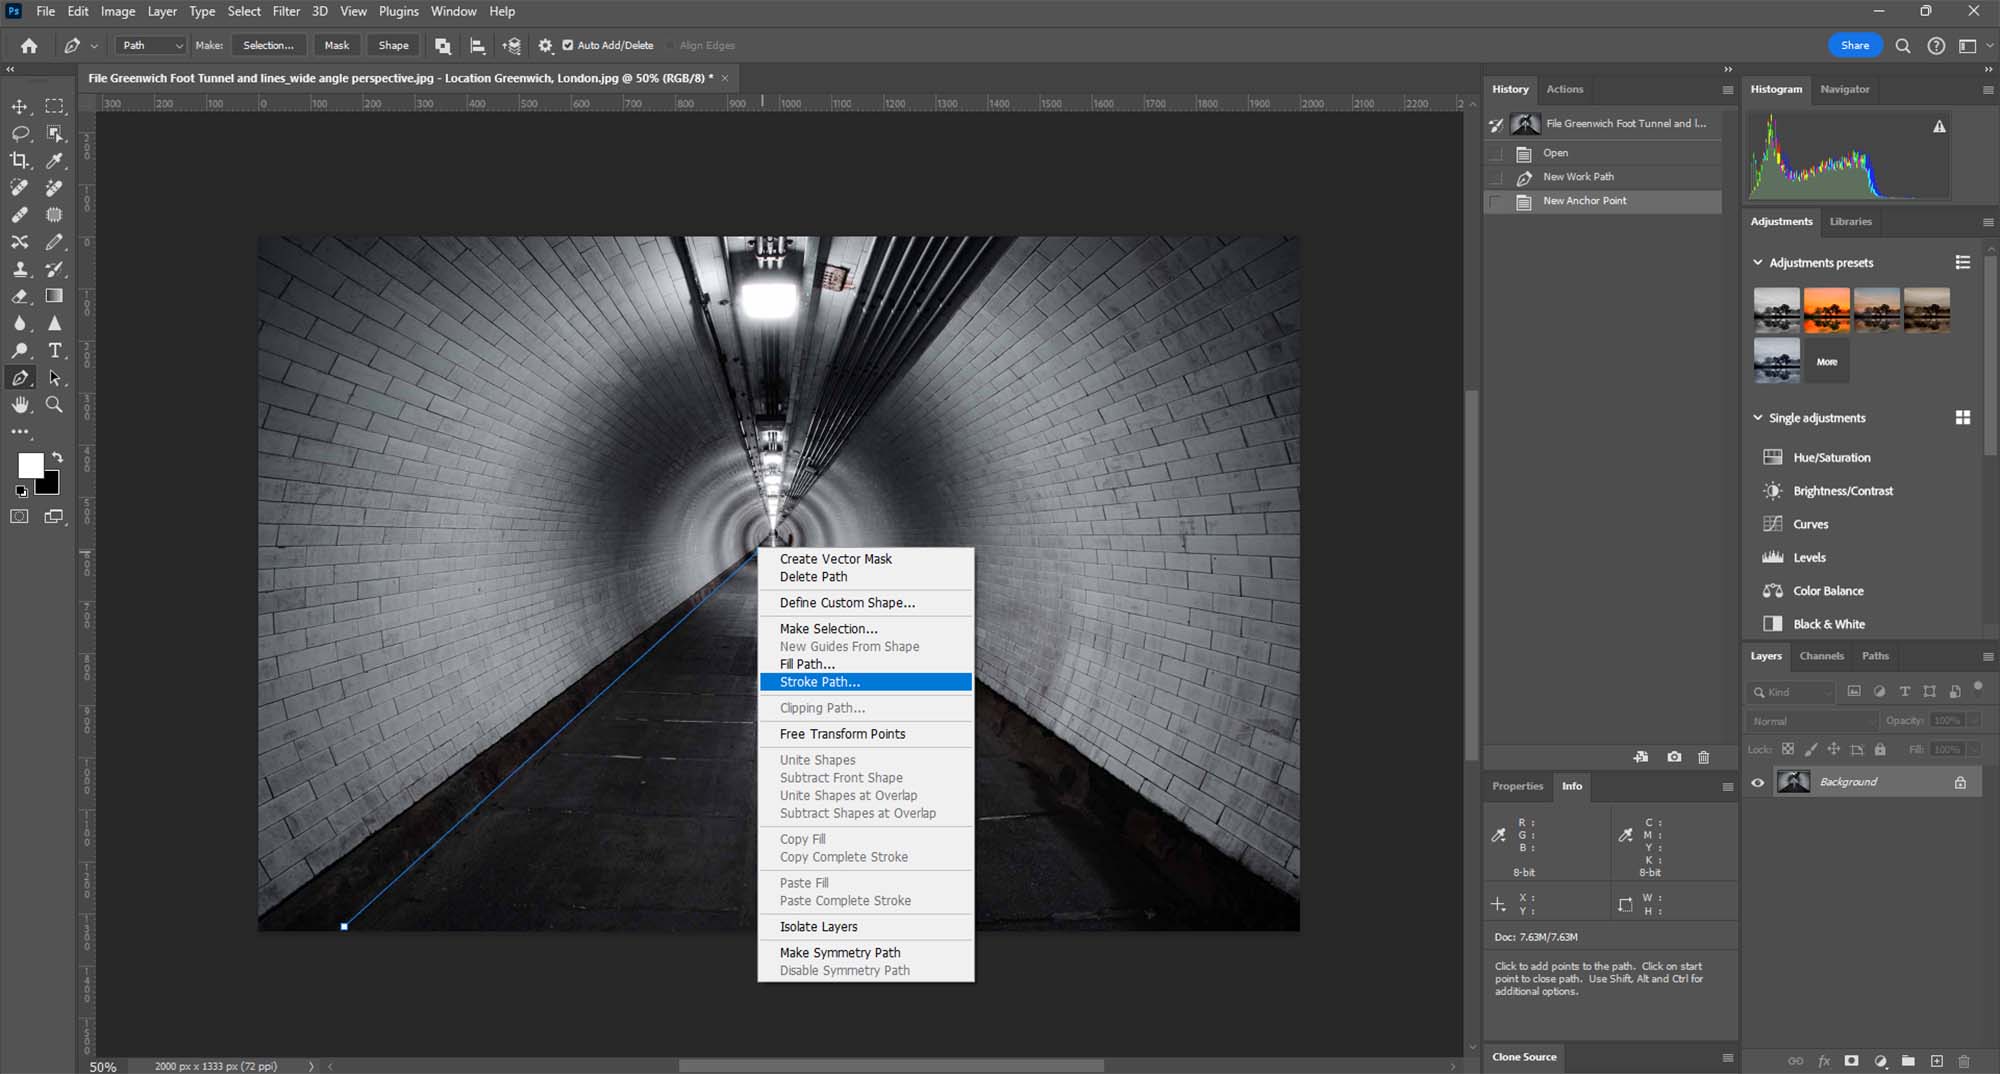
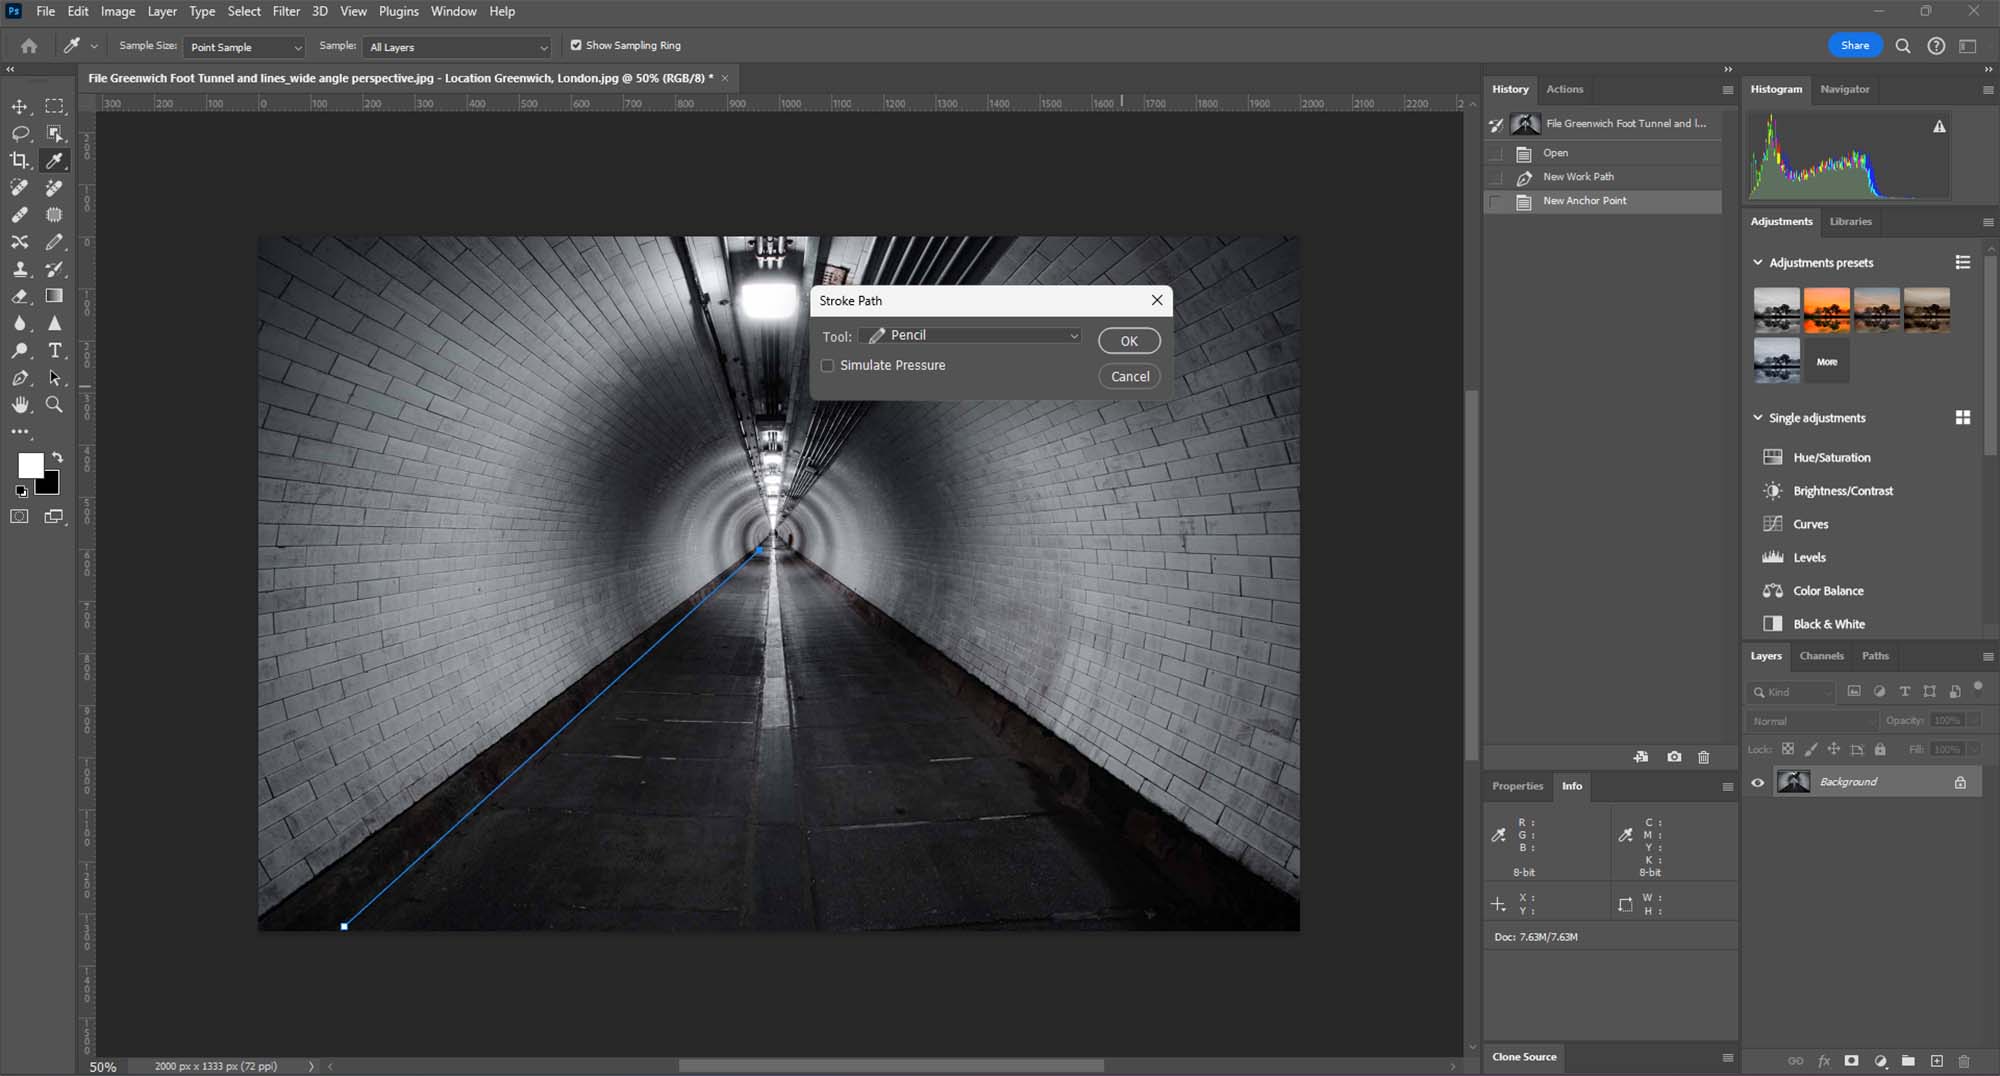
  1. Shoot in Color: Capture your images in color and convert them to black and white during post-processing for greater control over tones and contrasts.
  2. Play with Contrast: Experiment with different levels of contrast to create depth and drama in your images.
  3. Use Filters: When shooting, use red or yellow filters to enhance contrasts in the sky and landscapes.
  4. Mind the Grays: Pay attention to the gray tones in your image. They should vary to create a dynamic range in your photo.

Advanced Techniques in Black and White Photography

  • High-Key and Low-Key Photography: Explore high-key (predominantly light tones) and low-key (predominantly dark tones) photography for artistic effects.
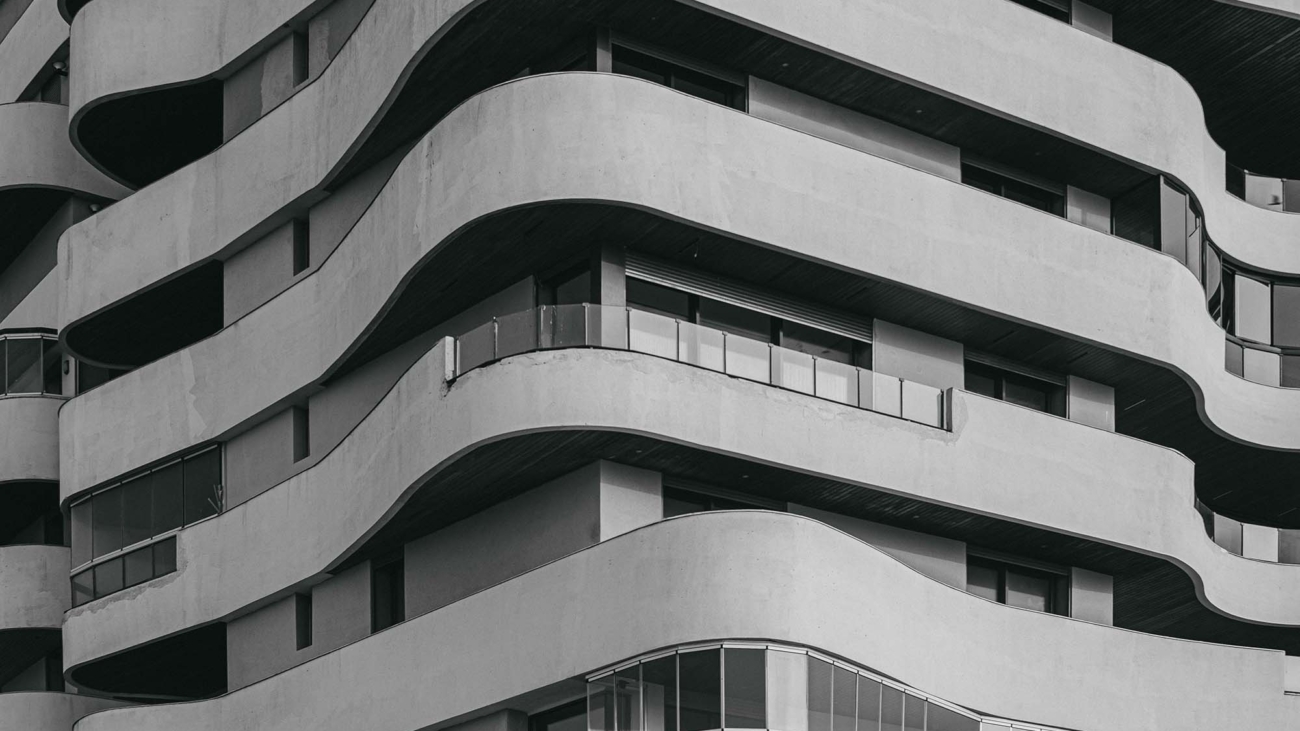
  • Texture Emphasis: Use black and white to emphasize textures, bringing out details that might go unnoticed in color.
  • Silhouettes and Shadows: Create striking silhouettes and shadow play, which are particularly compelling in black and white.

Practical Applications in Various Genres

  • Portrait Photography: Capture the expressions and emotions of subjects, focusing on the play of light and shadow on their features.
  • Landscape Photography: Convey the drama of landscapes, from the starkness of barren fields to the intricacy of urban architecture.
  • Street Photography: Document the rawness and authenticity of everyday life, highlighting the stark realities of urban environments.

Conclusion: The Power of Monochrome

Black and white photography is a powerful tool for simplifying compositions and conveying stories in a more focused and emotionally charged manner. It challenges photographers to look beyond color and explore the fundamental aspects of light, shadow, and form.

How to Simplify Your Photos for Clean Composition

Introduction: The Beauty of Minimalism

Minimalism in photography is an art form that focuses on simplicity and the deliberate use of space to convey a message or emotion. This guide explores how embracing minimalism can lead to powerful, thought-provoking images that resonate with viewers through their uncluttered and impactful compositions.

Understanding Simplicity and Minimalism

At its heart, minimalism is about stripping away the non-essential elements to highlight the beauty and uniqueness of the subject. It’s about finding strength in subtlety and conveying a narrative through the simplest of compositions.

Creative Process: Crafting Minimalist Photographs

  • Subject Selection: Choose subjects that stand out in their simplicity. Look for strong shapes, bold colors, or interesting textures.
  • Composition: Emphasize your subject by composing with plenty of negative space. Be intentional about what you include in the frame.
  • Lighting: Use lighting to enhance the mood. Minimalist photos often benefit from soft, natural light or dramatic contrasts.

Tips for Photographers

  1. Keep It Simple: Focus on one subject and remove any distracting elements from your frame.
  2. Pay Attention to Backgrounds: Choose backgrounds that are clean and unobtrusive to keep the focus on your subject.
  3. Experiment with Colors and Shapes: Use bold colors and simple shapes to create visually striking images.
  4. Practice Patience: Minimalist photography often requires patience to find the perfect subject or waiting for the right lighting conditions.

Advanced Techniques in Minimalist Photography

  • Abstract Minimalism: Create abstract compositions that focus on shapes, colors, and textures rather than specific subjects.
  • Monochromatic Themes: Experiment with monochromatic color schemes to enhance simplicity and focus.
  • Reflections and Shadows: Use reflections and shadows creatively to add depth and interest to minimalist compositions.

Practical Applications in Various Genres

  • Portrait Photography: Capture close-ups with simple backdrops or use the subject’s features as the main focal point.
  • Landscape Photography: Find simplicity in vast, open spaces or focus on a single natural element.
  • Architectural Photography: Look for clean lines, geometric shapes, and contrasting textures in buildings and structures.

Conclusion: Embracing the Minimalist Approach

Minimalism in photography is about more than just taking pictures with few elements. It’s a mindset that values the beauty of simplicity and the power of understatement. By adopting a minimalist approach, photographers can create images that are both visually appealing and emotionally resonant.

O Carroll, B. (2016). 28 Composition Techniques That Will Improve Your Photos.

References

O Carroll, B. (2016). 28 Composition Techniques That Will Improve Your Photos. [online] PetaPixel. Available at:

https://petapixel.com/photography-composition-techniques/

[Accessed 13 December]

How to Use Negative Space for Breathtaking Photos

Introduction: Embracing Simplicity through Negative Space

Negative space in photography refers to the areas around and between the subjects of an image – a concept that is central to minimalist photography. This guide will explore how negative space can be used to create powerful, visually appealing images that convey more with less.

Understanding Negative Space

Negative space, often just an open expanse of sky, water, an empty field, or a simple backdrop, provides breathing room for your subject. It shifts the focus to the essential elements of your composition, eliminating distractions and emphasizing the main subject.

Creative Process: Utilizing Negative Space

  • Scene Selection: Identify scenes where the background can be simplified, leaving more open space around your subject.
  • Composition and Placement: Place your subject in such a way that the negative space occupies a significant portion of the frame, creating a balanced yet minimalistic look.
  • Emphasizing Emotion: Use negative space to evoke emotion or a sense of solitude, peace, or even tension in your images.

Tips for Photographers

  1. Balanced Composition: Ensure that your use of negative space doesn’t unbalance the composition. The placement of your subject should feel intentional and harmonious.
  2. Color and Contrast: Utilize contrasting colors between the subject and the negative space for a striking effect.
  3. Simplicity Is Key: Keep the scene simple. The more clutter-free the negative space, the more impactful your subject will be.
  4. Experiment with Angles and Perspectives: Different angles can change the amount and perception of negative space, adding a unique feel to your images.

Advanced Techniques in Using Negative Space

  • Abstract Interpretation: Use negative space to create abstract compositions where the space itself becomes the subject.
  • Silhouettes and Shadows: Experiment with silhouettes and shadows against a large expanse of negative space for a dramatic effect.
  • Layering and Depth: Incorporate layers in your composition, using negative space to separate these layers and add depth.

Practical Applications in Various Genres

  • Landscape Photography: Use expansive skies or open fields as negative space to highlight natural features.
  • Portrait Photography: Apply negative space to focus attention on the subject, creating a sense of intimacy or solitude.
  • Urban Photography: Capture the architectural elements with the sky or empty spaces as negative space to emphasize form and structure.

Conclusion: The Power of Less in Photography

Negative space in photography is a powerful tool that, when used skillfully, adds a sophisticated and thoughtful dimension to your work. It’s about finding beauty in simplicity and conveying stories with minimal elements.

O Carroll, B. (2016). 28 Composition Techniques That Will Improve Your Photos.

References

O Carroll, B. (2016). 28 Composition Techniques That Will Improve Your Photos. [online] PetaPixel. Available at:

https://petapixel.com/photography-composition-techniques/

[Accessed 13 December]

Want Vivid Shots? Start Filling the Frame Now

Introduction: Embracing Detail with ‘Fill the Frame’

‘Filling the frame’ is a powerful photographic technique that involves using your camera frame to enclose a significant portion or all of a subject. This method is excellent for highlighting details, textures, and patterns, allowing the viewer to focus solely on the subject without distractions from the background or surrounding environment.

The Impact of Filling the Frame

This technique is particularly effective in drawing the viewer’s attention to specific details, creating a more intimate and immersive experience. It’s about isolating the subject, making it the undisputed focal point of your composition.

Creative Process: Mastering ‘Fill the Frame’

  • Choosing Your Subject: Look for subjects that have interesting details, textures, or patterns. These could range from the intricate lines on a leaf to the architectural details of a building.
  • Getting Close: Move closer to your subject or use a zoom lens to fill the frame with your subject. The goal is to eliminate as much of the background as possible.
  • Composition Considerations: Pay attention to the composition within your frame. The placement of your subject and how it interacts with the edges of your frame is crucial.

Tips for Photographers

  1. Use Macro Lenses for Close-Ups: Macro lenses are perfect for extreme close-up shots, allowing you to capture intricate details.
  2. Experiment with Aperture: Play with different aperture settings. A wide aperture can blur the background, while a narrow aperture can keep everything in focus.
  3. Mind the Edges: Be cautious of the edges of your frame. Clipping part of your subject can be a powerful tool but use it thoughtfully.
  4. Simplify: Avoid clutter in your frame. The more simplified and focused the composition, the more powerful the image.

Advanced Techniques in ‘Fill the Frame’

  • Selective Focusing: Use selective focus to emphasize a particular part of the subject while gently blurring the rest.
  • Creative Cropping: Don’t be afraid to crop your images in post-processing to achieve the desired ‘fill the frame’ effect.
  • Playing with Light: Use light and shadows creatively to add depth and dimension to your subject.

Practical Applications in Various Genres

  • Portrait Photography: Use ‘fill the frame’ to capture facial expressions or details like the eyes or lips.
  • Nature and Wildlife Photography: Fill the frame with a single animal or plant, highlighting its textures and features.
  • Urban and Street Photography: Capture the essence of street life or architectural details by filling the frame with your urban subject.

Conclusion: The Art of Detail in Photography

Filling the frame is more than just a technique; it’s an artistic approach to drawing the viewer’s eye into the heart of the subject. It’s about celebrating details, textures, and the essence of the subject itself.

How To Use The Rule Of Odds For Stronger Photos

Introduction: Understanding the Rule of Odds

The Rule of Odds is a fascinating compositional concept in photography that suggests images are more visually appealing when they contain an odd number of elements. This principle is based on the idea that odd-numbered groupings are more natural and less forced than even-numbered groupings, creating a sense of balance and harmony in a photograph.

The Essence of the Rule of Odds

This rule is grounded in the psychological perception that odd numbers, especially the number three, are more interesting and pleasing to the human eye. They create a sense of natural balance and make the composition more dynamic. When applied correctly, the Rule of Odds can transform a simple photograph into a captivating visual story.

Creative Process: Implementing the Rule of Odds

  • Identifying Opportunities: Look for scenes where you can naturally apply the Rule of Odds. This could be three birds on a branch, five stones in a riverbed, or a single person framed by two trees.
  • Composition and Framing: When composing your shot, place the odd elements in a way that is aesthetically pleasing and balanced. Consider using the Rule of Thirds in conjunction with the Rule of Odds for a more compelling composition.
  • Creating Focus: Use the odd elements to guide the viewer’s eye. The odd-numbered elements should lead to the main subject or create a pathway through the image.

Tips for Photographers

  1. Create Odd Groupings: If you can’t find a natural odd grouping, try creating one. This can be done by adjusting your position or perspective.
  2. Balance and Symmetry: Use the Rule of Odds to break symmetry in a way that is visually interesting and creates a focal point.
  3. Depth of Field: Utilize depth of field to emphasize the odd elements in your composition, making them stand out against a blurred background.
  4. Simplicity is Key: Keep the composition simple. Too many elements, even if odd-numbered, can overwhelm the viewer.

Advanced Techniques in Using the Rule of Odds

  • Foreground and Background: Incorporate odd elements both in the foreground and background to add depth to your composition.
  • Color and Light: Use color and light contrasts to highlight the odd elements, making them more pronounced.
  • Juxtaposition: Position the odd elements against a contrasting background to enhance their impact.

Practical Applications in Various Genres

  • Portrait Photography: Arrange group portraits with an odd number of people to create a more dynamic composition.
  • Landscape Photography: Find or create odd-numbered elements in a landscape, such as rocks, trees, or hills.
  • Street Photography: Capture candid moments where individuals or objects form an odd grouping, adding interest to everyday scenes.

Conclusion: Mastering the Art of Odd Numbers

The Rule of Odds is a simple yet powerful tool that can significantly enhance the visual appeal of your photographs. By understanding and applying this rule, photographers can create images that are not only aesthetically pleasing but also intriguing and balanced.

O Carroll, B. (2016). 28 Composition Techniques That Will Improve Your Photos.

References

O Carroll, B. (2016). 28 Composition Techniques That Will Improve Your Photos. [online] PetaPixel. Available at:

https://petapixel.com/photography-composition-techniques/

[Accessed 13 December]

How to Break the Pattern for Eye-Catching Photos

Introduction: The Art of Disruption

Breaking the pattern in photography is an innovative technique that involves disrupting a repetitive element to create a focal point of interest. This guide explores how to effectively identify and break patterns, adding an element of surprise and intrigue to your images, thus elevating the overall visual appeal.

Understanding Pattern Breaking

Pattern breaking involves identifying a repetitive sequence or design and then introducing an element that contrasts with this established pattern. This contrast can be in form, color, texture, or concept, and it serves to draw the viewer’s eye directly to the point of disruption, creating a powerful and memorable image.

Creative Process: Implementing Pattern Breaking

  • Identifying Patterns: Start by finding scenes or subjects with a clear, repetitive pattern. This could be architectural elements, natural textures, or even arranged objects.
  • Finding the Disruptor: Look for or place an element that distinctly contrasts with the pattern. This could be a splash of color, a different shape, or an unexpected object.
  • Composition and Framing: Compose your shot to highlight the disruption. The contrast should be evident, but balanced within the overall composition.

Tips for Photographers

  1. Use Color Contrast: One of the simplest ways to break a pattern is with color. Introduce a contrasting color to instantly draw the eye.
  2. Play with Light and Shadow: Use lighting to create a break in the pattern, either through natural or artificial means.
  3. Focus on Details: Sometimes the smallest detail can effectively break a pattern. Pay attention to the nuances within your scene.
  4. Experiment with Perspective: Changing your perspective can turn a normal scene into one with a broken pattern, offering a fresh view.

Advanced Techniques in Pattern Breaking

  • Juxtaposition: Place two contrasting elements side by side to enhance the impact of the broken pattern.
  • Selective Focus: Use depth of field to isolate the disruptor, making it stand out against a blurred background.
  • Abstract Interpretation: Consider abstract ways to break patterns, such as disrupting symmetry or alignment.

Practical Applications in Various Genres

  • Street Photography: Look for opportunities to capture an individual or object that stands out in a uniform urban environment.
  • Nature Photography: Find or create disruptions in natural patterns, like a single red leaf among green foliage.
  • Architectural Photography: Highlight the unique feature that breaks the continuity in architectural designs or structures.

Conclusion: Elevating Composition Through Contrast

Mastering the art of breaking patterns allows photographers to create compelling and eye-catching images. It’s a technique that challenges the viewer’s expectations and adds depth to the photographic narrative.

Digital, P. (2021). 5 Ways to Break Photography Composition Rules

Photo By Kwaw Tun

References

Digital, P. (2021). 5 Ways to Break Photography Composition Rules. [online] ProGrade Digital, Inc. Available at:

https://progradedigital.com/rules-for-breaking-the-rules-of-composition-in-photography/

[Accessed 12 Dec. 2023]

Cultural patterns and textures in Rabat.

How to Use Visual Weight for Eye-Catching Photos

Introduction: The Allure of Patterns and Textures

Patterns and textures are ubiquitous elements that, when captured effectively, can transform a photograph into a mesmerizing piece of art. They bring a tactile and rhythmic quality to images, offering visual harmony and a deeper connection to the subject. This guide delves into how to skillfully use patterns and textures in photography to enhance the overall impact of your compositions.

Understanding Patterns and Textures

Patterns are repetitive elements that create a sense of order and rhythm, while textures highlight the surface quality and details, adding depth and interest. From the natural lines on a leaf to the intricate designs of urban architecture, patterns and textures are everywhere, waiting to be explored through your lens.

Cultural patterns and textures in Rabat.

Creative Process: Capturing Patterns and Textures

  • Observing Your Surroundings: Begin by training your eye to notice patterns and textures around you. They can be found in both natural and man-made environments.
  • Composition and Framing: Consider how the pattern or texture fits within your frame. Fill the frame for an immersive effect or use them as part of a larger composition to add context.
  • Lighting and Perspective: Play with lighting and shadows to enhance textures and experiment with different angles and perspectives to showcase patterns in unique ways.

Tips for Photographers

  1. Macro Photography for Detail: Use macro photography to capture intricate textures, bringing out the fine details.
  2. Contrast and Color: Utilize contrast and color to make patterns stand out and catch the viewer’s eye.
  3. Simplifying the Scene: If using a busy pattern, simplify the rest of the scene to avoid overwhelming the viewer.
  4. Post-Processing: Enhance patterns and textures in post-processing, but be careful not to overdo it, as it might look unnatural.

Advanced Techniques in Using Patterns and Textures

  • Symmetry in Patterns: Use symmetry to create balance and harmony in compositions that feature patterns.
  • Textures as Leading Elements: Allow textures to lead the viewer’s eye to the main subject of your photograph.
  • Abstract Photography: Experiment with patterns and textures for abstract photography, focusing on form and color over the subject.

Practical Applications in Various Genres

  • Landscape Photography: Capture the repetitive patterns of nature or the varied textures of landscapes to add depth and interest.
  • Urban Photography: Explore the rhythmic patterns in architecture or the gritty textures of urban decay.
  • Portrait Photography: Use patterns and textures in the background or clothing to add depth and context to your portraits.

Conclusion: A World of Visual Rhythms

Embracing patterns and textures in photography opens up a world of visual rhythms and tactile qualities that can significantly enhance your photographic practice. Whether it’s the grand pattern of a landscape or the intricate texture of a close-up shot, these elements can transform your images into visually harmonic stories.

Diagonal tension at Hotel De Ville, Paris.

Want Better Composition? Add Diagonal Lines

Introduction: Harnessing the Energy of Diagonals and Triangles

Diagonals and triangles are potent tools in the photographer’s compositional arsenal, known for adding dynamic tension and visual interest to images. This tutorial explores how to effectively utilize these elements to inject energy and direction into your photography, transforming ordinary scenes into captivating visual narratives.

Understanding Diagonals and Triangles

Diagonals are lines that traverse the frame at an angle, conveying motion, direction, and energy. Triangles, whether real or implied, add stability and balance while maintaining a sense of dynamism. Together, these elements can create a sense of movement and tension, drawing the viewer’s eye through the photograph in a purposeful manner.

Diagonal tension at Hotel De Ville, Paris.

O Carroll, B. (2016). 28 Composition Techniques That Will Improve Your Photos.

Creative Process: Implementing Diagonals and Triangles

  • Seeking Out Natural Diagonals: Start by observing your environment for natural diagonal lines – fallen trees, angled shadows, or architectural lines.
  • Creating Implied Triangles: Look for opportunities to create triangles in your composition, which can be formed by the positioning of subjects, converging lines, or even the use of light and shadow.
  • Experimenting with Angles: Change your shooting angle to transform ordinary lines into dynamic diagonals, altering the perception and impact of the scene.

Tips for Photographers

  1. Utilize Leading Lines: Diagonal lines can act as powerful leading lines, guiding the viewer’s eye towards the main subject.
  2. Balance with Triangles: Use triangles to balance your composition, ensuring that the image feels both dynamic and stable.
  3. Play with Perspectives: Shoot from high or low angles to accentuate or create diagonal elements in your composition.
  4. Combine with Other Elements: Diagonals and triangles can be combined with other compositional techniques, such as the Rule of Thirds, for even greater impact.

Advanced Techniques in Using Diagonals and Triangles

  • Converging Diagonals: Use converging diagonal lines to create a sense of depth and perspective, particularly effective in architectural and street photography.
  • Color and Texture: Enhance diagonal elements with contrasting colors and textures to add depth and interest to your compositions.
  • Juxtaposition: Create visual tension by juxtaposing diagonal lines against more stable, horizontal, or vertical elements.

Practical Applications in Various Genres

  • Landscape Photography: Use natural diagonals like rivers, mountain ridges, or tree lines to add depth and motion.
  • Urban and Street Photography: Capture the dynamic energy of city life with the diagonal lines of buildings, streets, and urban landscapes.
  • Portrait Photography: Position subjects or their features in a triangular arrangement to create engaging and balanced portraits.

Conclusion: Adding Movement and Energy

Diagonals and triangles are more than just compositional elements; they are expressions of movement and energy. By mastering their use, photographers can elevate their work from static shots to dynamic compositions that captivate and engage the viewer.

References

O Carroll, B. (2016). 28 Composition Techniques That Will Improve Your Photos. [online] PetaPixel. Available at:

https://petapixel.com/photography-composition-techniques/

[Accessed 12 December]

Leading lines in photography composition.

Want Better Photos? Use Leading Lines Like This

Want better photos? Use leading lines like this

Introduction: The Power of Leading Lines

Leading lines are a foundational element in the art of photographic composition. They act as visual guides, leading the viewer’s eye through the image and towards the main subject or focal point. This technique is incredibly effective in creating a sense of movement and depth, making your photographs more engaging and dynamic.

Understanding Leading Lines

Leading lines can be anything in your scene that creates a line or path, such as roads, fences, shorelines, or architectural elements. They can be straight, curved, diagonal, or even zigzagged. The key is how these lines guide the viewer’s eye and how they interact with the other elements in your frame.

Leading lines in photography composition.

O Carroll, B. (2016). 28 Composition Techniques That Will Improve Your Photos.

Creative Process: Implementing Leading Lines

  • Identifying Lines in Your Environment: Begin by observing your surroundings and identifying potential leading lines. Pay attention to how these lines interact with the scene and your subject.
  • Strategic Placement: Position your camera so that the leading lines start from the edge of your frame and guide towards your main subject. Experiment with different angles and perspectives.
  • Balancing the Composition: Ensure that your leading lines enhance, not overpower, the main subject. The lines should be a part of the story, not the entire story.

Tips for Photographers

  1. Use Lines to Create Depth: Leading lines can add depth to a flat image, creating a more three-dimensional feel.
  2. Experiment with Different Types of Lines: Not all leading lines need to be obvious. Sometimes subtle lines, like a row of trees or a pattern on a floor, can be very effective.
  3. Combine with Other Composition Techniques: Leading lines work well when combined with other composition rules like the Rule of Thirds or Framing.
  4. Pay Attention to Line Direction: The direction of the lines can affect the mood of the image. For example, vertical lines can convey power and strength, while curved lines can create a sense of calm and flow.

Advanced Techniques in Using Leading Lines

  • Leading Lines in Portraits: Use environmental elements to guide the viewer’s eye towards the subject in portrait photography.
  • Urban and Architectural Photography: Urban landscapes are filled with leading lines. Use them to create compelling compositions in cityscapes.
  • Natural Leading Lines: In landscape photography, use natural elements like rivers, coastlines, or rows of trees as leading lines.

Practical Applications in Various Genres

  • Landscape Photography: Use paths, rivers, or mountain ridges to lead the eye through the landscape.
  • Street Photography: Streets, sidewalks, or architectural features can create dynamic leading lines in urban settings.
  • Architectural Photography: Use the lines of buildings, windows, and stairs to guide the viewer’s eye.

Conclusion: Elevating Your Photographic Vision

Understanding and utilizing leading lines can significantly elevate your photographic vision and storytelling. This technique is crucial in engaging the viewer and adding depth and direction to your images.

Photoshop demo of leading lines in photography.

Tutorial: Creating Leading Lines Using the Pen Tool in Photoshop

Step 1: Open Your Image

  1. Load the Image: Start by opening the image you wish to edit in Photoshop. Ensure you’re working on the correct layer in case your project has multiple layers.

Step 2: Selecting the Pen Tool

  1. Accessing the Pen Tool: Locate the Pen Tool in Photoshop’s toolbar, typically on the left side of the screen. The icon looks like a fountain pen tip. Click on it or press P on your keyboard to select it.
Urban leading lines in Photoshop demonstration.
Landscape photography leading lines in Photoshop.

Step 3: Drawing with the Pen Tool

  1. Creating a Path with Anchors: Click on your image where you want your leading line to start. This creates the first anchor point. Click again where you want the line to go, creating a path between the two points. You can click and drag to create curved lines. Continue this process to trace or create leading lines within your image.

Step 4: Stroking the Path

  1. Choosing the Stroke Path Option: Once you have your desired path, it’s time to turn it into a visible line. Right-click (or Control-click on a Mac) on the path and select ‘Stroke Path’ from the context menu.

  2. Selecting the Pencil Tool: In the Stroke Path dialog box, choose the Pencil tool. This will create a more defined and solid line. Adjust the size and properties of the Pencil tool beforehand as needed.

  3. Applying the Stroke: After selecting the Pencil tool, click ‘OK’ to apply the stroke to the path. This will render the path as a visible line on your image, creating the effect of leading lines.

Abstract leading lines in Photoshop.

Step 5: Removing the Path

  1. Deleting the Path: Once the stroke is applied, you don’t need the path anymore. To remove it, either go to the Paths panel and delete the current path or simply hit the ‘Delete’ key while the path is active.
Dynamic sports photography with leading lines.

Conclusion

Leading lines are a powerful compositional tool in photography and art, guiding the viewer’s eye through the image. With Photoshop’s Pen Tool, you can create or enhance these lines, giving your image a stronger sense of direction and focus. This technique is particularly useful for landscape, architectural, and street photography, where lines play a crucial role in the composition.

References

O Carroll, B. (2016). 28 Composition Techniques That Will Improve Your Photos. [online] PetaPixel. Available at:

https://petapixel.com/photography-composition-techniques/

[Accessed 12 Dec. 2023]

Layered framing in Maynooth, Ireland.

This Framing Hack Will Transform Your Photos

Introduction: The Art of Framing in Composition

Framing within a frame is a compelling compositional technique that involves using elements within your scene to create a ‘frame’ around your subject. This method adds depth, context, and intrigue to your photographs, turning ordinary scenes into layered stories.

Understanding ‘Frame Within a Frame’

This technique is all about using elements in your environment, such as windows, doorways, arches, or even natural elements like tree branches, to create a secondary frame within your photograph. This inner frame leads the viewer’s eye to the primary subject, enhancing the narrative and depth of the image.

Framed view of St Mark's Square, Venice.

O Carroll, B. (2016). 28 Composition Techniques That Will Improve Your Photos.

Creative Process: Implementing Framing Techniques

  • Identifying Framing Elements: Start by scouting for natural or architectural elements that can act as frames in your composition.
  • Positioning Your Subject: Place your subject in a way that the framing element encapsulates or complements it, creating a focus point.
  • Experimenting with Perspectives: Change your angle and perspective to see how different frames can alter the story or mood of your image.

Tips for Photographers

  1. Look for Unique Frames: Beyond windows and doors, look for unique framing opportunities like gaps in fences, reflections, or shadows.
  2. Play with Light and Shadow: Use light and shadows within your frame to add mood and emphasize your subject.
  3. Depth of Field: Experiment with different apertures to either blur the frame for a subtle effect or keep it sharp for a more pronounced framing.
  4. Balancing Elements: Ensure your frame complements the subject without overpowering it. The frame should lead to the subject, not distract from it.

Advanced Techniques in Framing

  • Multiple Layers: Incorporate multiple layers of framing for a more complex and intriguing composition.
  • Reflections as Frames: Use reflections in water, mirrors, or glass to create a unique framing effect.
  • Contrasting Elements: Combine contrasting elements within your frame and subject for a dramatic effect.

Practical Applications in Various Genres

  • Landscape Photography: Use tree branches or rock formations to frame a stunning vista or a setting sun.
  • Urban Photography: Urban environments are rich with framing opportunities like bridges, tunnels, and building facades.
  • Portrait Photography: Frame your subject with environmental elements to add context and depth to your portraits.

Conclusion: Refining Your Photographic Eye

Mastering the ‘Frame Within a Frame’ technique is a journey towards refining your photographic eye and enhancing your ability to tell stories through images. It requires practice, creativity, and an attentive observation of your surroundings.

References

O Carroll, B. (2016). 28 Composition Techniques That Will Improve Your Photos. [online] PetaPixel. Available at:

https://petapixel.com/photography-composition-techniques/

[Accessed 12 Dec. 2023]