3D effect at Sonsbeek Waterfall, Arnhem.

How to Use Foreground for Photos with Real Depth

Introduction: The Magic of Depth in Photography

Foreground interest is a powerful compositional tool in photography that adds depth, leading to more dynamic and engaging images. By incorporating elements in the foreground, photographers can create a sense of three-dimensionality, drawing viewers into the scene. This technique is vital in transforming flat images into vivid, life-like experiences.

Understanding Foreground Interest and Depth

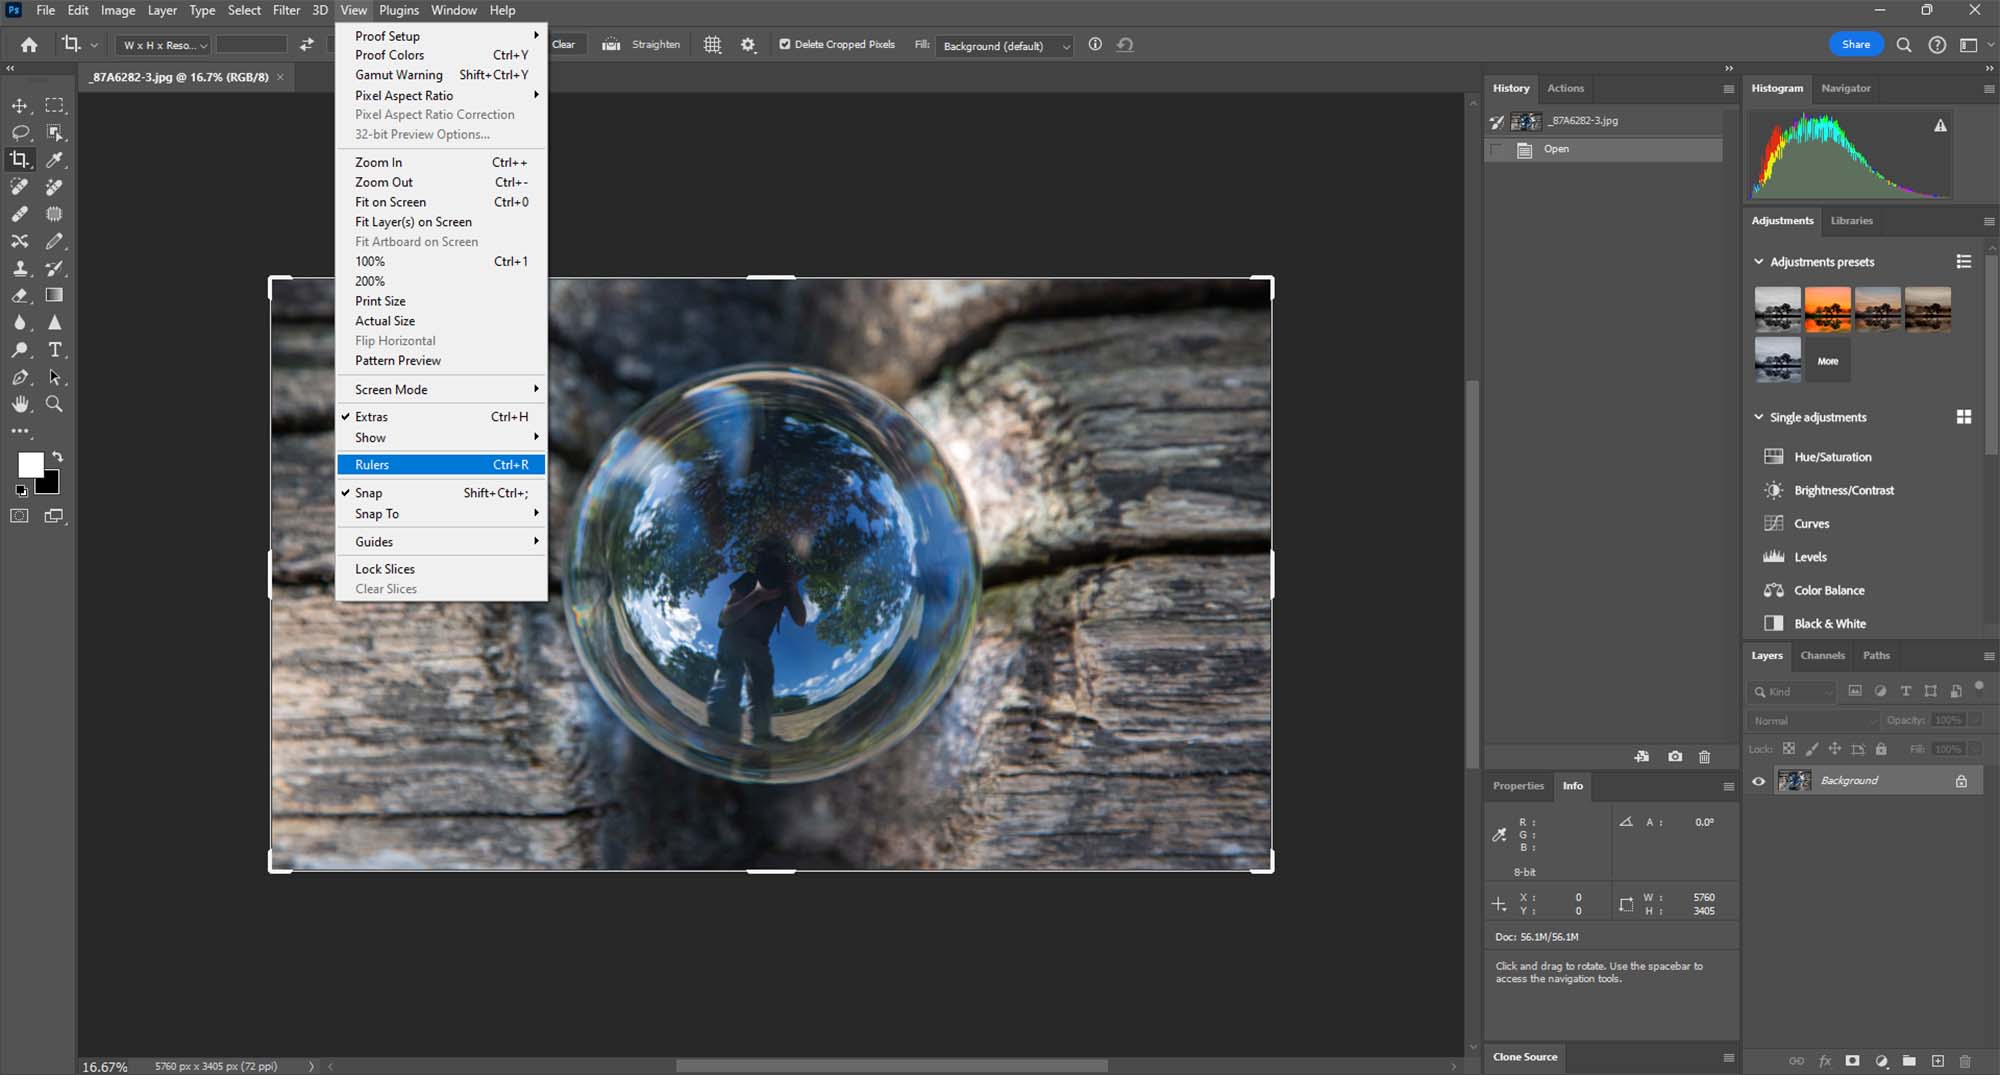
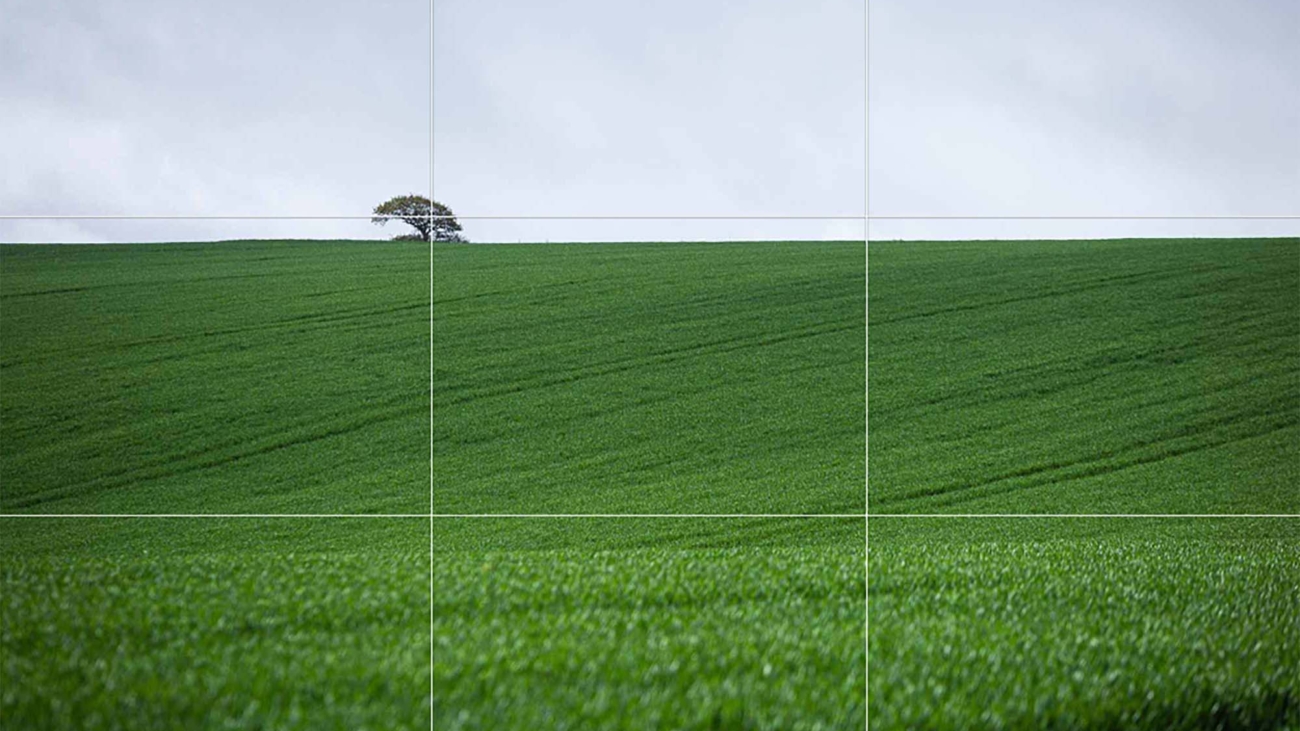
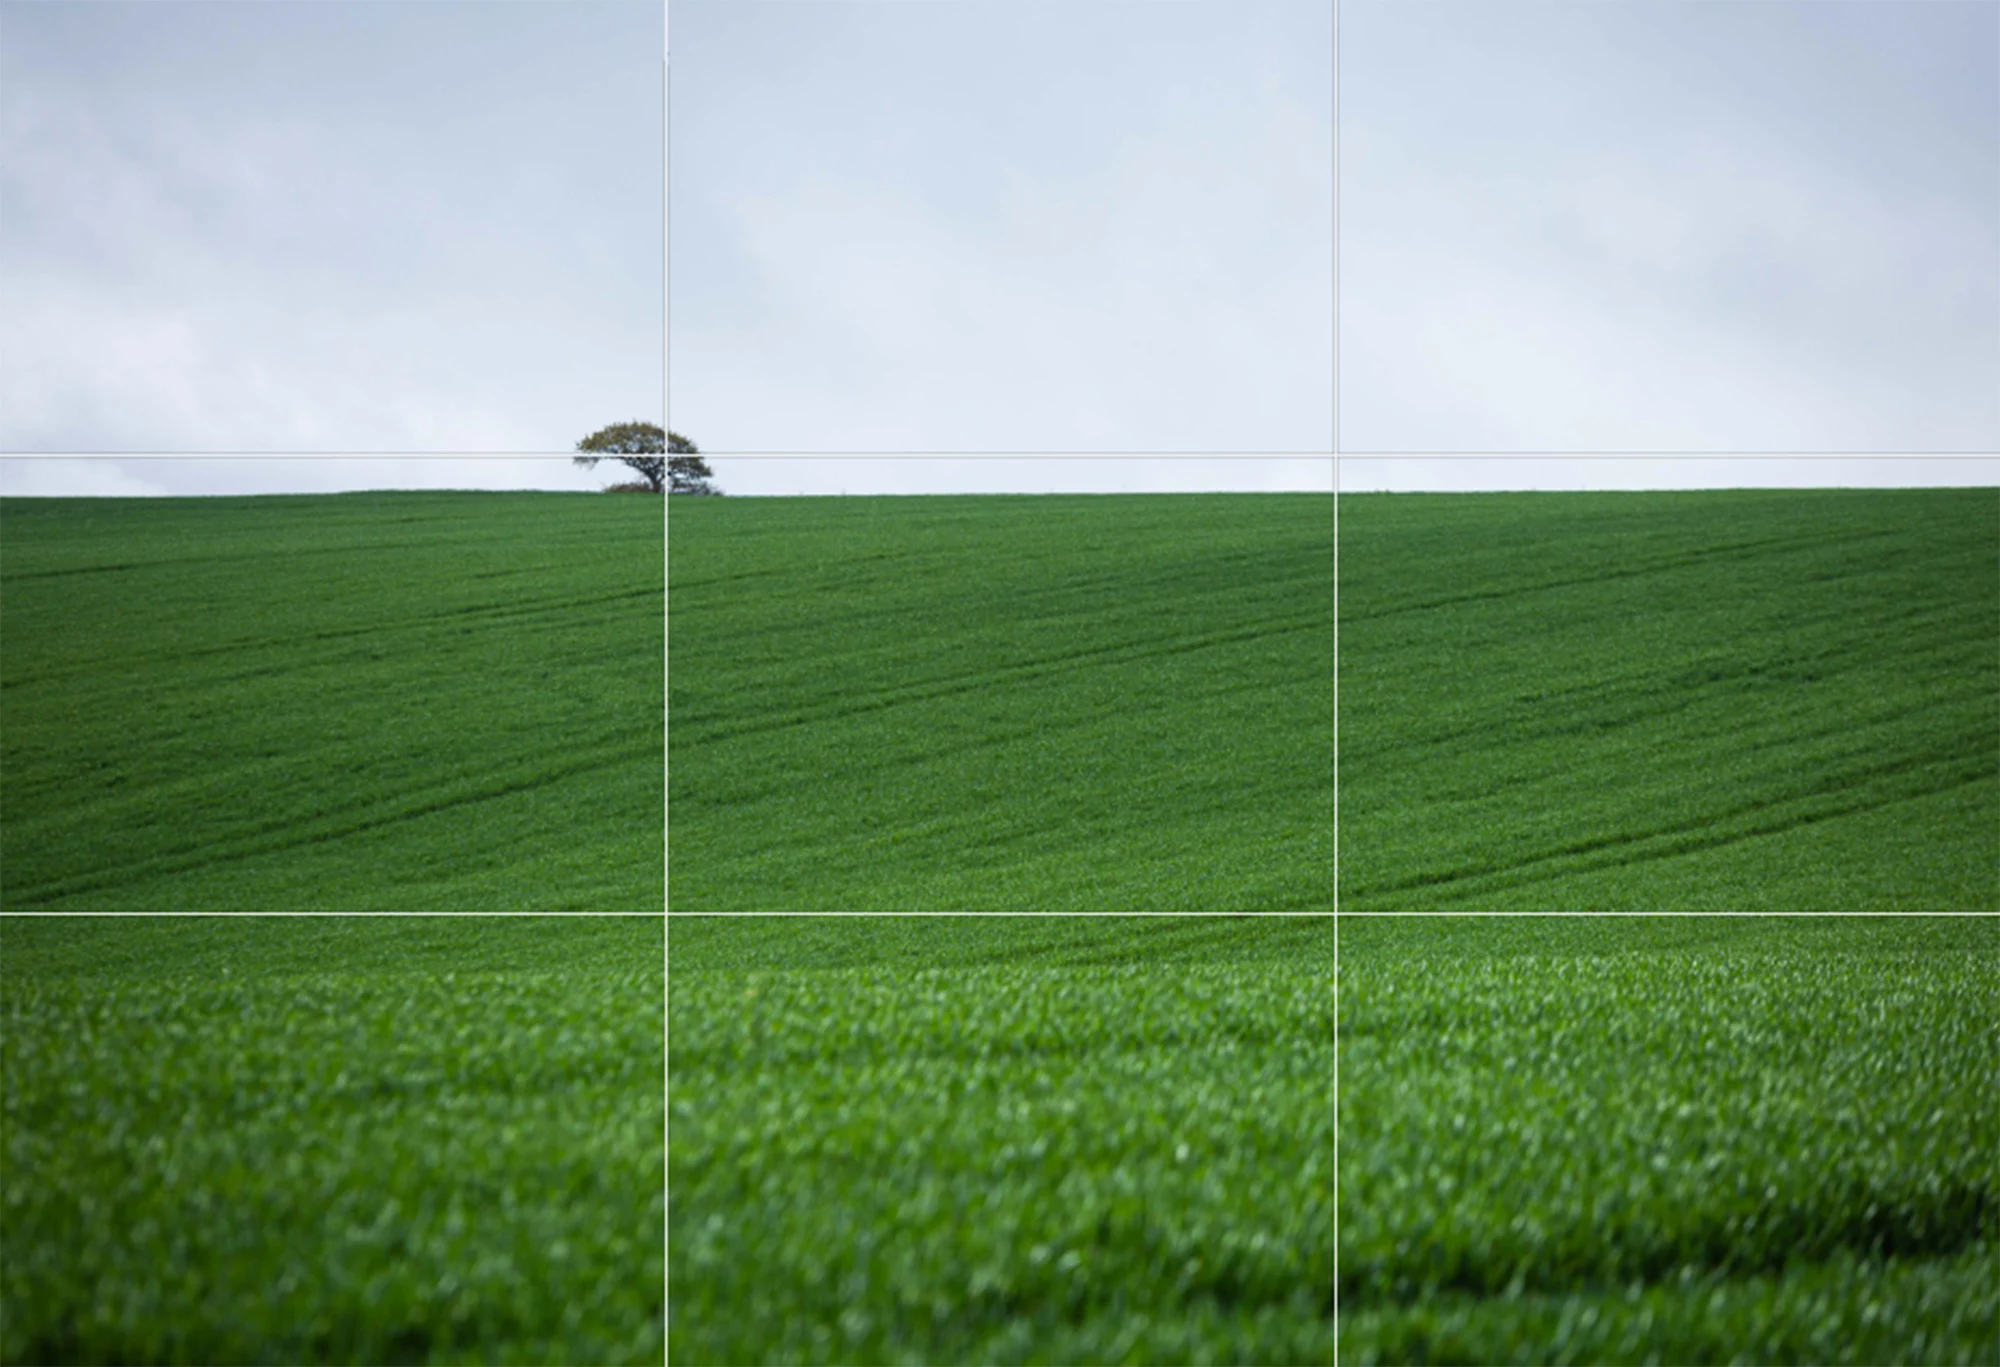
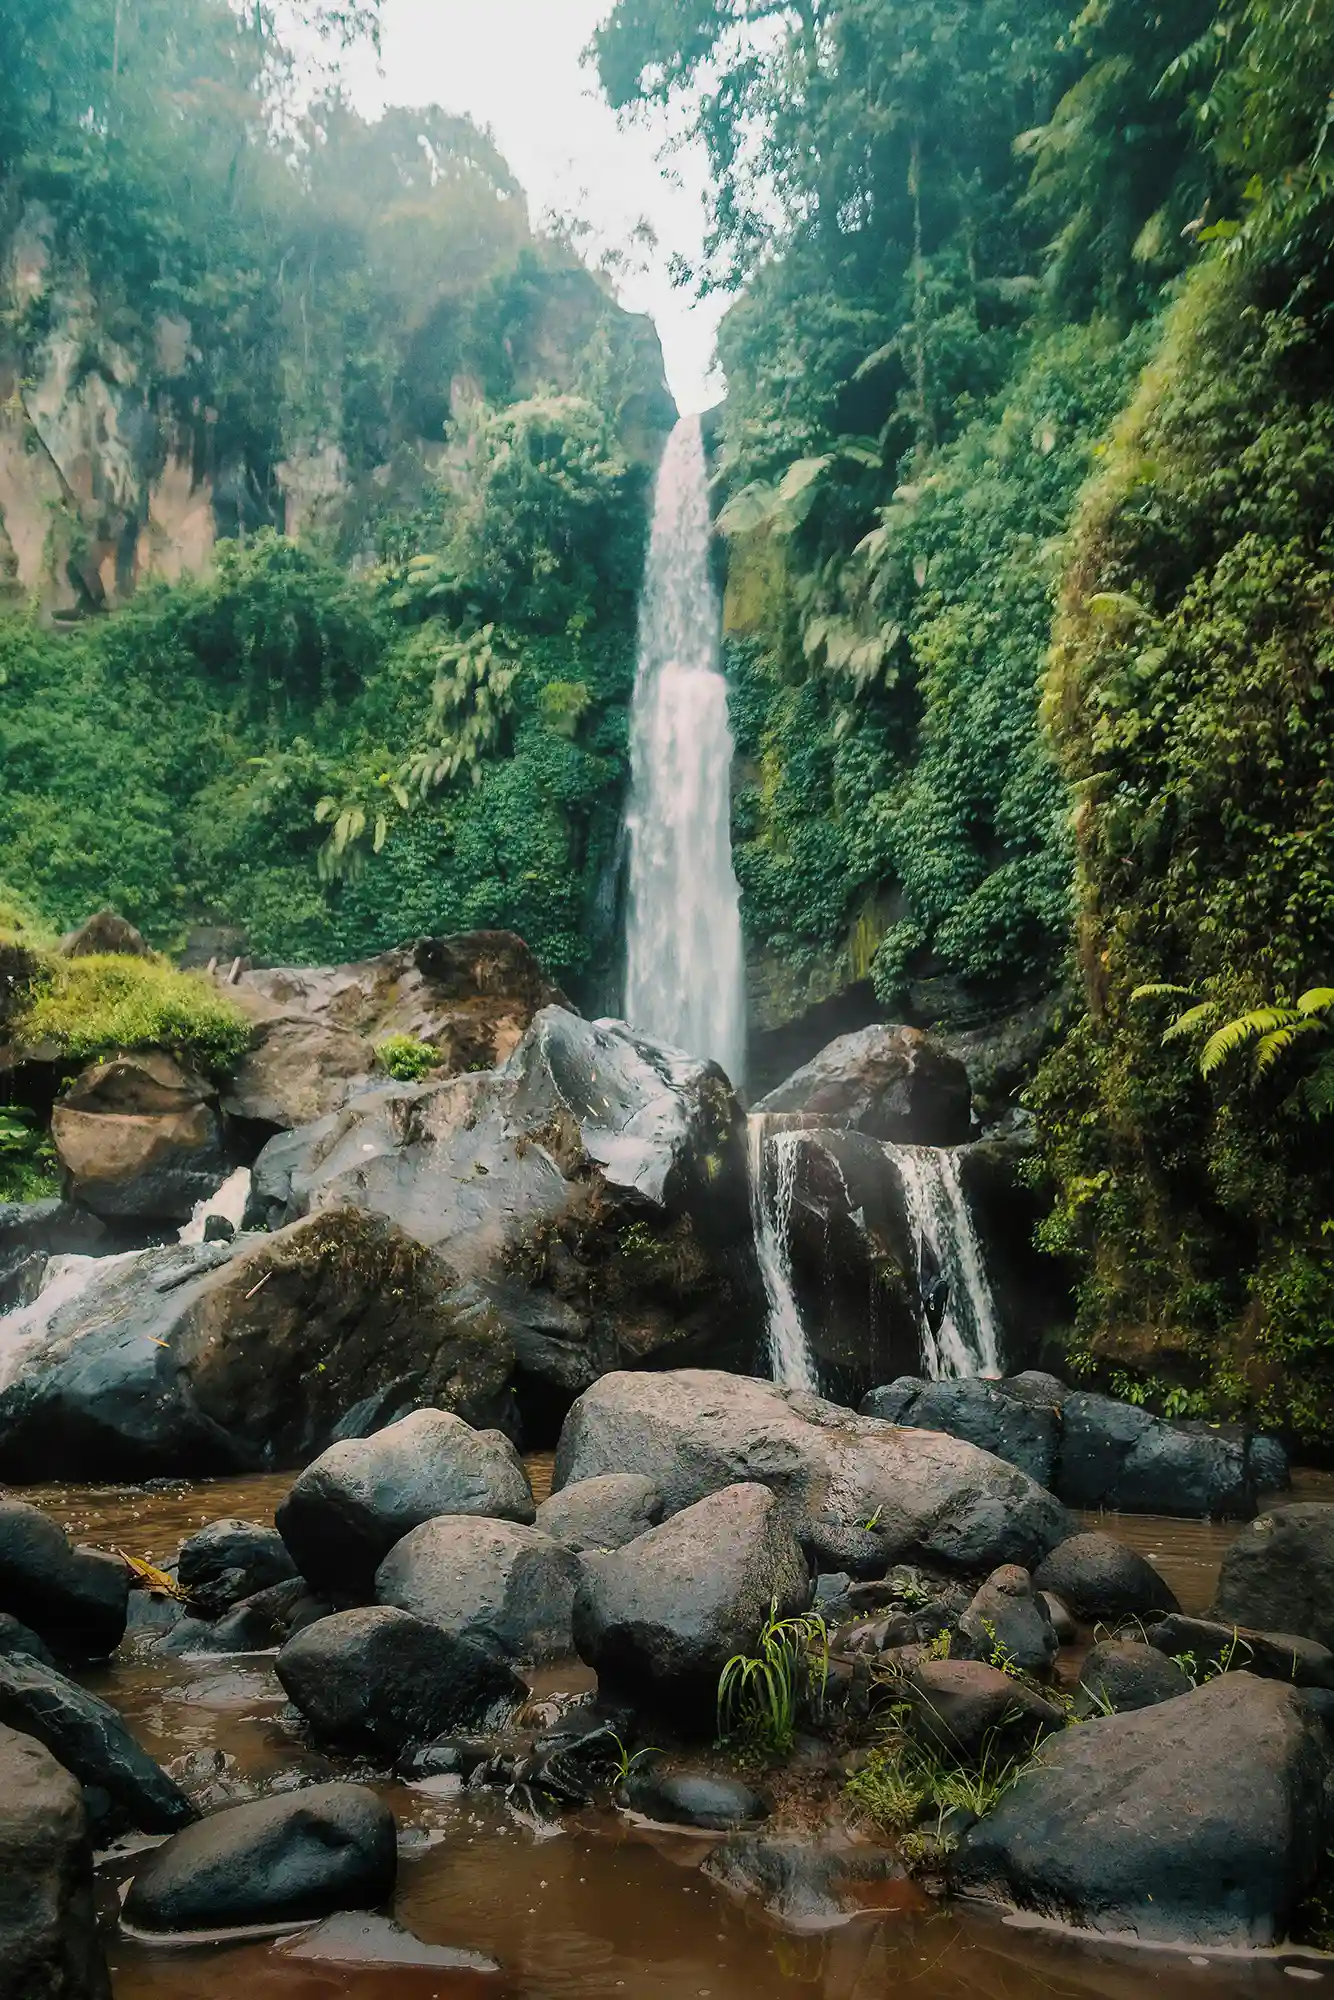
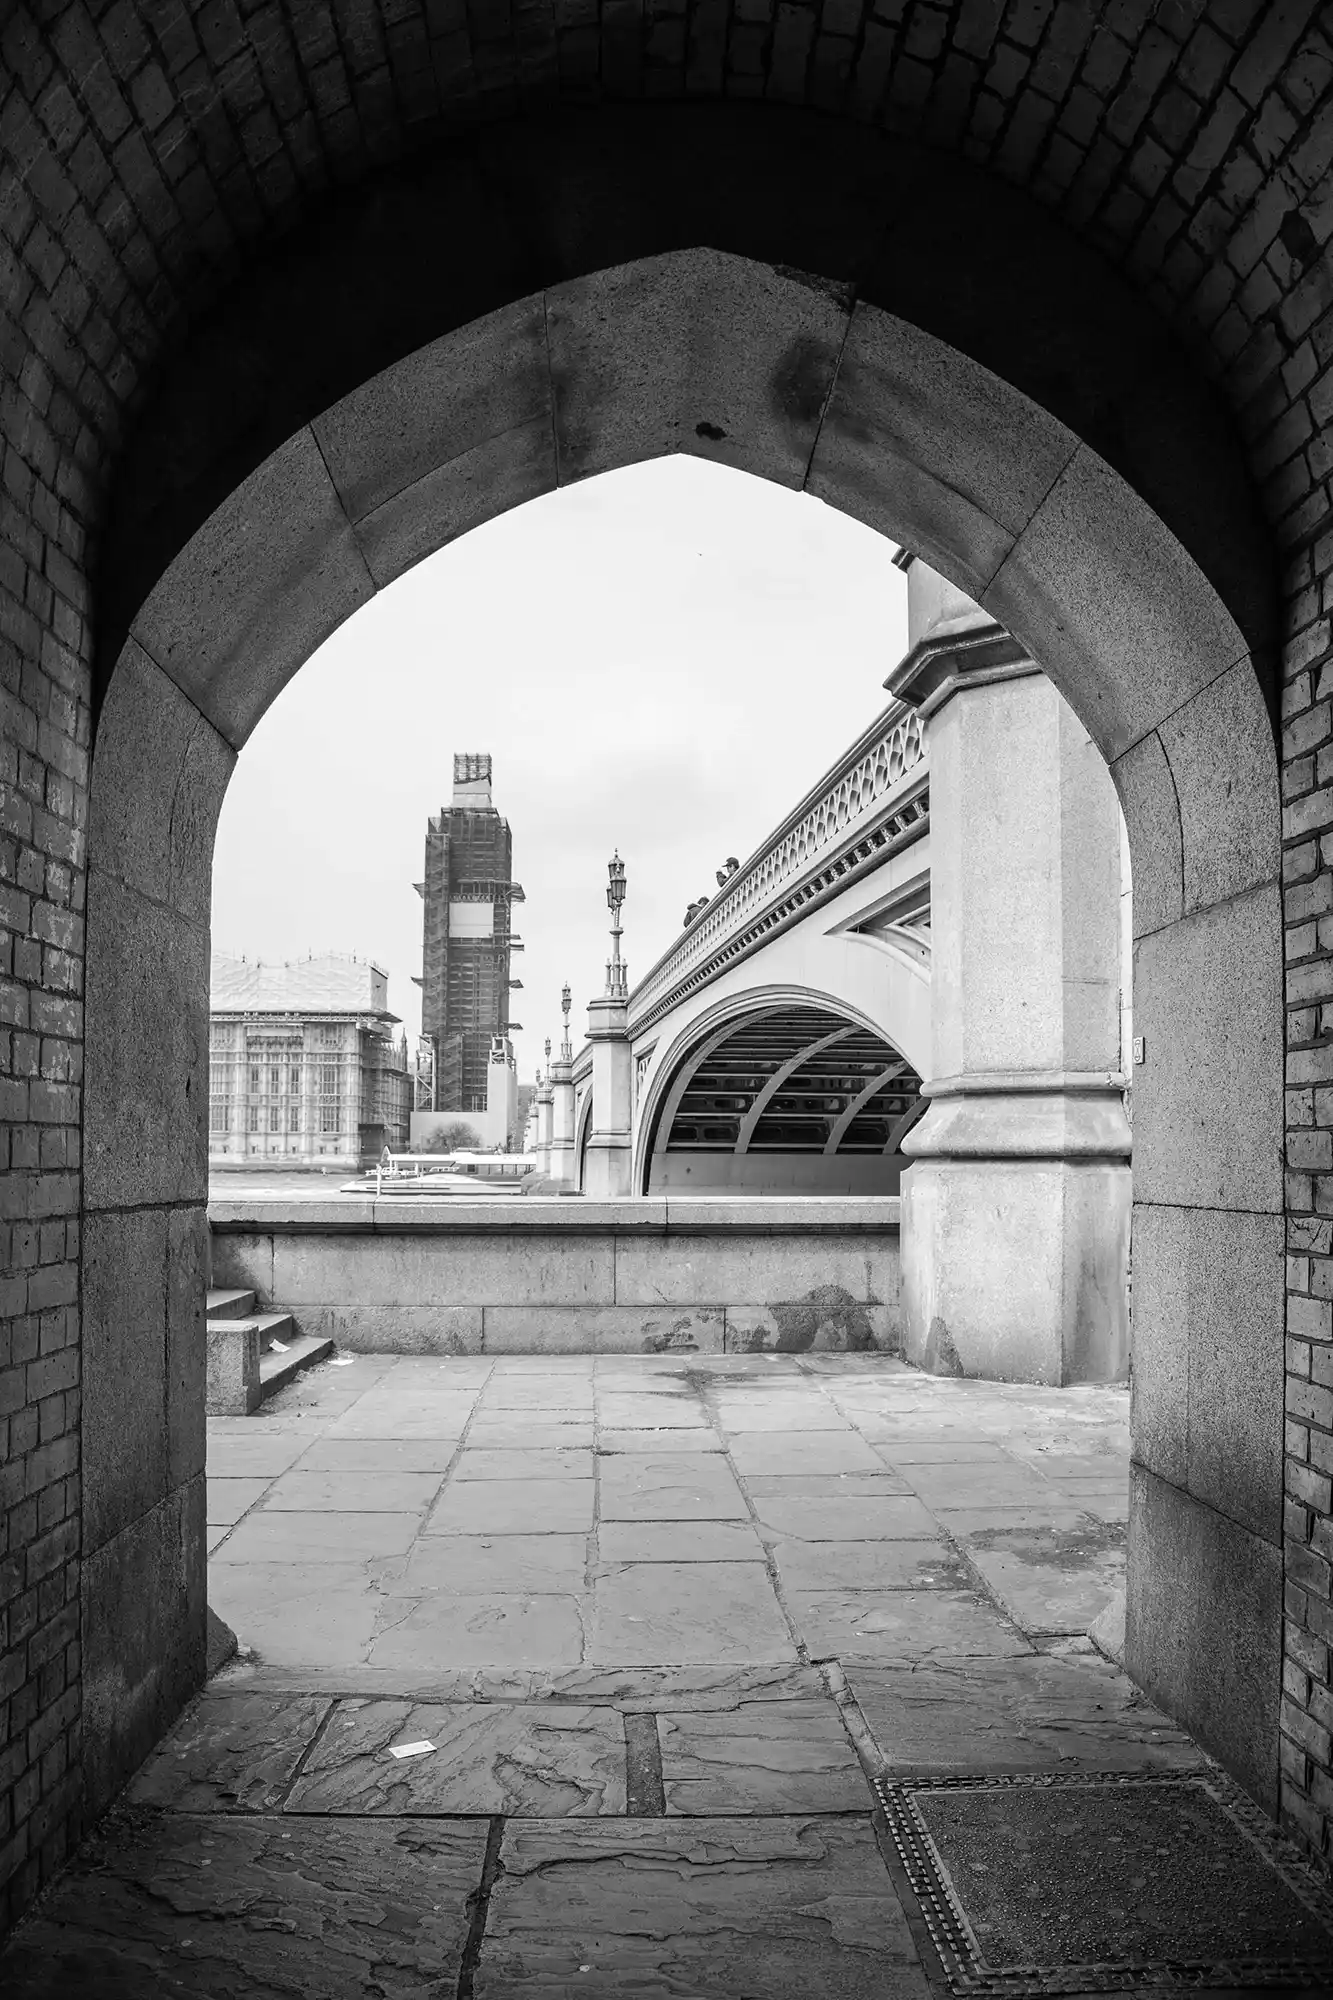
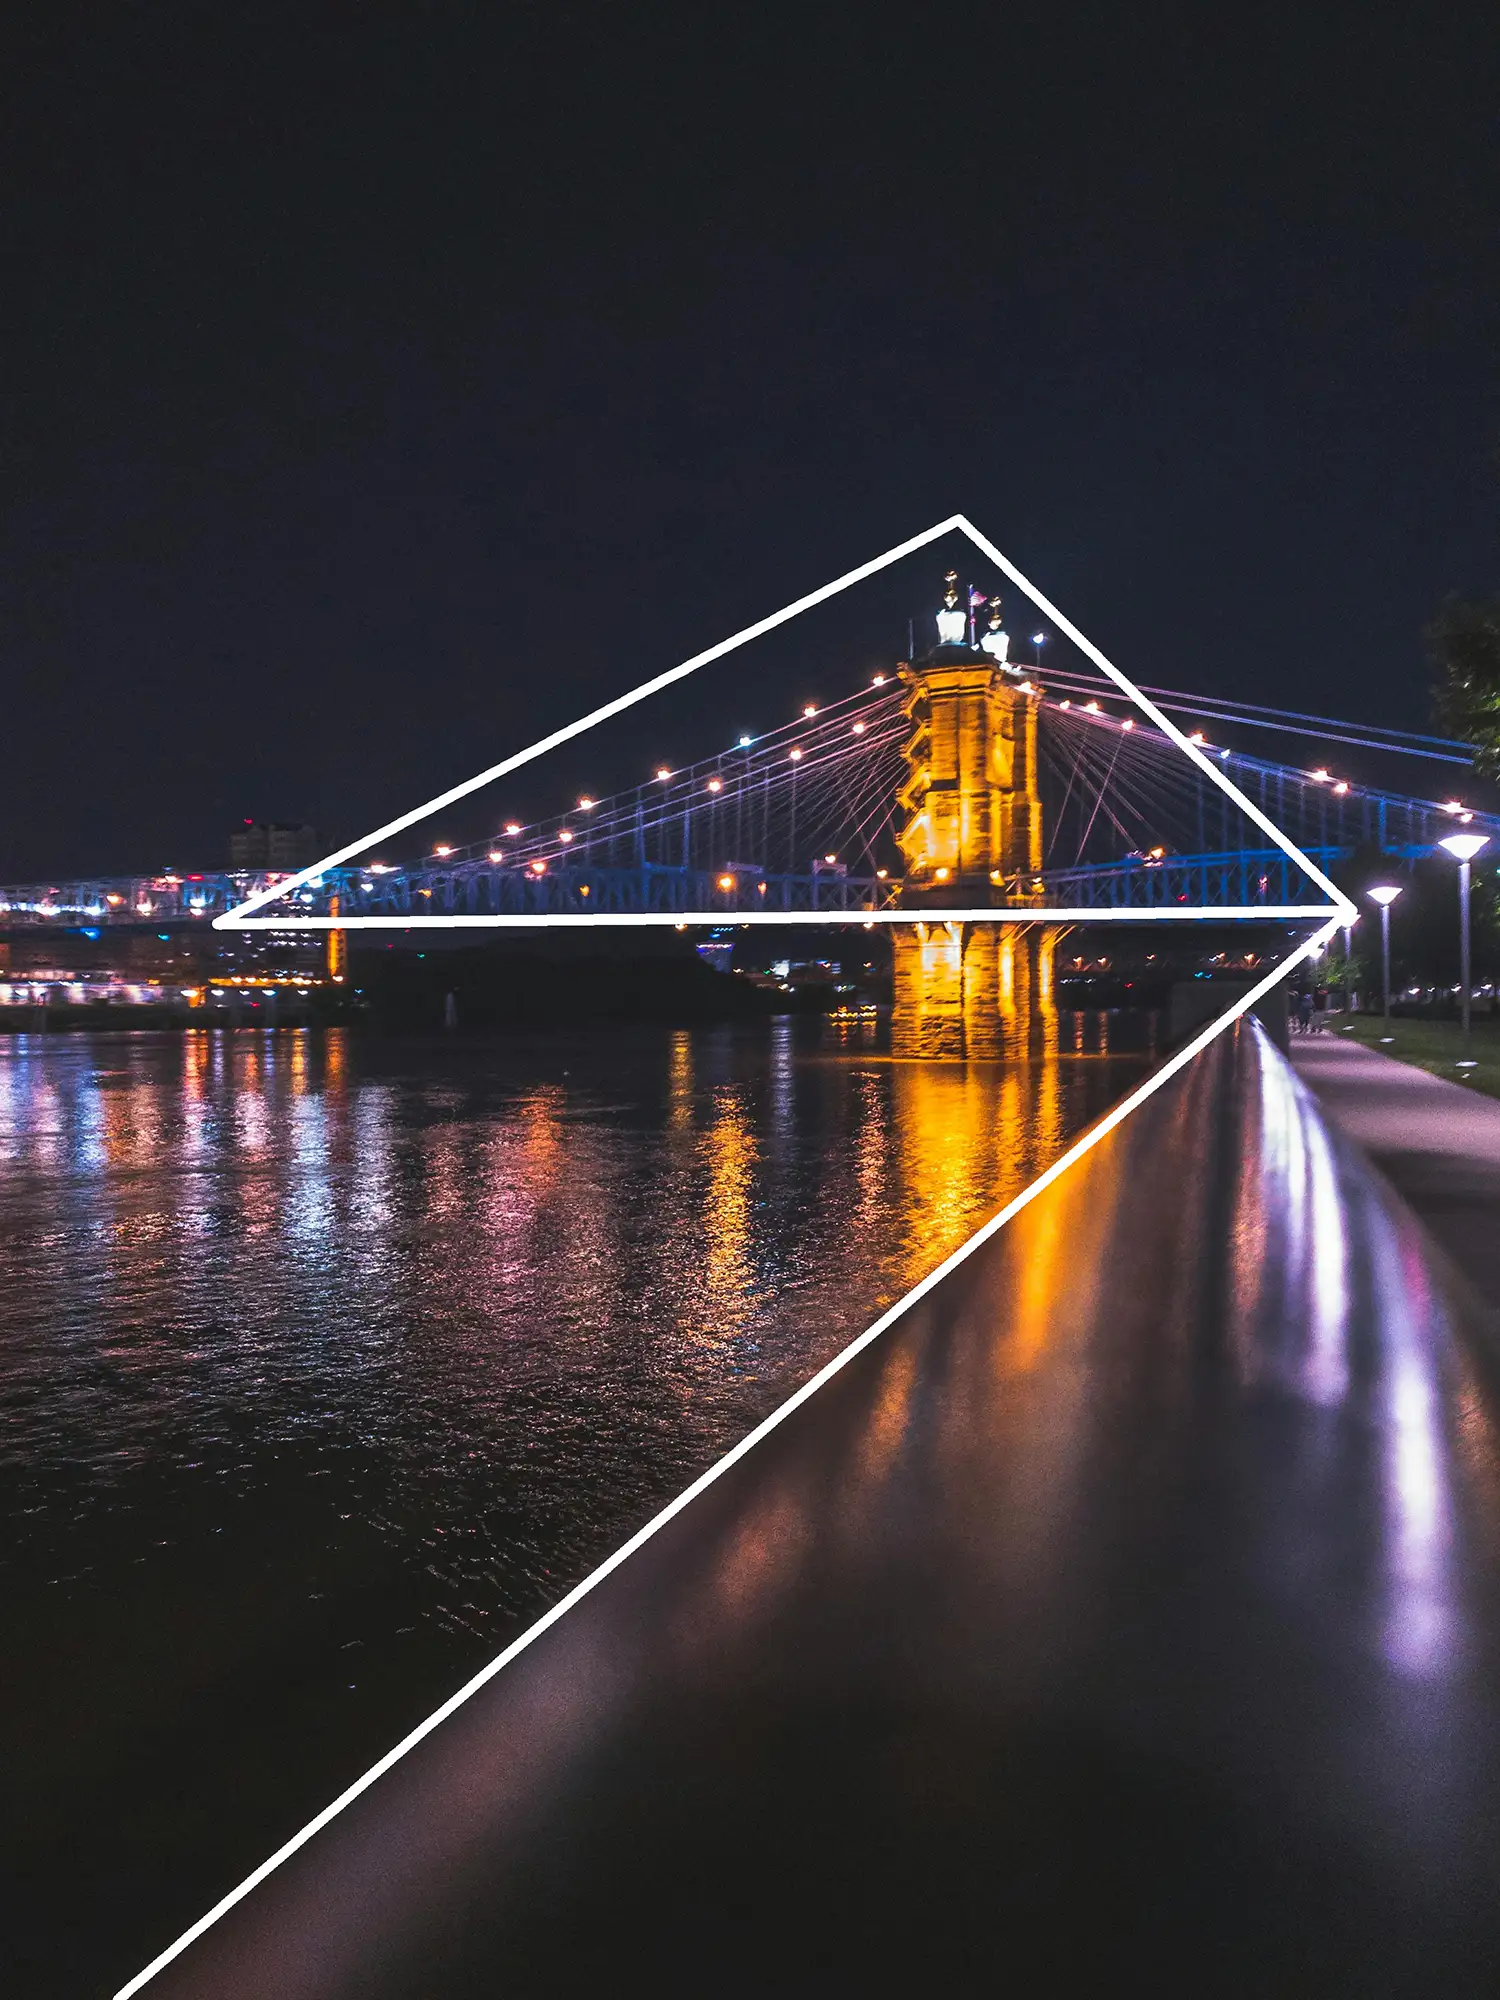
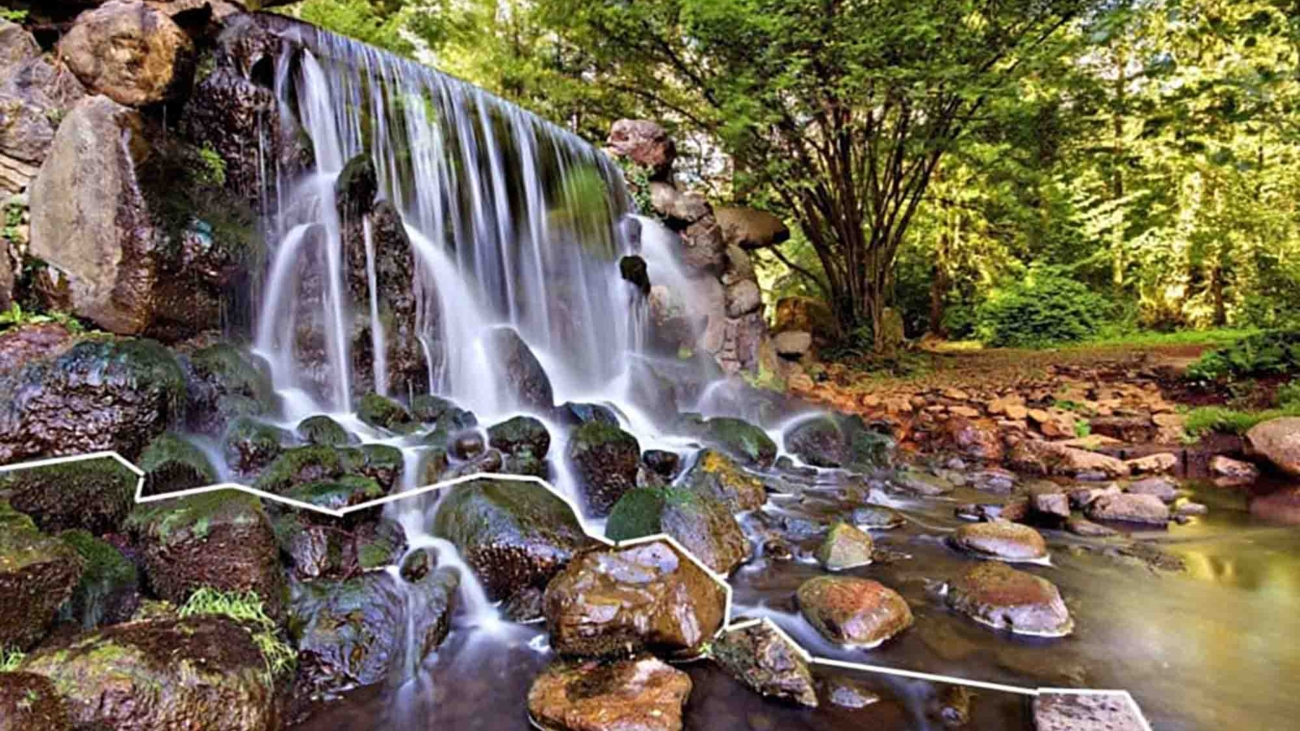
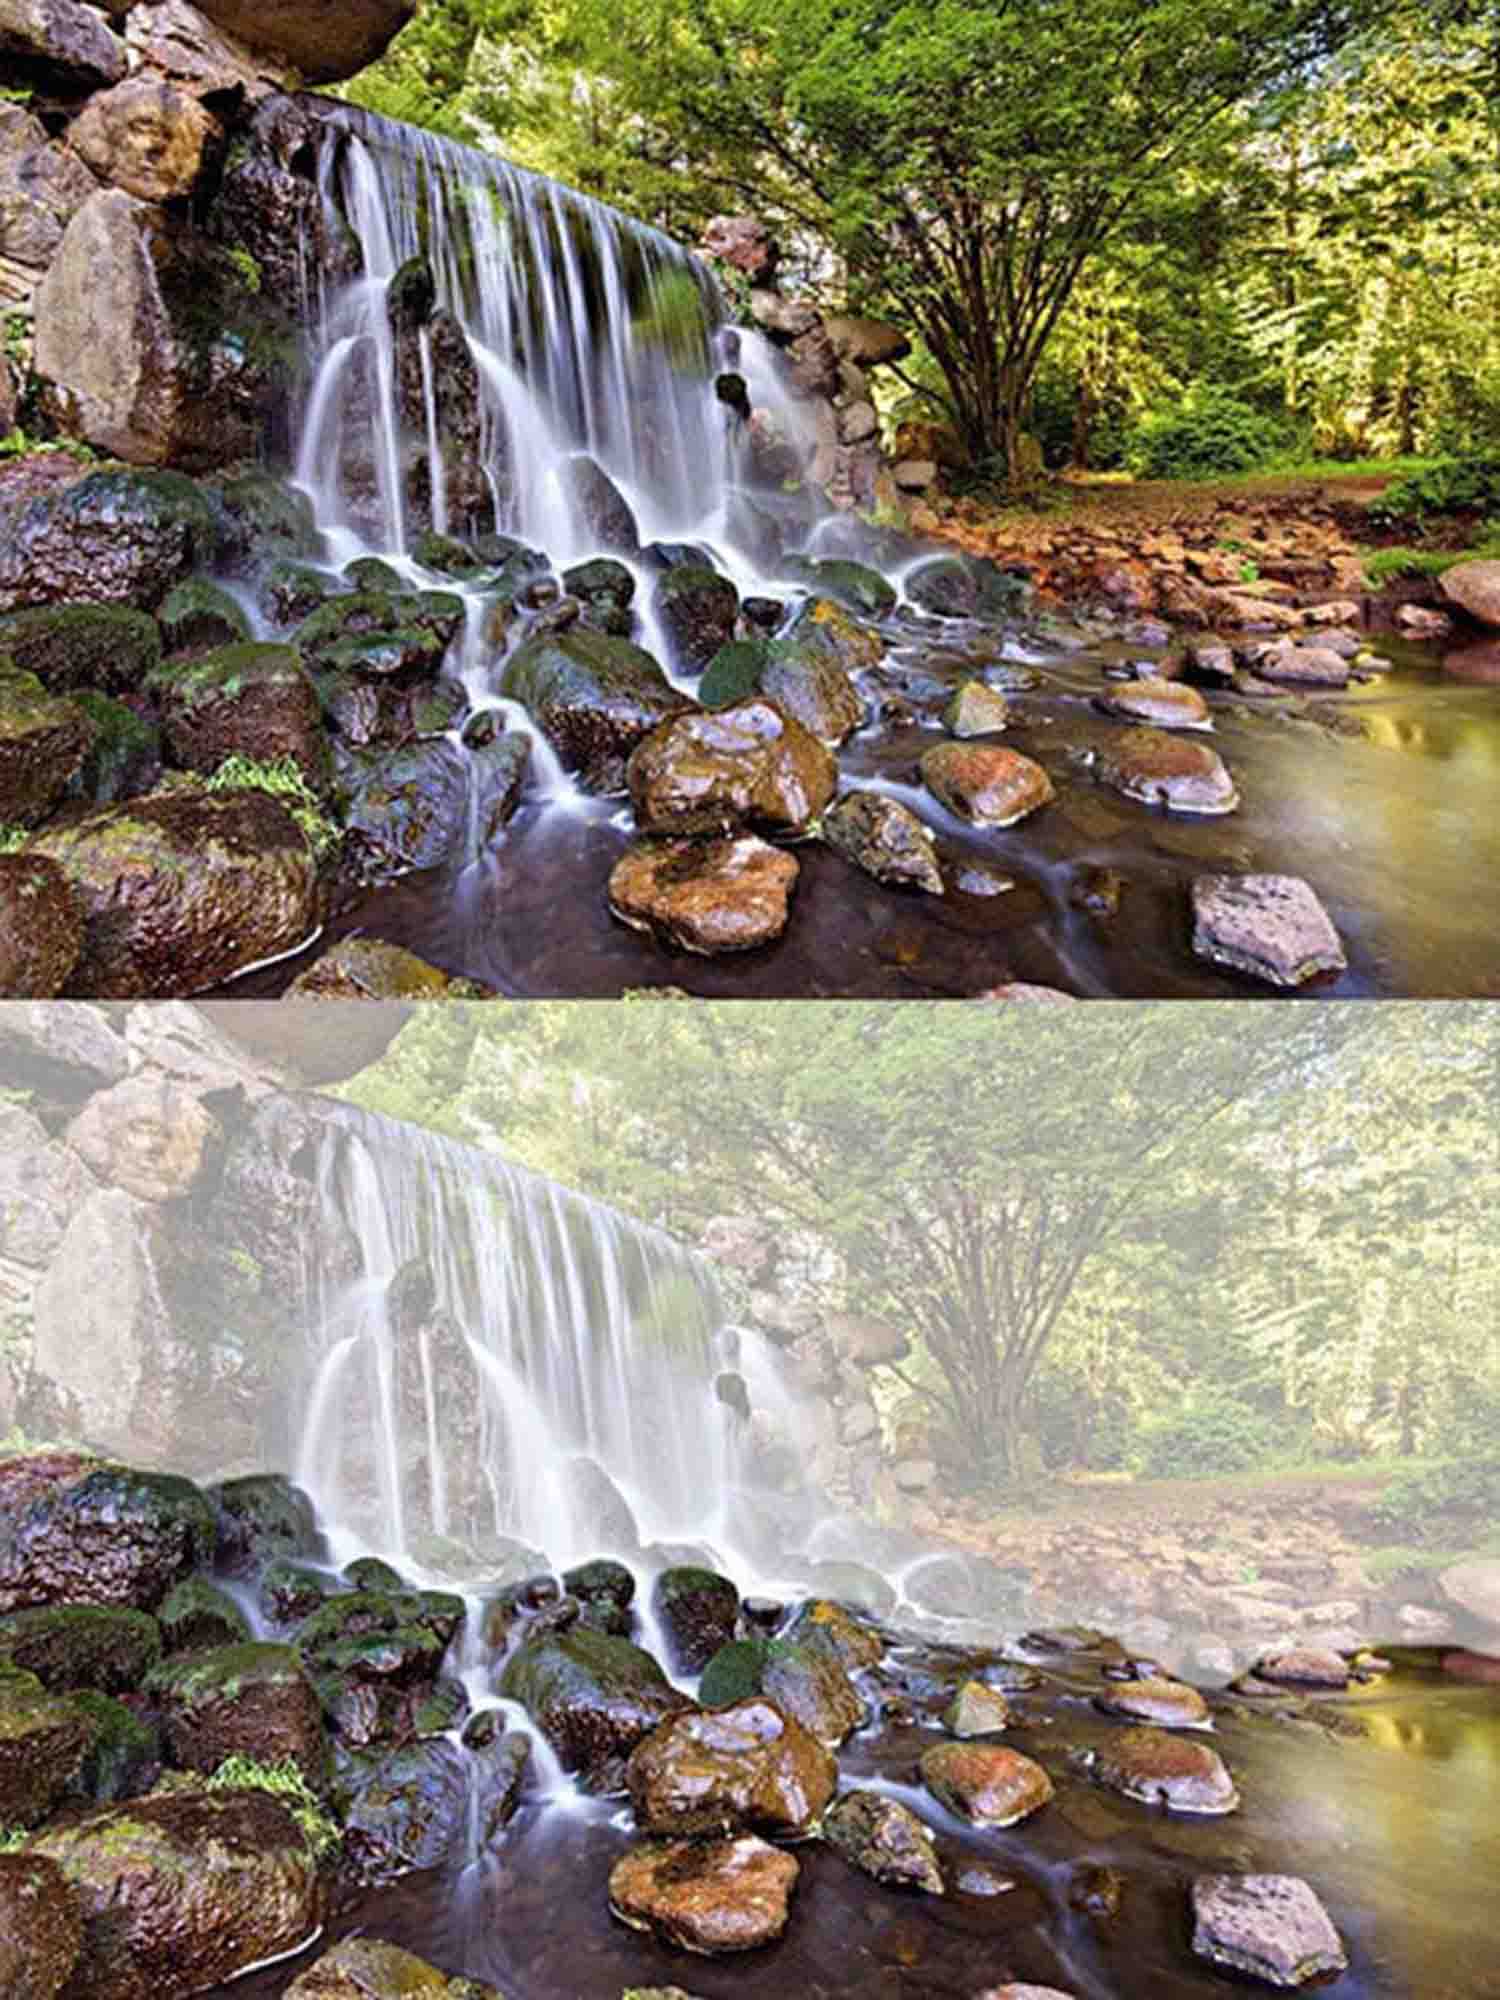
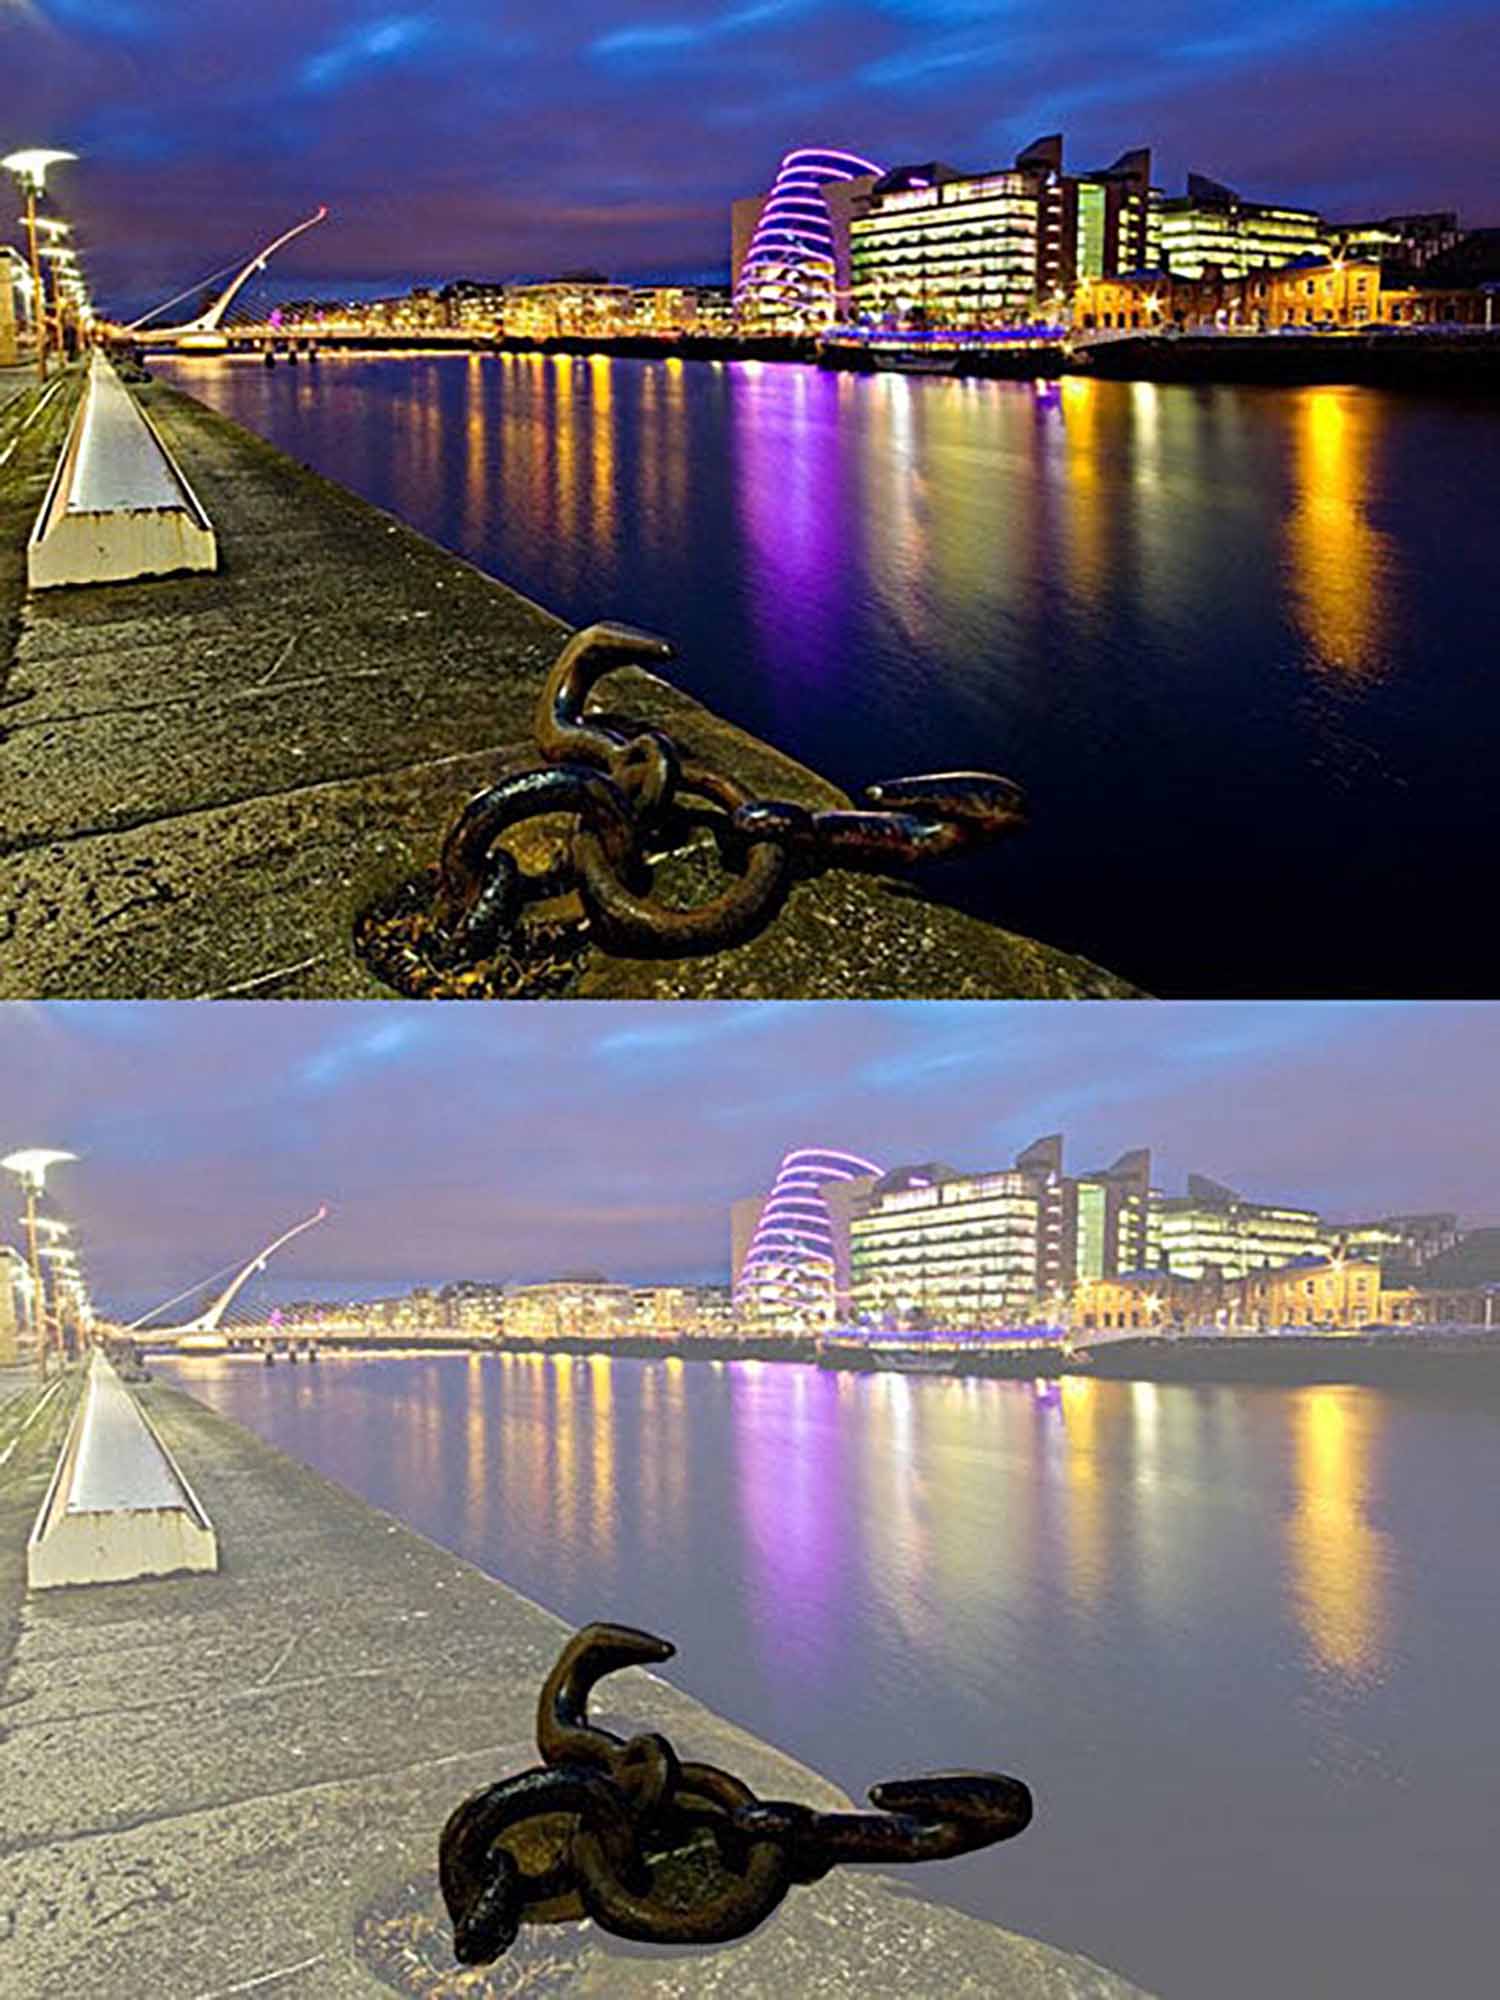
Foreground interest involves strategically placing objects or elements in the lower part of your frame, which are closer to the camera compared to the main subject. This layering technique not only adds depth but also helps in guiding the viewer’s eye through the image, creating a narrative and a sense of space.

3D effect at Sonsbeek Waterfall, Arnhem.

O Carroll, B. (2016). 28 Composition Techniques That Will Improve Your Photos.

Creative Process: Implementing Foreground Interest

  • Identifying Elements: Look for elements that can serve as interesting foreground subjects – rocks, flowers, urban artifacts, or even shadows and light patterns.
  • Composition and Placement: Place these elements in a way that they lead the eye towards the main subject. The placement should feel natural and not forced.
  • Balancing the Scene: Ensure that your foreground interest complements the scene and doesn’t overpower the main subject.

Tips for Photographers

  1. Wide-Angle Lenses: Use wide-angle lenses to exaggerate the sense of depth. They are excellent for capturing both the foreground interest and the background.
  2. Aperture Settings: Experiment with aperture settings. A smaller aperture (higher f-number) keeps both the foreground and background in focus.
  3. Trial and Error: Not every element makes good foreground interest. Experiment with different objects and see how they affect the scene.
  4. Focus Stacking: In landscapes, try focus stacking to keep the foreground and the distant background sharp.

Advanced Techniques in Using Foreground Interest

  • Leading Lines: Use natural or urban leading lines in the foreground to guide the viewer’s eye towards the main subject.
  • Framing the Subject: Elements in the foreground can act as a frame, subtly enclosing the main subject for added depth and focus.
  • Reflections as Foreground: In water bodies, reflections can serve as an interesting foreground, adding symmetry and depth.

Practical Applications in Various Genres

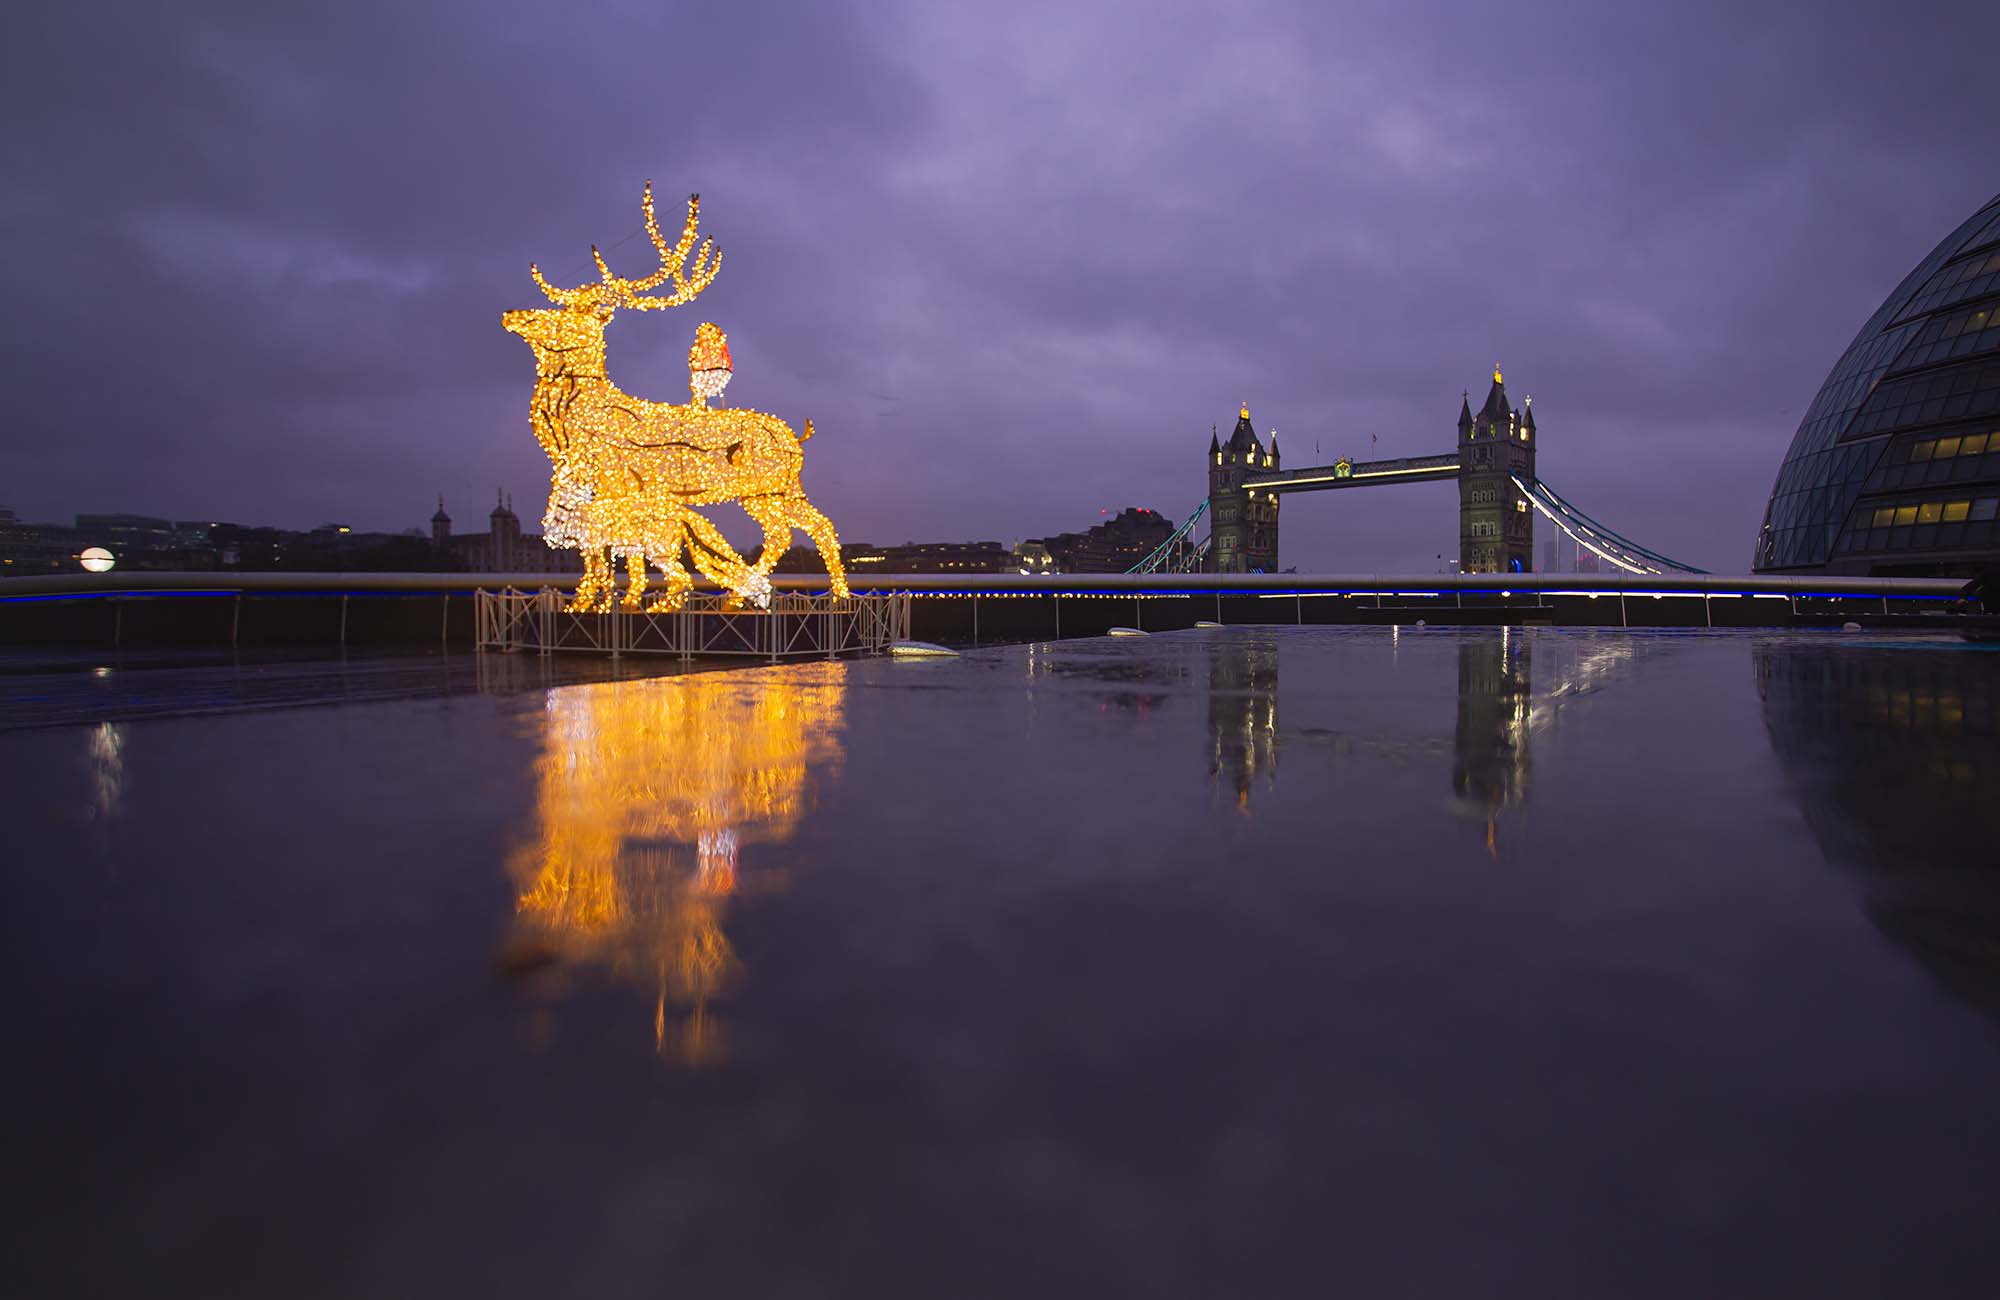
  • Landscape Photography: Use rocks, flowers, or foliage in the foreground to add depth to scenic views.
  • Urban and Street Photography: Urban elements like pavement patterns, street furniture, or even a passerby can serve as engaging foregrounds.
  • Macro Photography: In macro photography, a shallow depth of field can make the foreground elements blur into beautiful bokeh, adding depth.

Conclusion: Elevating Your Photographic Perspective

Incorporating foreground interest is a skill that elevates your photographic perspective, transforming ordinary scenes into captivating stories with depth and dimension. It requires practice, a keen eye for detail, and an understanding of how different elements in a scene interact with each other.

3D depth in Dublin's urban landscape.

O Carroll, B. (2016). 28 Composition Techniques That Will Improve Your Photos.

References

O Carroll, B. (2016). 28 Composition Techniques That Will Improve Your Photos. [online] PetaPixel. Available at:

https://petapixel.com/photography-composition-techniques/

[Accessed 12 Dec. 2023]

Symmetrical urban scene near London Bridge.

How to Use Symmetry and Patterns in Photos

How to Use Symmetry and Patterns in Photos

Introduction: The Power of Balance and Symmetry

Centered composition and symmetry in photography are more than just techniques; they are the essences of visual balance and harmony. When executed correctly, they can transform an ordinary scene into a captivating image, drawing the viewer’s eye and evoking a sense of tranquility and order.

Understanding Centered Composition and Symmetry

At its core, centered composition involves placing your subject in the middle of the frame, creating an equal balance on either side. Symmetry, on the other hand, refers to a mirrored balance, where elements on one side of the image closely resemble those on the other. These techniques are particularly powerful in scenes where balance and harmony are the focal points.

Symmetrical urban scene near London Bridge.

Creative Process: Implementing Symmetry and Balance

  • Visualizing Symmetry: Train your eye to identify naturally occurring symmetry in your environment. Reflective surfaces like water, architectural structures, and even shadows can provide perfect opportunities for symmetrical compositions.
  • Framing Your Subject: When using centered composition, consider the background elements. A centered subject can be made more compelling by an interesting or contrasting backdrop.
  • Using Grids: Many cameras have grid functionalities that can be super helpful in aligning your subject perfectly in the center of the frame.

Tips for Photographers

  1. Look for Natural Symmetry: Nature often presents itself with intrinsic symmetry. Look for these opportunities in your surroundings.
  2. Experiment with Different Angles: Sometimes, changing your perspective slightly can make a big difference in achieving perfect symmetry.
  3. Balance with Colors and Light: Symmetry isn’t just about shapes; colors and lighting play a crucial role. Balance these elements to enhance the symmetry in your shots.
  4. Post-Processing: Use editing software to fine-tune your images. Cropping and straightening tools are essential for perfecting centered compositions.

Advanced Techniques in Centered Composition

  • Reflective Surfaces: Utilize mirrors, water bodies, and glass surfaces to create intriguing symmetrical compositions.
  • Shadow Play: Experiment with shadows to add an element of surprise and depth to your symmetrical compositions.
  • Architectural Photography: Buildings and urban landscapes are ideal for practicing symmetry. Look for leading lines, doorways, and windows that offer natural frames and symmetrical patterns.

Practical Applications in Various Genres

  • Landscape Photography: Use symmetry to capture reflections in lakes or rivers, or to frame a mountain peak perfectly centered between its surroundings.
  • Portrait Photography: For portraits, symmetry can add a dramatic effect. Center your subject against a balanced backdrop for a striking image.
  • Street Photography: Symmetry can be found in the hustle of city life. Look for patterns, reflections, and balanced street scenes.

Conclusion: Symmetry as an Art Form

Centered composition and symmetry are more than just rules; they are artistic tools that, when used creatively, can produce stunning and memorable photographs. These techniques require a keen eye for detail, a sense of balance, and an understanding of how to make ordinary scenes extraordinary.

Centered composition demonstration in Photoshop.

Tutorial: Creating a Centered Composition in Photoshop

Step 1: Open Your Image

  1. Load the Image: Begin by opening the image you want to edit in Photoshop. Make sure you’re working on the desired layer if your project has multiple layers.

Step 2: Enabling Rulers

  1. Access View Menu: Navigate to the top menu bar in Photoshop and click on ‘View’. This menu contains various options to adjust the visibility of certain elements in your workspace.

  2. Selecting Rulers: In the ‘View’ dropdown menu, find and click on ‘Rulers’. Alternatively, you can use the shortcut Ctrl + R (Cmd + R on a Mac) to toggle the rulers on and off.

  3. Applying Rulers: Once selected, you’ll see rulers appear along the top and left sides of your Photoshop workspace. These rulers are used for precise placement and alignment.

Refining symmetry in Photoshop composition.

Step 3: Centering the Composition

  1. Centering the Ruler: To center the ruler, you need to set the zero point at the center of your image. Click on the corner where the two rulers meet (top left corner), and drag it to the center of your image. You can use the guidelines that appear or refer to the dimensions displayed on the rulers for accurate placement.

  2. Using Guides for Centered Composition: After setting the zero point, you can drag out guides from the rulers to mark the center of your image. Click on the top ruler and drag down to create a horizontal guide, and do the same with the left ruler for a vertical guide. Place these guides exactly where they intersect at the center of your image.

  3. Adjusting Your Image: Use these central guides to align key elements of your photo. For a centered composition, you’ll want to place the subject or main focus of your image at the intersection of these guides. This can be done by moving the image layer or by using the Crop Tool to adjust the overall composition.

Step 4: Finalizing Your Composition

  1. Review and Adjust: Take a moment to review your composition. Ensure that the main elements are centered as per your requirement and the composition looks balanced.

  2. Apply Changes: Once satisfied with the centered composition, save your changes. You can remove the guides by dragging them back to the rulers or by clearing them from the ‘View’ menu.

Advanced centered composition in Photoshop.

Conclusion

Centered compositions can be powerful and visually striking. By using Photoshop’s rulers and guides, you can accurately create a centered composition, ensuring that your image’s elements are perfectly aligned for maximum impact.

Example of photographic composition rules.

Capturing the Essence: 28 Composition Secrets for Stunning Photography

Introduction to Composition in Photography

Photography is more than capturing moments; it’s about crafting stories through imagery. This guide delves into 28 advanced composition techniques that are essential for any photographer aiming to elevate their work into the realm of art. Each technique is not just a method but a doorway into a new way of seeing and capturing the world around us.

1. Rule of Thirds

Imagine the viewfinder of your camera is a canvas divided by two equally spaced horizontal and vertical lines, creating nine squares. This grid guides where you place your subject for optimal aesthetic balance. The rule of thirds is foundational in photography, providing a simple yet effective blueprint for capturing engaging images. It nudges the photographer to avoid placing the subject directly in the center, which can often result in static, less engaging compositions. Instead, by aligning the subject with these guidelines—perhaps an eye in portrait photography at an intersection point—the viewer’s gaze flows more naturally across the image, lending a dynamic quality even to still life.

2. Centered Composition and Symmetry

Symmetry brings a sense of balance and harmony that is deeply pleasing to the human eye. A centered composition works exceptionally well in scenes where symmetry is the soul of the image—think reflections in water, a long hallway, or a lone tree in the center of a field at sunrise. This technique is about finding the invisible lines that tie everything together into a coherent whole, where the balance of elements provides stability and tranquility to the image. It’s particularly powerful in architectural photography, where the deliberate alignment of structural elements creates a majestic and imposing effect, drawing the viewer into a geometrically satisfying experience.

Elegance of symmetry in Leytonstone.

3. Foreground Interest and Depth

Adding elements to the foreground of your photograph can transform a flat scene into a multi-dimensional spectacle, guiding the viewer’s eye from the front all the way to the back. This technique is crucial in landscape photography, where the inclusion of rocks, plants, or even a pathway can create a sense of depth that makes the viewer feel as if they could step into the photograph. It’s about layering the elements in a way that not only tells a story but also constructs a world within the frame. This method encourages exploring different angles and positions, looking for ways to incorporate the environment into a more compelling narrative.

3D effect mastery by Darwis Alwan.

4. Frame Within a Frame

This technique involves using elements within the scene to create a frame around your main subject, which helps isolate the subject and draw attention directly to it. It could be as simple as a window frame or as complex as branches arching over a path. This compositional tool not only focuses the viewer’s attention but also adds context, enriching the narrative of the image. It’s a powerful way to compose a shot in both urban and natural environments, offering a glimpse into the world of your subject. The frame within a frame invites the viewer to peer into a different part of that world, creating a picture within a picture, each layer adding to the depth of the story.

Depth through layers in London architecture.

5. Leading Lines

Imagine lines that draw your viewer deeper into the image, guiding their gaze across the composition. These can be roads, fences, shorelines, or even architectural elements. Leading lines are powerful compositional tools because they control the viewer’s journey through the image. They create a pathway to follow, connecting the foreground to the background in a smooth visual flow that enhances the narrative structure of the photograph. Whether it’s a winding river in a landscape or a street extending into the urban jungle, leading lines not only show depth but also suggest continuity beyond the frame.

Leading lines in Greenwich, London.

6. Diagonals and Triangles

Diagonal lines create movement and excitement, propelling the viewer’s eye across the image and adding a dynamic element to your compositions. Triangles, whether real or implied, bring a sense of stability and focus. This technique involves identifying and leveraging these shapes to enhance the structural composition of your images. In a chaotic street scene, for instance, a diagonal line can be the crossing path of a pedestrian, while triangles might be formed by the visual connection of people and objects, creating a sense of harmony and balance amidst the disorder.

Dynamic tension by Jeffrey Riley.

7. Patterns and Textures

Our eyes are naturally drawn to patterns and textures; they can add a captivating element to your photographs. Patterns provide a rhythm, while textures highlight the quality of surfaces under different lighting conditions. This technique is about recognizing and framing these elements to enhance the tactile and visual experience of the viewer. In nature photography, capturing the repetitive patterns of a forest canopy or the intricate textures of a leaf can make the image come alive, providing a window into the complexity of natural designs.

Visual harmony at Liverpool Street.


8. Break the Pattern

While patterns can attract, breaking them can intrigue. Introducing an anomaly within a repetitive pattern grabs attention and adds a layer of interest. This could be a splash of color in a monochrome setting, an irregular shape in a line of uniform objects, or a human element disrupting a series of impersonal architectural features. This technique is about finding the break that challenges the expectation, turning what could be a mundane shot into a story worth exploring.

Allure of pattern breaking by Klaus Nielsen.

9. Rule of Odds

The rule of odds suggests that images with an odd number of elements are more visually appealing and balanced than those with an even number. This principle taps into the inherent nature of human perception to find order and balance. An odd number of subjects prevents the eye from dividing the space into equal halves, which can make the scene more dynamic and aesthetically pleasing. It’s particularly effective in portrait groupings, floral arrangements, or any setting where three elements can be positioned to create a triangle that guides the viewer’s gaze through the composition.

10. Fill the Frame

To fill the frame is to eliminate all but the essential, zooming in close or positioning yourself so that your subject occupies nearly the entire frame. This approach can be powerful in both portrait and macro photography, where the details of a face or the intricate patterns of an insect are so rich that anything else would be superfluous. It’s about intimacy and detail, drawing the viewer into the nuances of the subject, capturing the textures, colors, and emotions that might otherwise go unnoticed.

Detailed texture in Central London.

11. Leave Negative Space

Leaving significant amounts of negative space around your subject can be just as impactful as filling the frame. This technique creates a minimalist aesthetic that emphasizes the subject through isolation, making the viewer’s focus irresistibly drawn to the intended focal point. Negative space can be a clear sky, an expansive wall, or an open sea that stands in contrast to the subject, providing a breath of visual relief and a sense of scale. It’s particularly effective in creating a mood or emotion, such as solitude, tranquility, or even tension, depending on how the space interacts with the subject. This approach isn’t just about what you include; it’s equally about what you exclude, allowing the story to breathe and resonate within the unoccupied spaces.

12. Simplicity and Minimalism

In a world often cluttered with visual noise, simplicity and minimalism stand out by offering a serene reprieve. This composition technique strips down the scene to its core essentials, focusing on a single subject or a concise theme. It’s about eliminating distractions to highlight the beauty or impact of what remains. Whether it’s a lone figure against a stark backdrop, a simple object portrayed with elegant lighting, or a clean landscape with minimal elements, this style speaks volumes through quietness and restraint. It teaches the viewer to appreciate the subtlety and value of simplicity, making each element significant and every detail speaking loudly in silence.

Simplicity in composition by Alper Çakır.

13. Use Black and White

Black and white photography transcends the distraction of color, focusing the viewer on the raw textures, contrasts, and patterns of the scene. This technique is powerful for evoking a timeless quality and drawing deeper emotional reactions. It strips the narrative down to its visual essences—light against dark, white against black. This simplicity can often lead to a more profound connection with the subject, as it compels the viewer to fill the color gaps with personal interpretation and emotion. Whether capturing the rugged lines on an elderly face or the stark contrast of urban architecture, black and white create a dramatic stage for stories of any age.

14. Isolate the Subject

Isolating the subject using a shallow depth of field focuses attention precisely where it’s intended, making the subject stand out starkly against a blurred background. This technique is often used in portrait and wildlife photography, where the clarity of the subject is paramount. The isolation can also evoke a poignant sense of place and mood, highlighting the subject’s emotional state or the essence of their environment. It’s about using focus not just as a technical tool but as a narrative one, guiding the viewer’s eyes and emotions to connect deeply with the subject at hand.

Elegant female model in Central London, color.

15. Shoot from Below

Shooting from a lower perspective can radically change the perception of the subject, imbuing it with a sense of grandeur and dominance. This angle invites the viewer to look up to the subject, be it a towering skyscraper, a commanding figure, or even a blooming flower seen from the ground up. It’s a powerful way to communicate strength and impact, making the ordinary appear extraordinary. This perspective not only alters the viewer’s physical viewpoint but also their conceptual viewpoint, challenging them to see the world from a different vantage point.

Architectural detail from below on Goodge Street.

16. Shoot from Above

Conversely, shooting from above provides a comprehensive overview, often lending a detached, observational quality to the photograph. This bird’s-eye view can simplify compositions, reducing complex scenes into more abstract forms and patterns. It’s particularly effective in capturing the hustle and bustle of street markets, the organized chaos of cityscapes, or the quiet solitude of a single person in a large space. From this vantage point, the photographer plays the role of an omniscient narrator, offering a god-like perspective that can make the expansive seem intimate and the mundane seem significant.

Aerial view of Goodge Street, London.

17. Look for Particular Color Combinations

Colors play a crucial role in setting the tone of an image. By focusing on specific color combinations, particularly those opposite on the color wheel, photographers can create vibrant and eye-catching compositions. This technique is not just about aesthetic appeal but also emotional resonance. Colors can evoke feelings of warmth or coldness, excitement or calm, harmony or chaos. Utilizing complementary colors (like blue and orange or red and green) can add a dynamic element to the photograph, drawing the viewer’s eye directly to the area of contrast and making the subjects pop against each other.

Vibrant Sophie in Central London, color portrait.

18. Rule of Space

The rule of space involves giving your subject room to move within the frame, anticipating their motion or gaze. This composition technique is particularly powerful in wildlife and sports photography, where the sense of movement is literal and dynamic. But it can also be applied in a more metaphorical sense in portraits or street photography, where the subject’s gaze towards an empty space can suggest anticipation, longing, or contemplation. It creates a narrative tension and a story that extends beyond the edges of the frame, inviting the viewer to imagine what lies ahead or just out of view.

Dynamic composition by James Wheeler.

19. Left to Right Rule

The left to right rule leverages the natural way most people scan images, influenced by the direction of reading in many cultures. By placing key elements or the movement from the left side of the frame to the right, the composition feels more natural and is easier for the viewer to engage with. This technique can be particularly effective in narrative sequences or when directing the viewer through a series of events or actions within the frame. It also helps in creating a sense of ease and flow in the viewing experience, making the photograph not just seen but also felt in its dynamic progression.

Guided viewing by Aleksandar Radovanovic.

20. Balance Elements in the Scene

Balancing elements within a composition is akin to finding visual equilibrium. This can mean mirroring subjects of similar visual weight across the frame or placing a single small subject against a large expansive background to create a pleasing asymmetry. This technique ensures stability in your photos, even if the balance is achieved through contrasting elements. It’s particularly effective in landscapes where the sky and land intersect, or in architectural photography where the interplay between space and structure needs to resonate with harmony. This approach isn’t just about symmetry; it’s about arranging all elements so that they feel inherently right and aesthetically pleasing together.

Unique balance by bt3gl PH.

21. Juxtaposition

Juxtaposition involves placing seemingly unrelated or contrasting elements next to each other to create a more complex narrative or highlight differences. This technique can evoke curiosity, surprise, or deeper thinking, depending on the elements juxtaposed. It might be an old building next to a modern skyscraper, a vibrant flower amid decay, or a solitary figure surrounded by a crowd. Juxtaposition not only enhances visual interest but also invites the viewer to make personal connections or contrasts, enriching the interpretative layers of the image. It’s about crafting a dialogue between disparate elements that, when placed together, tell a story greater than the sum of their parts.

22. Golden Triangles

The use of golden triangles involves dividing the image using diagonal lines that create triangles, with the elements of the photo aligned along these lines or within these shapes. This composition technique lends dynamic tension and a sense of movement to your photos. It works well in varied photographic contexts, from capturing the angular dynamics of a bustling city intersection to the serene diagonals of a lone tree on a hill. The key is to use the natural and structural lines present in your scene to guide the viewer’s eye through the image, creating both balance and intrigue through angular harmony.

Golden triangles in urban London.

23. Golden Ratio

A step beyond the rule of thirds, the golden ratio is about placing your subject along a curve or spiral that follows a 1:1.618 ratio, often referred to as the Fibonacci spiral. This method is believed to be inherently pleasing to the human eye and is used to create a natural focus that feels organically embedded within the broader scene. It’s especially powerful in portrait and nature photography, where the spiral can guide the viewer’s eye through the curves of a face or the sweep of a landscape, making the composition feel simultaneously grounded and fluid. The golden ratio invites the viewer on a visual journey that feels both guided and natural.

Golden ratio in photography.

24. Let the Background Give Context to the Subject

Allowing the background to inform the story of the subject adds depth and a richer narrative layer to your photographs. This technique is about more than just backdrop; it’s about context and enhancement. For example, a portrait with a bustling market behind the subject can suggest vibrancy and life, while a lone figure against a stark, empty landscape might convey isolation or introspection. The background sets the stage, providing clues to the subject’s environment and emotional or social state, making the image not just a portrait but a story captured in time.

25. Let the Eye Wander Around the Frame

Creating compositions that encourage the viewer’s eye to wander around the frame engages and retains interest. This technique is particularly useful in complex scenes, where multiple elements—whether in a crowded street scene, a detailed landscape, or a layered social gathering—invite exploration. It’s about crafting a visual narrative that offers several points of interest, encouraging the viewer to linger within the frame, discovering new details and connections that enrich the overall experience of the image.

26. Use Layers in the Frame

Layering involves strategically placing elements at different depths within the frame to create a sense of three-dimensional space in a two-dimensional medium. This can mean foreground elements like branches framing a distant mountain, or people scattered at varying distances in an urban scene. Each layer contributes its own story, adding to a cumulative narrative that makes the photograph denser and more immersive. This technique is about depth not just as a physical concept but as a narrative one, where each layer offers a unique contribution to the visual story being told.

Depth creation by Mathias Reding.

27. Add Human Interest

Including people in photographs automatically adds a layer of narrative and emotional engagement. Human subjects provide a point of connection for viewers, offering a glimpse into a moment of life, an emotion, or an activity that is universally relatable. Whether it’s a candid shot of a bustling street, a portrait of a person in their home environment, or a staged interaction, human elements make photographs more compelling and often more memorable. This technique emphasizes the human aspect of photography, capturing the essence of human experiences as both a witness and a narrator.

Textural details of Canary Wharf underground in B&W.

28. Wait for the “Decisive Moment”

The “decisive moment” is that split second when all elements within the frame align perfectly, capturing the essence of the experience and offering the viewer a poignant glimpse into the scene. This might be the exact moment a dancer leaps, a bird takes flight, or a smile spreads across a subject’s face. It’s about anticipation and timing, understanding the scene and its potential so that you can capture the peak of emotional or physical action. This technique requires patience and a keen sense of observation, but the result is often a powerful and timeless image that encapsulates the essence of a singular, unrepeatable moment.

Decisive moment by Daniel Kux.

Conclusion

Mastering these 28 advanced photography composition techniques offers a comprehensive toolkit for transforming your visual stories from simple images to complex, evocative narratives. Each technique provides a different lens through which to view the world, challenging you to explore and experiment with new perspectives and storytelling methods. As you grow in your photographic journey, remember that these techniques are not just rules to follow but starting points for creative exploration. Photography is about seeing, feeling, and communicating through imagery, and with these tools at your disposal, you can aim to not just capture moments but to create art that resonates deeply with viewers.

Visual mastery by Matheus Bertelli.

Interested in Perfecting Your Photo Composition?

Explore our comprehensive guide to mastering composition techniques and elevate your photography to professional levels. Dive deeper into the art of visual storytelling with our tailored workshops and online tutorials. Click here to learn more and sign up today!

Verdant English countryside under a clear sky.

What Makes Telephoto Landscape Photography So Powerful And Overlooked

Introduction

Landscape photography is not just about capturing what you see; it’s about conveying how you see it. The use of a telephoto lens in landscape photography opens up a realm of possibilities, allowing photographers to compress distances, isolate subjects, and capture details that transform the ordinary into the extraordinary.

The Unseen Majesty of Far-Off Landscapes

A telephoto lens, typically ranging from 70mm to 200mm or more, offers a unique perspective in landscape photography. It can transform a scene, bringing distant elements into sharp focus and creating a sense of intimacy with the vastness of nature. Mountains become more majestic, forests more intricate, and horizons more captivating.

Storytelling Through Isolation

In the vast canvas of a landscape, a telephoto lens allows photographers to isolate singular elements, turning them into the protagonists of the scene. A single tree against the backdrop of rolling hills, a solitary boat on a vast lake, or a distant farmhouse set against the mountainside – each becomes a story waiting to be told.

The Layered World: Compressing Depth for Impact

Telephoto lenses compress the perceived distance between foreground and background, creating a layered effect that adds depth and drama to a photograph. This technique is particularly powerful in landscapes, where the layering of hills, valleys, and cloud formations can create a striking visual narrative.

Colorful sunset clouds over Rabat.

Creative Process: The Art of Seeing Differently

The creative process with a telephoto lens in landscape photography is as much about patience and observation as it is about technical skill. It involves understanding the interplay of light and shadow, recognizing patterns and textures from a distance, and anticipating how elements in nature might align to create a compelling composition.

  1. Observation and Patience: Spend time observing your landscape. Notice how the light changes throughout the day and how it interacts with the elements within your frame.
  2. Composition and Framing: With a narrower field of view, composition becomes crucial. Experiment with different angles and positions to find the most compelling way to frame your subject.
  3. Embrace the Weather: Overcast days, misty mornings, and even light rain can add mood and depth to your landscapes. Don’t shy away from less-than-perfect weather conditions.

Tips for Aspiring Landscape Photographers

For those starting in telephoto landscape photography, here are some tips to guide your journey:

  1. Invest in a Quality Tripod: Stability is key in telephoto photography. A sturdy tripod will help eliminate camera shake and ensure sharp images.
  2. Experiment with Focal Lengths: Different focal lengths offer different perspectives. Experiment to find the right balance between subject isolation and environmental context.
  3. Understand Your Lens: Spend time getting to know your lens. Understand its strengths and limitations, especially in terms of aperture and depth of field.
  4. Practice Manual Focus: Sometimes, auto-focus may not accurately capture your intended subject. Practicing manual focus gives you more control, especially in complex visual environments.

Conclusion: A Journey of Discovery

Embarking on landscape photography with a telephoto lens is a journey of discovery and creativity. It challenges conventional perspectives, encourages exploration of the unseen, and enhances storytelling through visuals. The power of a telephoto lens lies not just in its ability to bring distant subjects closer but in its capacity to transform the way we perceive and interpret the natural world around us.

Abstraction in Architecture showing a Colorful kaleidoscope of Manhattan Loft Gardens.

How To Understand Abstraction In Architecture Through Geometry

Introduction: The Photographer’s Role in Revealing Architectural Abstraction

As photographers, we’re often taught to see the world through light, lines, and form—but when it comes to architecture, there’s a deeper layer waiting to be uncovered. Abstraction in architecture isn’t just about minimalism or geometric patterns; it’s about perceiving the essence of a structure beyond its function or façade. Through the photographer’s lens, abstraction becomes a visual language—one that distills buildings into rhythm, repetition, contrast, and shape.

Unlike architects, who design from the inside out, we document from the outside in. That difference in perspective is powerful. Photography gives us the ability to transform concrete into concept, to frame a detail so closely that it becomes unfamiliar, or to step so far back that the building becomes a brushstroke in the landscape.

But how do we train our eye to see abstractly? How can we use geometry to reveal, not just represent, the spaces we move through every day? In this guide, we’ll break down the artistic and technical approaches that allow photographers to make architectural abstraction not just visible—but unforgettable.


Understanding Abstraction in Architecture Through Form and Design


What Is Abstraction in Architecture?


At its core, abstraction in architecture is the process of distilling form down to its fundamental elements—line, shape, texture, and space. It removes the narrative, strips away function, and asks the viewer to focus instead on pure form. For photographers, this abstraction is fertile ground for visual exploration. It allows us to isolate moments of design that might otherwise be overlooked: a repeating series of windows, the negative space between two walls, the intersection of planes under morning light.

Unlike representational photography, which often aims to document a building in its entirety, abstract architectural photography zeroes in on fragments. These fragments may not “explain” the structure, but they reveal something deeper—its rhythm, its proportions, or its emotional resonance.


The Geometry Behind Abstract Design


Geometry is the architect’s toolkit—and the photographer’s playground. From the triangle-heavy compositions of brutalist architecture to the smooth elliptical curves of contemporary museums, geometric thinking runs through every stage of the design process. Abstraction invites us to lean into that geometry. A single corner, captured in sharp contrast, might read like a painting. A steel column, reflected and reframed, can become an arrow cutting through negative space.

This isn’t accidental. Many architects rely heavily on geometry to guide their concepts—from sacred ratios in classical buildings to modular grids in modern design. As photographers, our job is to uncover these systems and translate them visually.


Modern and Postmodern Structures as Abstract Subjects


Contemporary architecture lends itself beautifully to abstraction. Think of the fragmented lines of Zaha Hadid’s designs or the crystalline forms of Daniel Libeskind. These buildings often defy symmetry and challenge our sense of balance—yet that tension is exactly what makes them compelling photographic subjects.

In photographing modern and postmodern buildings, abstraction becomes not just a stylistic choice, but almost a necessity. Their scale and complexity resist traditional framing. Instead, they invite cropping, isolation, and reinterpretation. The result? Images that blur the line between documentation and fine art.

Abstraction in Architecture of Southwark bridge in B&W.


Seeing Geometry Through the Lens: How Photographers Frame Abstraction


Line, Symmetry, and Negative Space


Geometry isn’t just something we capture—it’s something we compose with. As photographers, we’re constantly making decisions about where a line leads, how two shapes relate, and when to leave something out. A flat wall isn’t just a wall—it can be a canvas for balance, tension, and rhythm. The subtle curve of a staircase or the jagged silhouette of a rooftop becomes a gesture in space.

Symmetry, whether perfect or broken, is one of the most powerful tools we have to abstract a scene. When we center a doorway or mirror a reflection, we invite the viewer to focus not on what the object is, but on how it’s structured. That shift in attention is the essence of abstraction in architecture.

And then there’s negative space—the silence around the structure. In architectural photography, emptiness is as important as form. By isolating the subject against a clean sky or blank wall, we amplify its presence and transform a practical detail into a poetic composition.


Patterns, Repetition, and Texture


Architecture is full of systems: rows of windows, modular facades, tiled floors. These repeating elements can be photographed in ways that turn function into form. The longer you stare, the less it looks like a building—and the more it feels like visual music.

Texture plays a subtler but equally vital role. A concrete wall photographed at an angle might cast soft shadows that accentuate its roughness. A glass facade can reflect not just light but movement, color, even time. In abstract photography, surface becomes subject.


Light and Shadow: Shaping the Invisible


There is no abstraction without light. A plain surface becomes a sculpture when lit from the side. A shadow falling across a staircase transforms it from a route into a rhythm. Architectural photographers often work at the edges of the day—golden hour, blue hour—not just for aesthetic reasons but because that’s when light becomes structure.

We don’t need a building to say something. We need it to be still long enough for the light to reveal what it already contains. That’s what abstraction is—it’s what’s always there, waiting to be seen.

Abstraction in Architecture of Southwark bridge in B&W.


Field Techniques: Capturing Abstract Architecture in Real Settings

Equipment and Lenses That Enhance Geometry

Abstract architectural photography doesn’t demand the most expensive gear—but it does reward precision. Tilt-shift lenses, for example, allow you to maintain straight verticals while reframing structures creatively. Wide-angle lenses let you exaggerate scale and stretch space into surreal compositions. But sometimes, a simple 50mm prime is all you need to isolate form without distortion.

What matters more than the lens is how you use it. A telephoto lens can compress distance and reveal unexpected patterns in a facade. A macro lens might bring you close enough to a textured wall that it stops looking like architecture and starts reading like abstract art. The key is to choose gear that lets geometry speak clearly.

Choosing Vantage Points and Perspectives

The building doesn’t move—you do. That’s the advantage of the photographer. Elevate your view from a nearby rooftop, crouch low to exaggerate height, or align your camera so that edges frame the shot with mathematical elegance. Every step you take shifts the relationship between the lines in the scene—and with it, the abstraction you’re creating.

Reflection is another tool in your kit. Glass, water, metal—these surfaces let you duplicate, distort, or obscure form. A single shot through a windowpane can layer architecture on top of itself, creating ghostly repetitions and nested geometries.

Minimalism and Isolation in Composition

One of the most effective strategies in abstract photography is subtraction. Don’t show everything—show only what matters. Crop aggressively. Center one detail. Frame so tight that the context disappears. When a photo doesn’t “make sense” immediately, it forces the viewer to engage more deeply, to look again.

Minimalism isn’t about emptiness; it’s about emphasis. When you strip away clutter, you give shape the chance to stand alone. And in architectural photography, that can turn a mundane support beam into a sculpture.

From Observation to Interpretation: Developing an Abstract Eye

You can’t force abstraction—it has to emerge from how you see. Developing an “abstract eye” as a photographer means learning to look at buildings as more than structures. Instead of asking, What is this? ask, What does this feel like? What shapes are hidden in plain sight? The more you train yourself to notice form, the more you’ll recognize the moments when geometry becomes something else: movement, mood, metaphor.

Walking through a city becomes a kind of sketching exercise. You start to see how morning light slices between towers. How a row of vents becomes a barcode. How reflection can fracture form until the familiar looks foreign. These are not accidents—they’re opportunities.

One powerful habit is to slow down. Choose a single building. Walk around it for 30 minutes without taking a photo. Notice the way its lines intersect, where the materials change, what it hides when viewed from the side. When you finally lift your camera, you’ll know what to look for.

And don’t wait for perfect conditions. Some of the most abstract images are taken in harsh sunlight, rain, or deep shadow. These extremes help break away from realism and into emotion—something far more powerful than documentation.

Abstraction in Architecture of Southwark bridge in B&W.


Post-Processing Abstract Architectural Photos


Enhancing Geometry Through Contrast and Clarity


Shooting abstract architecture is only half the equation—editing is where structure often becomes sculpture. One of the most effective ways to emphasize abstraction in architecture is by boosting local contrast and sharpness along edges. Architectural lines thrive on definition. With clarity adjustments, mid-tones sharpen and give geometric elements a crisp, almost tactile feel.

Dodging and burning—subtly lightening or darkening parts of an image—can guide the viewer’s eye through the frame, reinforcing flow and rhythm. With abstraction, you’re not just correcting reality; you’re interpreting it.


Cropping for Abstraction


Sometimes a photo only becomes abstract after the fact. Cropping is a powerful way to eliminate narrative, context, or clutter. A scene that originally included people, signage, or street details can be reduced to just curves, contrast, or texture.

In post-production, challenge yourself to see the image again—can you rotate it? Can you flip it upside down? Sometimes the most compelling abstract photos are the ones that disorient, reframe, and force the viewer to pause.


Color vs. Black and White for Mood and Structure


Color can be expressive, but it can also be distracting. In abstract architectural photography, black and white has a long legacy for a reason—it strips away surface and brings geometry forward. When color remains, it must serve the structure: monochromes that heighten emotion, complementary tones that emphasize tension.

There’s no rule—some buildings beg for their red accents to pop. Others come alive only when reduced to shape and shadow. The post-processing phase is where you decide which truth to tell.

Abstraction in Architecture of Southwark bridge in B&W.


Why Abstraction in Architecture Resonates — and Why I Keep Coming Back to It


There’s something about abstraction in architecture that continues to pull me in, even after years of photographing buildings. It’s not just about form or composition—it’s about what the structure starts to say when everything else is stripped away. A wall becomes a brushstroke. A shadow becomes a pause. A reflection becomes a question.

When I shoot abstractly, I’m not trying to explain a building. I’m trying to feel it. To find the part of it that doesn’t need context or permission. That emotional connection is what I chase—and what I hope the viewer feels too. Maybe it’s a quiet stillness. Maybe it’s disorientation. Maybe it’s awe. Whatever it is, it lives in that space between recognition and imagination.

Abstraction also challenges me intellectually. When I frame something in a way that removes its function or identity, I start to ask new questions: What am I really looking at? What’s hidden here? And I love that viewers do the same. They pause. They lean in. They try to solve the image. And in that moment, they’re not just seeing—they’re engaging.

Over time, abstraction has become more than just a technique in my photography. It’s become part of my visual language. It’s how I process space. How I create rhythm. How I say something without words.

I’ve learned that you don’t need iconic buildings or perfect light to make abstract work. You need patience. Curiosity. The willingness to see something ordinary from an angle no one else has considered. That’s how abstraction becomes not just a style—but a signature.

Frequently Asked Questions

To me, abstraction in architecture means isolating a building’s essence—its shapes, rhythms, or surfaces—and capturing it without needing to explain what it is. It’s about creating an image that communicates feeling or structure, not just function. A wall becomes more than a wall when you show how it bends light or cuts through space.

Start by slowing down. Look at buildings without trying to capture the whole thing—focus on lines, contrast, and materials. Ask yourself, what happens if I crop here? What if I turn the frame sideways? Abstraction often begins where context ends.

No, but certain tools help. A wide-angle lens can exaggerate perspective, while a telephoto lens flattens space and reveals patterns. What matters most is how you use light, line, and framing—not the gear.

It depends on the image. Black and white can reduce distraction and make geometry stand out, especially when working with strong contrast or texture. But some structures rely on color for their abstract impact. I decide in post—based on which version best supports the mood I want to evoke.

You can do it anywhere. Abstraction isn’t about the fame of the building—it’s about how you see it. Some of my favorite abstract shots come from side streets, parking garages, or municipal buildings. It’s about perspective, not prestige.