Conclusion: Integrating Amazing Techniques for Photographic Mastery

Introduction: Synthesizing Photographic Skills

As we conclude our series on photographic techniques, the focus shifts to integrating these diverse skills into a cohesive practice. Mastery in photography is not just about understanding individual techniques but about combining them artfully to create compelling and dynamic images.

The Journey to Photographic Mastery

Photographic mastery is achieved through the synthesis of various techniques, from understanding composition and lighting to mastering the decisive moment and storytelling. This guide will explore how to weave these elements together seamlessly.

Creative Process: Blending Techniques for Impact

  • Assessing the Scene: Evaluate each scene with a multi-faceted approach, considering composition, lighting, color, and narrative elements.
  • Combining Techniques: Learn to combine techniques such as the Rule of Thirds, leading lines, and depth of field for balanced and intriguing compositions.
  • Adapting to the Subject: Be adaptable and choose techniques that best suit your subject and the story you want to tell.

Tips for Photographers

  1. Continual Learning: Stay open to learning and experimenting with different techniques, no matter your level of experience.
  2. Practice Mindful Shooting: Be present in the moment and mindful of the various elements at play within your frame.
  3. Review and Reflect: Regularly review your work, noting how effectively you integrated different techniques and where improvements can be made.
  4. Seek Inspiration: Draw inspiration from a range of sources, including other photographers, art forms, and your surroundings.

Advanced Techniques for Integration

  • Thematic Series: Work on thematic series where you can apply and integrate various techniques around a central subject or theme.
  • Post-Processing Skills: Enhance your integration skills with post-processing, where you can further adjust and combine elements like color balance, contrast, and composition.
  • Creative Experimentation: Don’t be afraid to experiment with unconventional combinations of techniques to find your unique style.

Practical Applications in Various Genres

  • Landscape Photography: Integrate compositional rules with an understanding of natural light and moments to capture breathtaking landscapes.
  • Portrait Photography: Combine lighting techniques with emotional expression and compositional skills for impactful portraits.
  • Street Photography: Use a blend of anticipation for decisive moments, composition, and storytelling to capture the essence of street life.

Conclusion: The Art of Integration for Mastery

Achieving mastery in photography is a continuous journey of learning, experimenting, and integrating. By skillfully blending various techniques, photographers can elevate their work from mere images to artful expressions.

O Carroll, B. (2016). 28 Composition Techniques That Will Improve Your Photos.

References

O Carroll, B. (2016). 28 Composition Techniques That Will Improve Your Photos. [online] PetaPixel. Available at:

https://petapixel.com/photography-composition-techniques/

Layered composition at Groenerei Canal, Bruges.

Layers in Frame: Creating Amazing Depth and Narrative Photographs

Introduction: The Art of Layering in Photography

Layering is a powerful compositional technique in photography that involves placing elements at various distances from the camera. This approach creates depth, complexity, and a sense of narrative within the frame. Our guide explores how to skillfully use layering to enhance your photographic storytelling.

Understanding Layering for Depth and Narrative

Layering in photography is about more than just depth—it’s about constructing a story within a single frame. By thoughtfully positioning elements in the foreground, middle ground, and background, photographers can create engaging, multi-dimensional images.


Layered composition at Groenerei Canal, Bruges.

O Carroll, B. (2016). 28 Composition Techniques That Will Improve Your Photos.

Creative Process: Building Layers in Composition

  • Identifying Foreground, Middle Ground, and Background: Start by assessing your scene and identifying elements that can be incorporated into different layers.
  • Positioning Elements: Place subjects or objects in a way that they interact across the layers, leading the viewer’s eye through the image.
  • Balancing the Composition: Ensure that each layer contributes to the overall balance and narrative of the image without overpowering the others.

Tips for Photographers

  1. Use Depth of Field: Adjust your depth of field to either isolate a layer or keep multiple layers in focus, depending on your narrative intent.
  2. Find Natural Frames: Look for natural frames in the foreground to add depth and focus to subjects in the middle or background.
  3. Experiment with Perspectives: Changing your perspective can reveal new layering opportunities within a scene.
  4. Consider Lighting: Lighting can dramatically affect how layers interact. Use light and shadow to separate or blend different layers.

Advanced Techniques in Layered Composition

  • Juxtaposition of Elements: Place contrasting elements in different layers to add visual interest and complexity.
  • Reflective Surfaces: Utilize mirrors, water, or windows to add reflective layers that enhance the narrative.
  • Leading Lines Across Layers: Use leading lines to guide the viewer’s eye across multiple layers in the frame.

Practical Applications in Various Genres

  • Street Photography: Capture the dynamism of urban life by layering people, architecture, and urban elements.
  • Landscape Photography: Compose landscapes with distinct layers like foreground rocks, a mid-ground river, and background mountains.
  • Portrait Photography: Use layered backgrounds to add context and depth to your portraits, telling a story about the subject.

Conclusion: The Multidimensional Impact of Layering

Mastering the technique of layering in photography allows you to create images with enhanced depth, complexity, and narrative power. It challenges photographers to see and think in multiple dimensions, elevating their visual storytelling.

References

O Carroll, B. (2016). 28 Composition Techniques That Will Improve Your Photos. [online] PetaPixel. Available at:

https://petapixel.com/photography-composition-techniques/

[Accessed 14 December]

Let the Eye Wander: Crafting Complex and Amazing Scenes

Introduction: The Intricacy of Complex Scenes

Creating complex scenes in photography is an art that involves arranging multiple elements in a frame in a harmonious yet intricate manner. This guide will delve into how to effectively compose these scenes to captivate and lead the viewer’s eye through a visual journey within your photograph.

Understanding Complex Scene Composition

Complex scene composition is about more than just filling the frame with elements; it’s about creating a narrative, evoking emotions, and guiding the viewer’s eye through the image. The key is to maintain a balance that intrigues without overwhelming.

Creative Process: Building Complex Compositions

  • Identifying Key Elements: Start by identifying the main elements of your scene. These could be subjects, colors, patterns, or textures that you want to highlight.
  • Layering Your Composition: Think in terms of layers – foreground, middle ground, and background. Each layer should contribute to the overall scene without cluttering it.
  • Creating Visual Pathways: Arrange elements in a way that creates a natural flow or pathway for the eye to follow through the scene.

Tips for Photographers

  1. Balance is Crucial: Ensure that your composition is balanced. Use color, light, and shadow to create visual harmony amidst the complexity.
  2. Utilize Leading Lines: Incorporate leading lines to guide the viewer’s eye through the photograph.
  3. Play with Depth of Field: Use depth of field creatively to highlight certain parts of your scene while allowing others to recede into soft focus.
  4. Keep the Viewer Engaged: Arrange elements so that the viewer discovers something new each time they look at the image.

Advanced Techniques in Complex Scene Composition

  • Juxtaposition: Use juxtaposition to add interest and contrast within the scene.
  • Color Theory: Apply color theory to create a visual flow and harmony between various elements.
  • Repetition and Patterns: Utilize repetition and patterns to create a rhythm in your composition.

Practical Applications in Various Genres

  • Street Photography: Capture the complexity of urban life, focusing on the interplay between people, architecture, and urban elements.
  • Landscape Photography: Compose layered landscape scenes with elements like trees, rocks, water, and sky to add depth.
  • Event Photography: Capture the hustle and bustle of events, ensuring each element contributes to the story of the event.

Conclusion: The Art of Visual Complexity

Mastering complex scene composition is a journey in learning how to see and convey intricacy in a harmonious way. It challenges photographers to create images that are rich in detail and story, offering new discoveries with every view.

O Carroll, B. (2016). 28 Composition Techniques That Will Improve Your Photos.

References

O Carroll, B. (2016). 28 Composition Techniques That Will Improve Your Photos. [online] PetaPixel. Available at:

https://petapixel.com/photography-composition-techniques/

[Accessed 14 December]

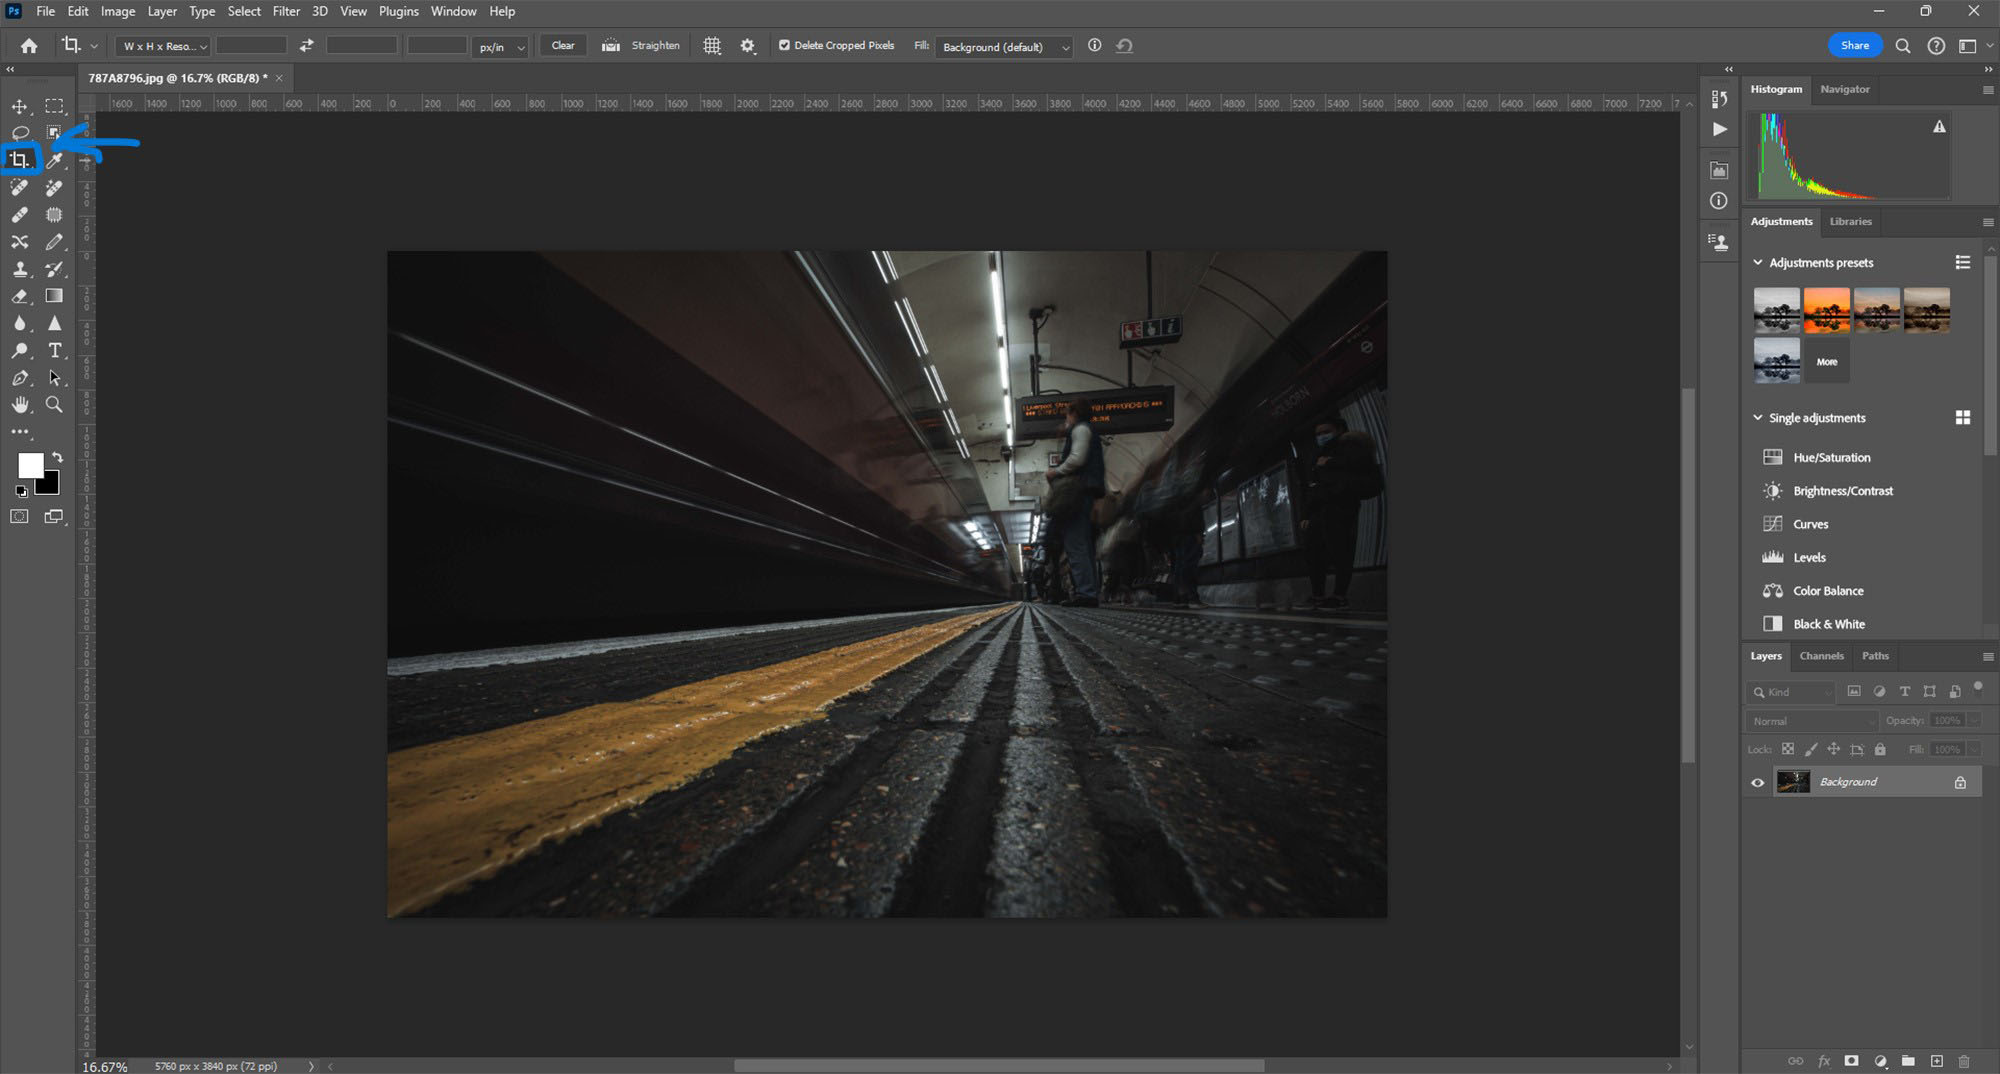
First demonstration of Golden Triangles in Photoshop.

Golden Triangles: Mastering Amazing Compositional Techniques

Introduction: The Geometry of Golden Triangles

Golden Triangles is an advanced compositional technique that involves dividing the frame into a series of triangles of differing sizes, based on diagonals, to create dynamic and balanced images. This technique is particularly effective for adding a sense of movement, direction, and harmony to photographs.

Understanding Golden Triangles

The principle behind Golden Triangles is to use diagonal lines that intersect at right angles, forming triangles within the image frame. These triangles guide the viewer’s eye through the composition, leading to a visually satisfying experience.

Creative Process: Implementing Golden Triangles

  • Visualizing Diagonals and Triangles: Start by imagining diagonal lines across your frame. Where these lines intersect, form triangles to place your compositional elements.
  • Balancing the Frame: Use the triangles as a guide to balance the elements in your scene – placing subjects, objects, or areas of contrast within or along these triangles.
  • Dynamic Composition: Look for natural formations or arrange your subjects in a way that aligns with these diagonal lines and triangles.

Tips for Photographers

  1. Practice Visualization: Regularly practice visualizing the golden triangle grid in various scenes to become adept at identifying compositional opportunities.
  2. Use Grids in Post-Processing: Many editing software tools allow you to overlay grids. Use a golden triangle grid during post-processing to refine your composition.
  3. Combine with Other Rules: Don’t hesitate to combine golden triangles with other compositional rules like the Rule of Thirds or leading lines for more complex compositions.
  4. Flexibility is Key: The golden triangles guideline is not rigid; use it flexibly and creatively to suit the needs of your scene.

Advanced Techniques in Golden Triangle Composition

  • Asymmetry for Interest: Use the asymmetrical nature of golden triangles to create more dynamic and interesting compositions.
  • Contrast and Color: Utilize contrasts in color, light, and shadow within the triangles to guide the viewer’s eye and add depth.
  • Layering Elements: Incorporate different elements in each triangle to create a layered, multi-dimensional effect in your photos.

Practical Applications in Various Genres

  • Landscape Photography: Use the lines of the golden triangles to align natural features like rivers, mountain ridges, or trees.
  • Urban and Architectural Photography: Apply this technique to align architectural elements and urban landscapes for a dynamic composition.
  • Portrait Photography: Position your subject along the diagonal lines or within the triangles to create a more engaging portrait.

Conclusion: Elevating Your Compositional Approach

The Golden Triangles technique is a valuable tool for photographers seeking to elevate their compositional approach. It offers a way to create images that are both dynamic and harmonious, engaging the viewer through thoughtful arrangement of visual elements.

First demonstration of Golden Triangles in Photoshop.

Tutorial: Using Golden Triangles for Composition in Photoshop

Step 1: Open Your Image

  1. Load the Image: Start by opening the image you wish to edit in Photoshop. Ensure you are working on the appropriate layer if your project has multiple layers.

Step 2: Accessing the Crop Tool

  1. Selecting the Crop Tool: Find the Crop Tool in the Photoshop toolbar, usually located on the left side of the screen. The icon looks like two intersecting right angles. Click on it or press the C key on your keyboard to activate it.
Golden Triangles technique in Photoshop.

Step 3: Setting Up Golden Triangles Grid

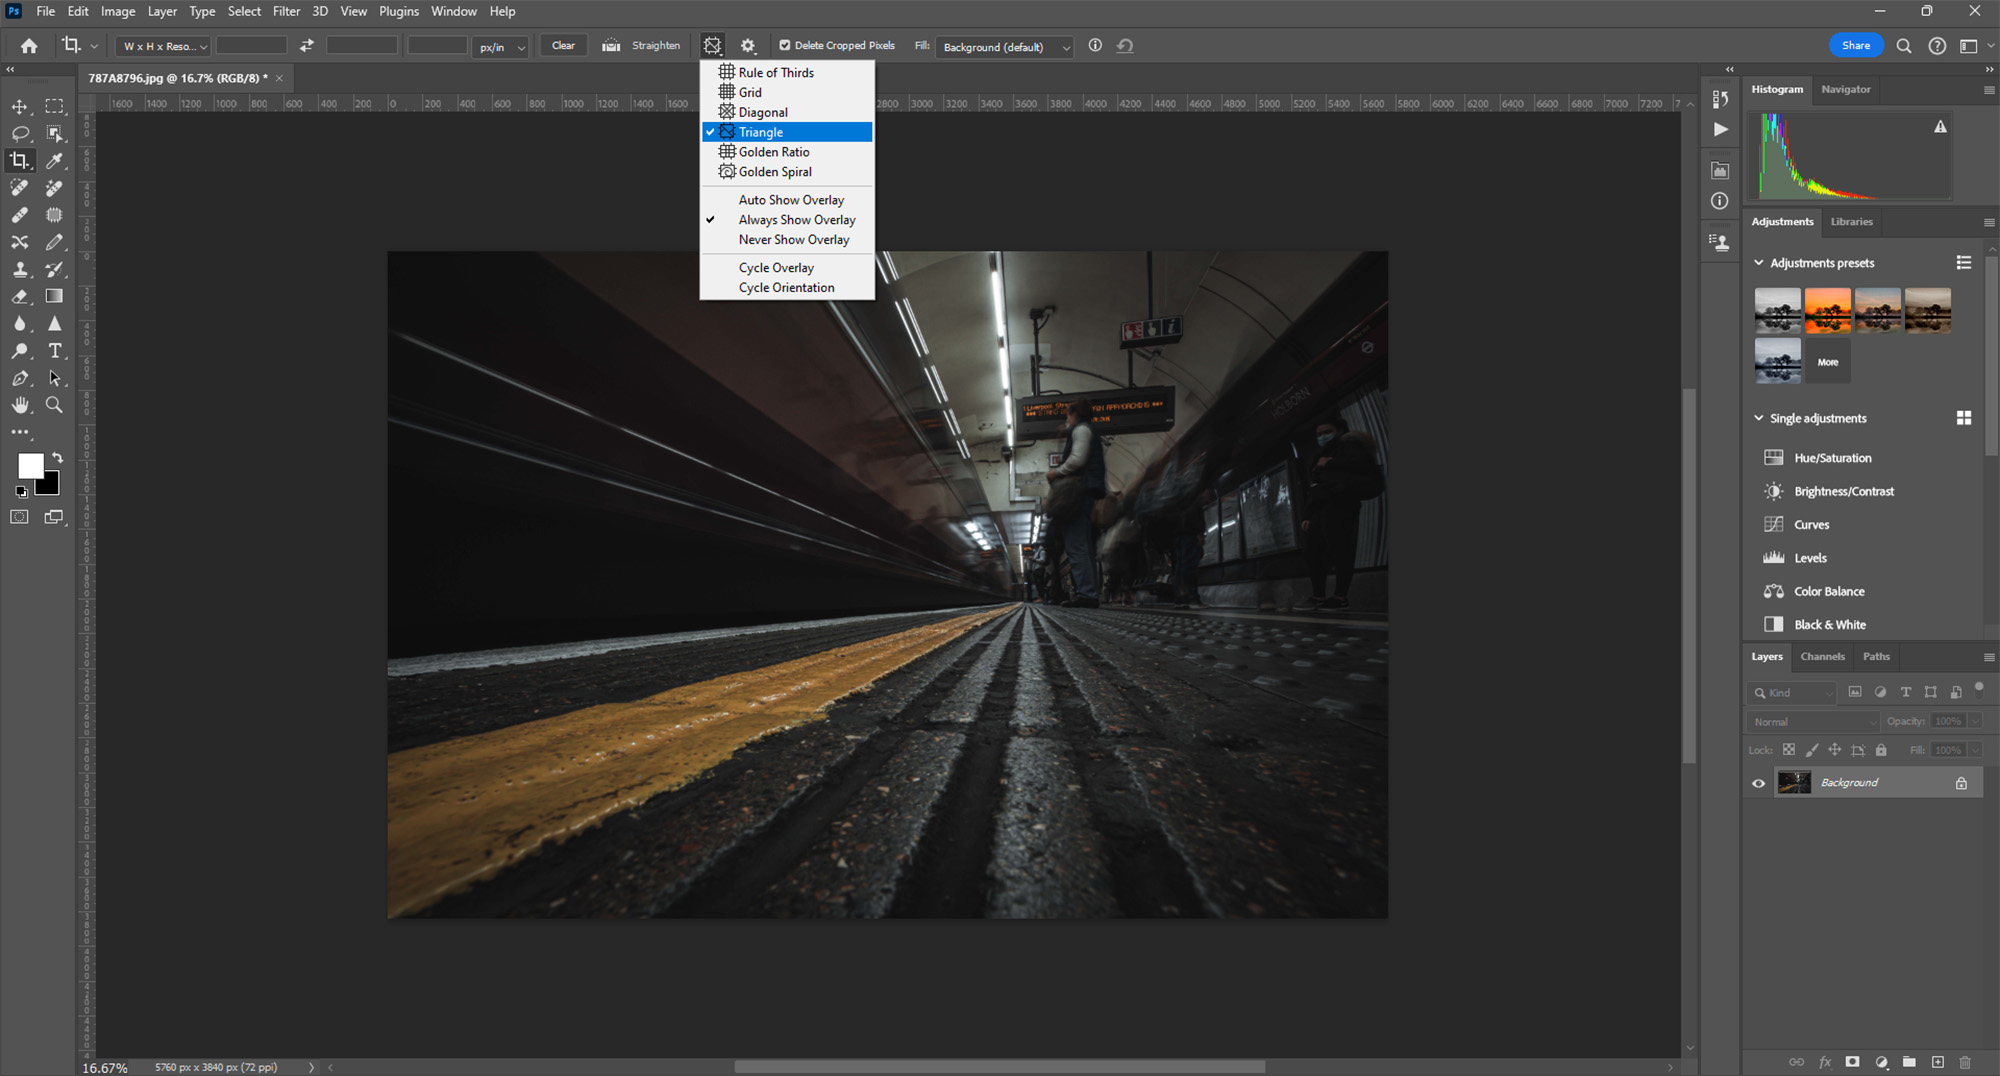
  1. Accessing Crop Tool Options: With the Crop Tool active, direct your attention to the options bar at the top of the Photoshop window.

  2. Changing to Golden Triangles Grid: Look for the overlay options, typically set to the ‘Rule of Thirds’ by default. Click on this option and from the dropdown menu, select ‘Golden Triangles’. This will change the overlay grid on your image to the Golden Triangles layout.

Advanced Golden Triangles usage in Photoshop.

Step 4: Composing with Golden Triangles

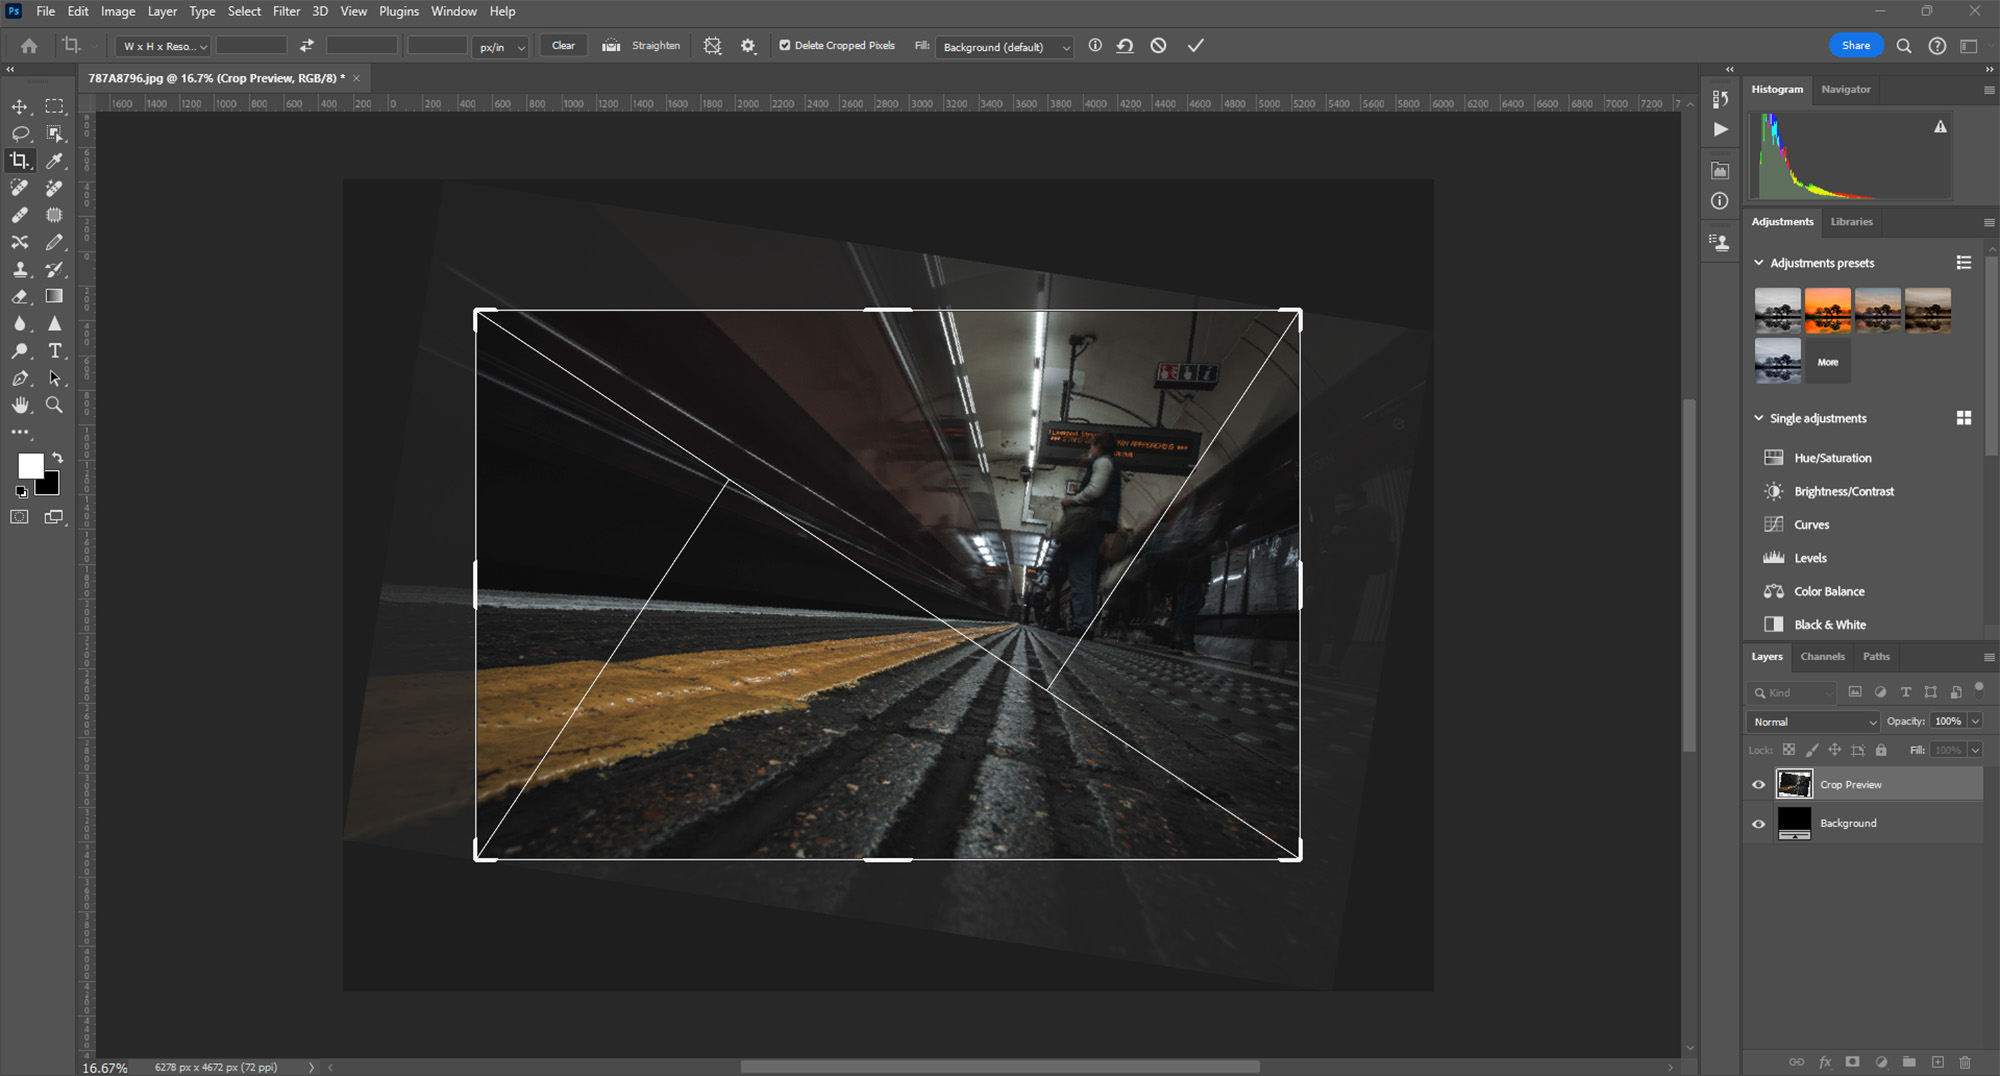
  1. Adjusting the Image to the Grid: Click and drag the corners of the crop frame to adjust your composition. Aim to align the key elements of your photo along the lines of the triangles or at their points of intersection. This technique helps in creating dynamic and balanced compositions.

  2. Rotating the Grid for Different Compositions: You can change the orientation of the Golden Triangles by cycling through different options. This can be done by pressing Shift + O while the Crop Tool is active. This allows you to explore various compositional possibilities with the triangles aligning differently with your image.

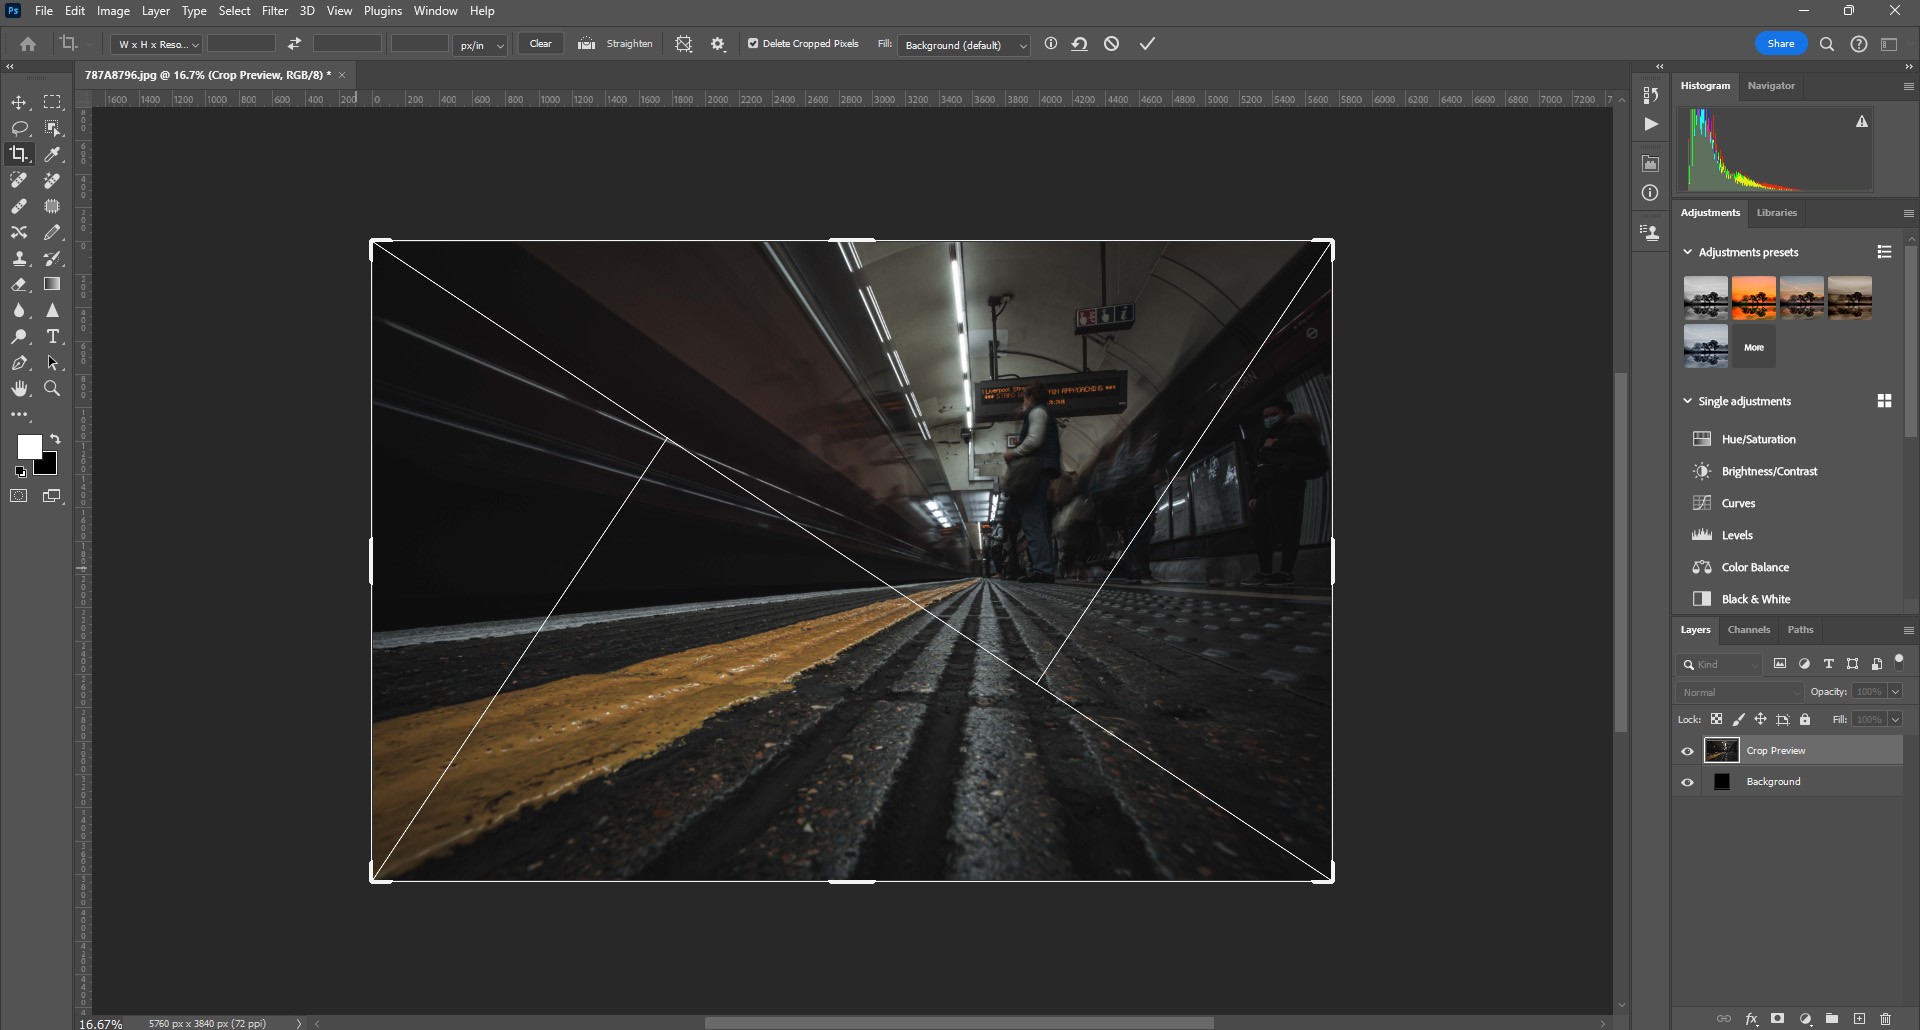
  3. Finalizing the Composition: After adjusting the image to your satisfaction according to the Golden Triangles grid, apply the crop. Press Enter or click the checkmark at the top of the window to confirm your changes.

Creative application of Golden Triangles in Photoshop.

Conclusion

Golden Triangles are an effective compositional tool, especially useful for creating tension, energy, and balance in a photograph. This technique, based on diagonal lines and asymmetrical balance, can add a dynamic element to your compositions. Photoshop’s Crop Tool with the Golden Triangles grid makes it easy to apply this principle to enhance the visual impact of your images.

O Carroll, B. (2016). 28 Composition Techniques That Will Improve Your Photos.

References

O Carroll, B. (2016). 28 Composition Techniques That Will Improve Your Photos. [online] PetaPixel. Available at:
https://petapixel.com/photography-composition-techniques/

[Accessed 14 December]

Emotional color combinations in Stratford.

Color Photograph Combinations: The Important Role of Color Theory

Introduction: The Power of Colors in Photography

Colors have a profound impact on the aesthetic and emotional appeal of photographs. Understanding color theory and how different colors interact can significantly enhance the visual storytelling of your images. This guide delves into the use of color combinations in photography, providing insights into creating harmony and contrast to evoke specific moods and themes.

Understanding Color Theory

Color theory is a set of principles used to create harmonious color combinations. In photography, this involves understanding the color wheel, complementary colors, analogous colors, and the psychological impact of different hues and shades.

Color theory in Central London architecture.

Creative Process: Crafting Colorful Compositions

  • Studying the Color Wheel: Familiarize yourself with the color wheel, identifying complementary (opposite colors) and analogous (adjacent colors) schemes.
  • Observing Your Environment: Look for natural and artificial color combinations around you. Notice how different colors interact and the emotions they evoke.
  • Experimenting with Colors: Play with various color combinations in your compositions. Experiment with dominant and accent colors to create balance.

Tips for Photographers

  1. Use Complementary Colors: Complementing colors, being opposites on the color wheel, create high contrast and vibrancy when used together.
  2. Explore Analogous Colors: Analogous colors, which sit next to each other on the color wheel, offer a more harmonious and cohesive look.
  3. Consider Color Temperature: Warm colors (reds, oranges) evoke different feelings compared to cool colors (blues, greens). Use them to set the mood of your image.
  4. Mind the Color Balance: Pay attention to how much of each color is present in the frame. Too much of a dominant color can overwhelm the viewer.

Advanced Techniques in Color Theory

  • Color Isolation: Isolate a single color against a more neutral background for a striking effect.
  • Monochromatic Themes: Experiment with monochromatic color schemes, using various shades of a single color to create depth and interest.
  • Post-Processing for Color Enhancement: Utilize post-processing tools to adjust saturation, luminance, and hue to fine-tune your color compositions.

Practical Applications in Various Genres

  • Landscape Photography: Use color theory to enhance natural scenes, balancing sky blues with earthy tones, or capturing the vibrant colors of a sunset.
  • Portrait Photography: Consider the colors in your background and clothing to complement or contrast with your subject’s features.
  • Street Photography: Capture the colorful dynamics of urban life, using colors to highlight focal points and lead the viewer’s eye.

Conclusion: Painting with Light and Colors

Color theory in photography is akin to painting with light and colors. It’s about creating a visual harmony that resonates with viewers, evoking emotions and telling stories through hues and shades.

Isolate the Subject: Clarity in Focus in Photography

Introduction: The Art of Isolating Your Subject

Isolating the subject is a powerful photographic technique that involves focusing on a single element within the frame to draw the viewer’s attention. This method is effective in creating striking images that convey a clear message or emotion, emphasizing the subject with minimal distractions.

Understanding Subject Isolation

Subject isolation is about making your main subject the unmistakable focal point of your photograph. This can be achieved through various means, such as using depth of field, contrast, lighting, or compositional techniques. It’s a way to ‘declutter’ the image and make your subject stand out.

Creative Process: Achieving Clarity in Focus

  • Identifying Your Subject: Clearly define what the main subject of your image is. It could be a person, an object, a landscape feature, etc.
  • Choosing the Right Background: Look for backgrounds that are unobtrusive and don’t compete with your subject for attention. Simple or blurred backgrounds often work best.
  • Utilizing Lighting: Use lighting to illuminate your subject. Side lighting or backlighting can be particularly effective in separating the subject from the background.

Tips for Photographers

  1. Depth of Field Mastery: Use a wide aperture to create a shallow depth of field, blurring the background and foreground to isolate the subject.
  2. Framing Techniques: Frame your subject using natural or architectural elements to draw the viewer’s eye directly to the subject.
  3. Color and Contrast: Utilize color contrasts to make your subject stand out. A brightly colored subject against a muted background can be very effective.
  4. Selective Focus: Use manual focus or selective autofocus points to ensure your subject is the sharpest element in your image.

Advanced Techniques in Subject Isolation

  • Bokeh Effect: Master the art of bokeh – a Japanese term for the aesthetic quality of the blur produced in the out-of-focus parts of an image.
  • Post-Processing: Enhance subject isolation in post-processing by adjusting brightness, contrast, or sharpness around the subject.
  • Use of Negative Space: Incorporate negative space effectively to emphasize isolation and bring focus to your subject.

Practical Applications in Various Genres

  • Portrait Photography: Isolate the subject to capture the essence of their personality and emotions.
  • Wildlife Photography: Use subject isolation to focus on a single animal, highlighting its features or behaviors.
  • Street Photography: Isolate individuals or specific interactions to tell a story or capture a moment in time.

Conclusion: Mastering the Focal Point

Isolating the subject is a skill that elevates the impact of your photography, allowing viewers to connect more deeply with the focal point of your image. It requires a combination of technical knowledge and creative vision to execute effectively.

Fill the Frame: Focusing on Amazing Photographic Details

Introduction: Embracing Detail with ‘Fill the Frame’

‘Filling the frame’ is a powerful photographic technique that involves using your camera frame to enclose a significant portion or all of a subject. This method is excellent for highlighting details, textures, and patterns, allowing the viewer to focus solely on the subject without distractions from the background or surrounding environment.

The Impact of Filling the Frame

This technique is particularly effective in drawing the viewer’s attention to specific details, creating a more intimate and immersive experience. It’s about isolating the subject, making it the undisputed focal point of your composition.

Creative Process: Mastering ‘Fill the Frame’

  • Choosing Your Subject: Look for subjects that have interesting details, textures, or patterns. These could range from the intricate lines on a leaf to the architectural details of a building.
  • Getting Close: Move closer to your subject or use a zoom lens to fill the frame with your subject. The goal is to eliminate as much of the background as possible.
  • Composition Considerations: Pay attention to the composition within your frame. The placement of your subject and how it interacts with the edges of your frame is crucial.

Tips for Photographers

  1. Use Macro Lenses for Close-Ups: Macro lenses are perfect for extreme close-up shots, allowing you to capture intricate details.
  2. Experiment with Aperture: Play with different aperture settings. A wide aperture can blur the background, while a narrow aperture can keep everything in focus.
  3. Mind the Edges: Be cautious of the edges of your frame. Clipping part of your subject can be a powerful tool but use it thoughtfully.
  4. Simplify: Avoid clutter in your frame. The more simplified and focused the composition, the more powerful the image.

Advanced Techniques in ‘Fill the Frame’

  • Selective Focusing: Use selective focus to emphasize a particular part of the subject while gently blurring the rest.
  • Creative Cropping: Don’t be afraid to crop your images in post-processing to achieve the desired ‘fill the frame’ effect.
  • Playing with Light: Use light and shadows creatively to add depth and dimension to your subject.

Practical Applications in Various Genres

  • Portrait Photography: Use ‘fill the frame’ to capture facial expressions or details like the eyes or lips.
  • Nature and Wildlife Photography: Fill the frame with a single animal or plant, highlighting its textures and features.
  • Urban and Street Photography: Capture the essence of street life or architectural details by filling the frame with your urban subject.

Conclusion: The Art of Detail in Photography

Filling the frame is more than just a technique; it’s an artistic approach to drawing the viewer’s eye into the heart of the subject. It’s about celebrating details, textures, and the essence of the subject itself.

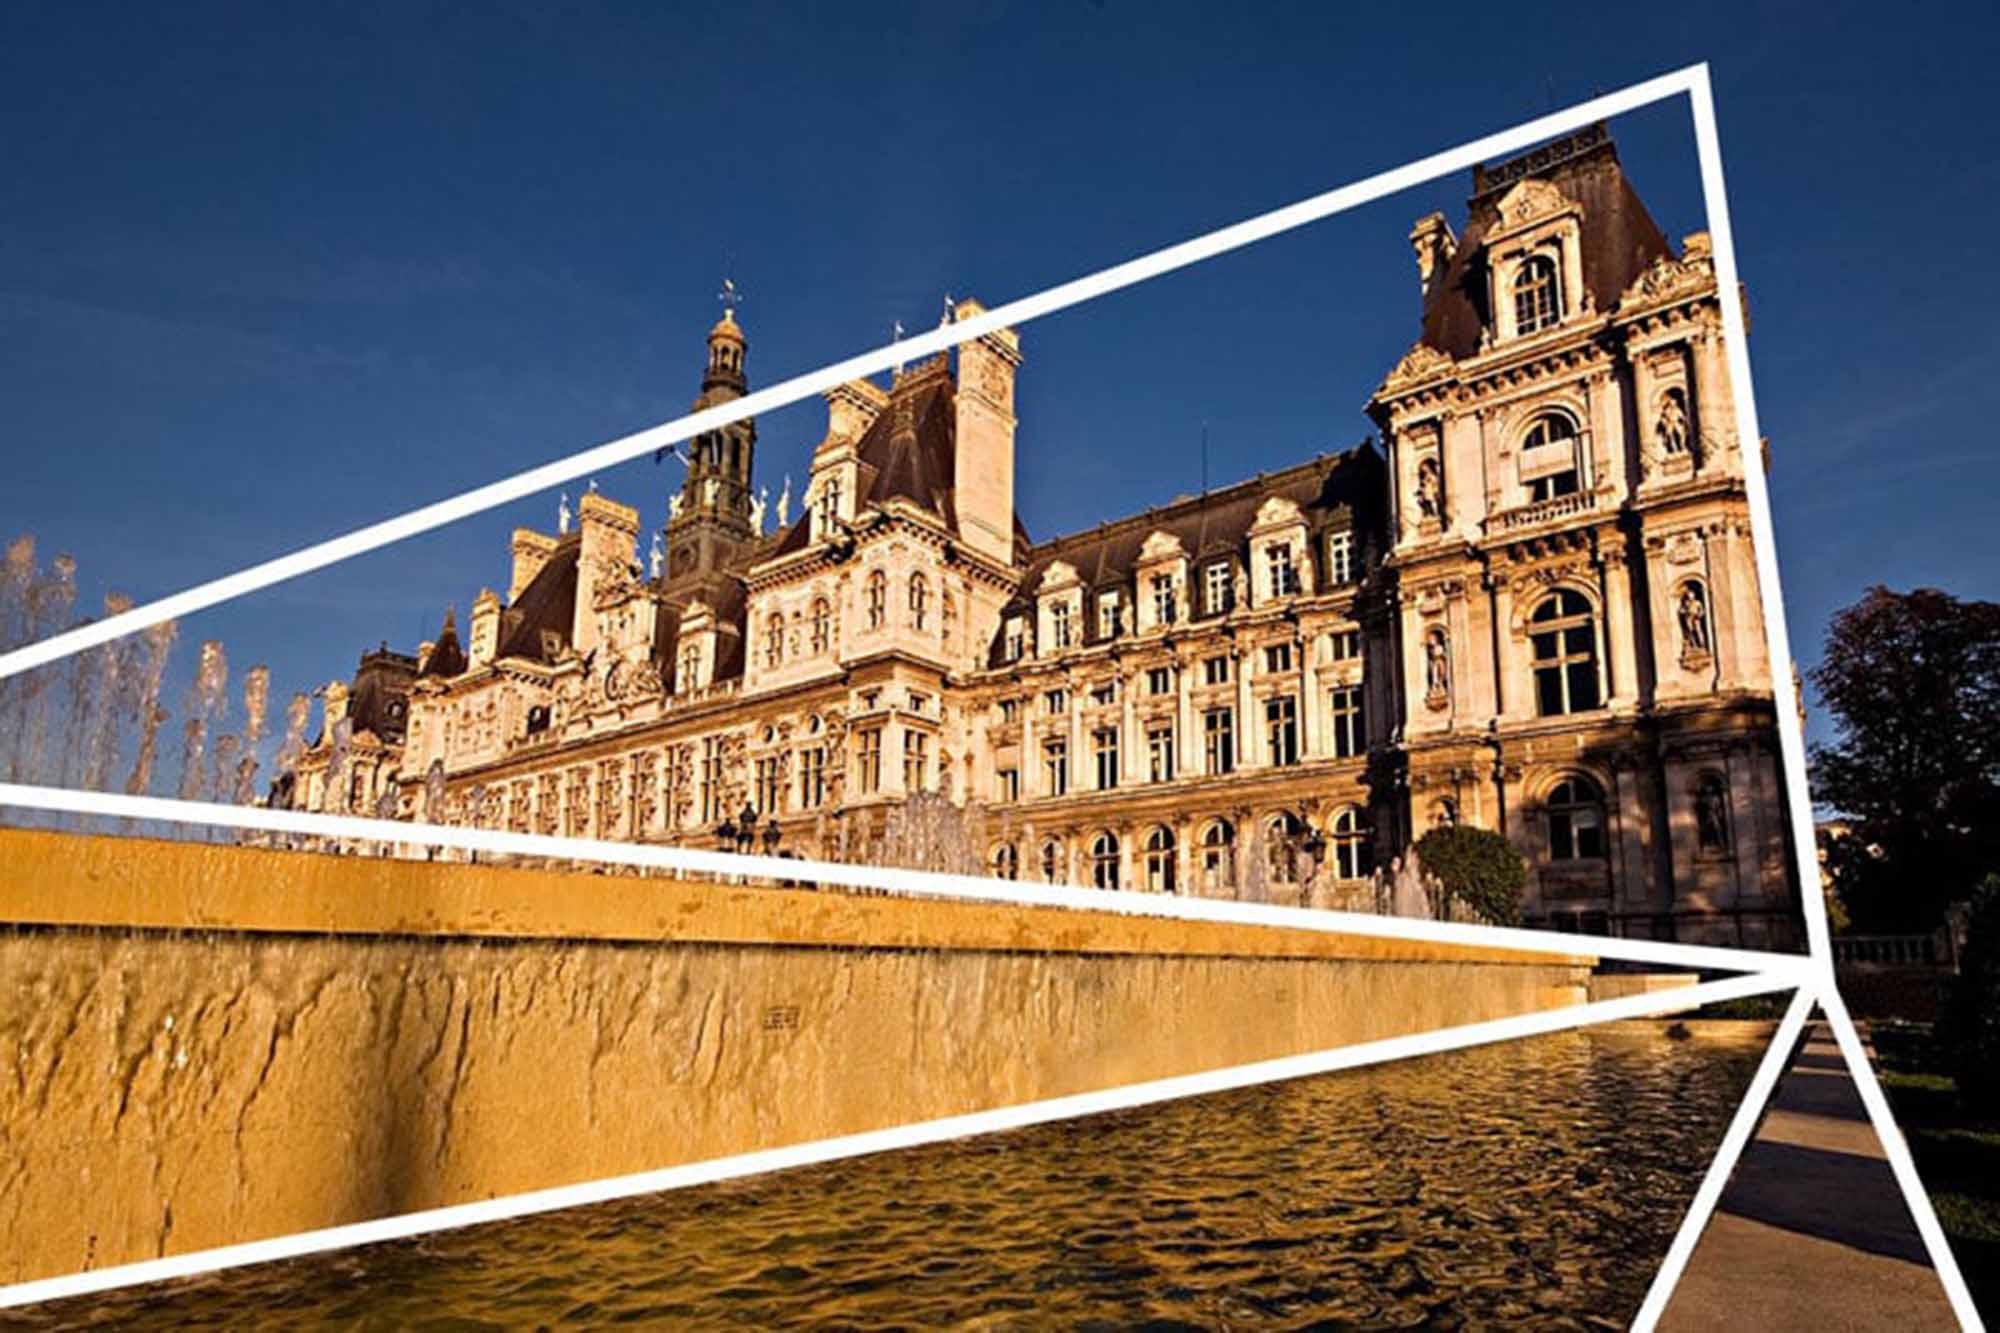
Diagonal tension at Hotel De Ville, Paris.

Diagonals and Triangles: Dynamic Tension in Photography

Introduction: Harnessing the Energy of Diagonals and Triangles

Diagonals and triangles are potent tools in the photographer’s compositional arsenal, known for adding dynamic tension and visual interest to images. This tutorial explores how to effectively utilize these elements to inject energy and direction into your photography, transforming ordinary scenes into captivating visual narratives.

Understanding Diagonals and Triangles

Diagonals are lines that traverse the frame at an angle, conveying motion, direction, and energy. Triangles, whether real or implied, add stability and balance while maintaining a sense of dynamism. Together, these elements can create a sense of movement and tension, drawing the viewer’s eye through the photograph in a purposeful manner.

Diagonal tension at Hotel De Ville, Paris.

O Carroll, B. (2016). 28 Composition Techniques That Will Improve Your Photos.

Creative Process: Implementing Diagonals and Triangles

  • Seeking Out Natural Diagonals: Start by observing your environment for natural diagonal lines – fallen trees, angled shadows, or architectural lines.
  • Creating Implied Triangles: Look for opportunities to create triangles in your composition, which can be formed by the positioning of subjects, converging lines, or even the use of light and shadow.
  • Experimenting with Angles: Change your shooting angle to transform ordinary lines into dynamic diagonals, altering the perception and impact of the scene.

Tips for Photographers

  1. Utilize Leading Lines: Diagonal lines can act as powerful leading lines, guiding the viewer’s eye towards the main subject.
  2. Balance with Triangles: Use triangles to balance your composition, ensuring that the image feels both dynamic and stable.
  3. Play with Perspectives: Shoot from high or low angles to accentuate or create diagonal elements in your composition.
  4. Combine with Other Elements: Diagonals and triangles can be combined with other compositional techniques, such as the Rule of Thirds, for even greater impact.

Advanced Techniques in Using Diagonals and Triangles

  • Converging Diagonals: Use converging diagonal lines to create a sense of depth and perspective, particularly effective in architectural and street photography.
  • Color and Texture: Enhance diagonal elements with contrasting colors and textures to add depth and interest to your compositions.
  • Juxtaposition: Create visual tension by juxtaposing diagonal lines against more stable, horizontal, or vertical elements.

Practical Applications in Various Genres

  • Landscape Photography: Use natural diagonals like rivers, mountain ridges, or tree lines to add depth and motion.
  • Urban and Street Photography: Capture the dynamic energy of city life with the diagonal lines of buildings, streets, and urban landscapes.
  • Portrait Photography: Position subjects or their features in a triangular arrangement to create engaging and balanced portraits.

Conclusion: Adding Movement and Energy

Diagonals and triangles are more than just compositional elements; they are expressions of movement and energy. By mastering their use, photographers can elevate their work from static shots to dynamic compositions that captivate and engage the viewer.

References

O Carroll, B. (2016). 28 Composition Techniques That Will Improve Your Photos. [online] PetaPixel. Available at:
https://petapixel.com/photography-composition-techniques/

[Accessed 12 December]

Layered framing in Maynooth, Ireland.

Frame Within the Frame: Depth Through Layers in Photography

Introduction: The Art of Framing in Composition

Framing within a frame is a compelling compositional technique that involves using elements within your scene to create a ‘frame’ around your subject. This method adds depth, context, and intrigue to your photographs, turning ordinary scenes into layered stories.

Understanding ‘Frame Within a Frame’

This technique is all about using elements in your environment, such as windows, doorways, arches, or even natural elements like tree branches, to create a secondary frame within your photograph. This inner frame leads the viewer’s eye to the primary subject, enhancing the narrative and depth of the image.

Framed view of St Mark's Square, Venice.

O Carroll, B. (2016). 28 Composition Techniques That Will Improve Your Photos.

Creative Process: Implementing Framing Techniques

  • Identifying Framing Elements: Start by scouting for natural or architectural elements that can act as frames in your composition.
  • Positioning Your Subject: Place your subject in a way that the framing element encapsulates or complements it, creating a focus point.
  • Experimenting with Perspectives: Change your angle and perspective to see how different frames can alter the story or mood of your image.

Tips for Photographers

  1. Look for Unique Frames: Beyond windows and doors, look for unique framing opportunities like gaps in fences, reflections, or shadows.
  2. Play with Light and Shadow: Use light and shadows within your frame to add mood and emphasize your subject.
  3. Depth of Field: Experiment with different apertures to either blur the frame for a subtle effect or keep it sharp for a more pronounced framing.
  4. Balancing Elements: Ensure your frame complements the subject without overpowering it. The frame should lead to the subject, not distract from it.

Advanced Techniques in Framing

  • Multiple Layers: Incorporate multiple layers of framing for a more complex and intriguing composition.
  • Reflections as Frames: Use reflections in water, mirrors, or glass to create a unique framing effect.
  • Contrasting Elements: Combine contrasting elements within your frame and subject for a dramatic effect.

Practical Applications in Various Genres

  • Landscape Photography: Use tree branches or rock formations to frame a stunning vista or a setting sun.
  • Urban Photography: Urban environments are rich with framing opportunities like bridges, tunnels, and building facades.
  • Portrait Photography: Frame your subject with environmental elements to add context and depth to your portraits.

Conclusion: Refining Your Photographic Eye

Mastering the ‘Frame Within a Frame’ technique is a journey towards refining your photographic eye and enhancing your ability to tell stories through images. It requires practice, creativity, and an attentive observation of your surroundings.

References

O Carroll, B. (2016). 28 Composition Techniques That Will Improve Your Photos. [online] PetaPixel. Available at:
https://petapixel.com/photography-composition-techniques/

[Accessed 12 Dec. 2023]

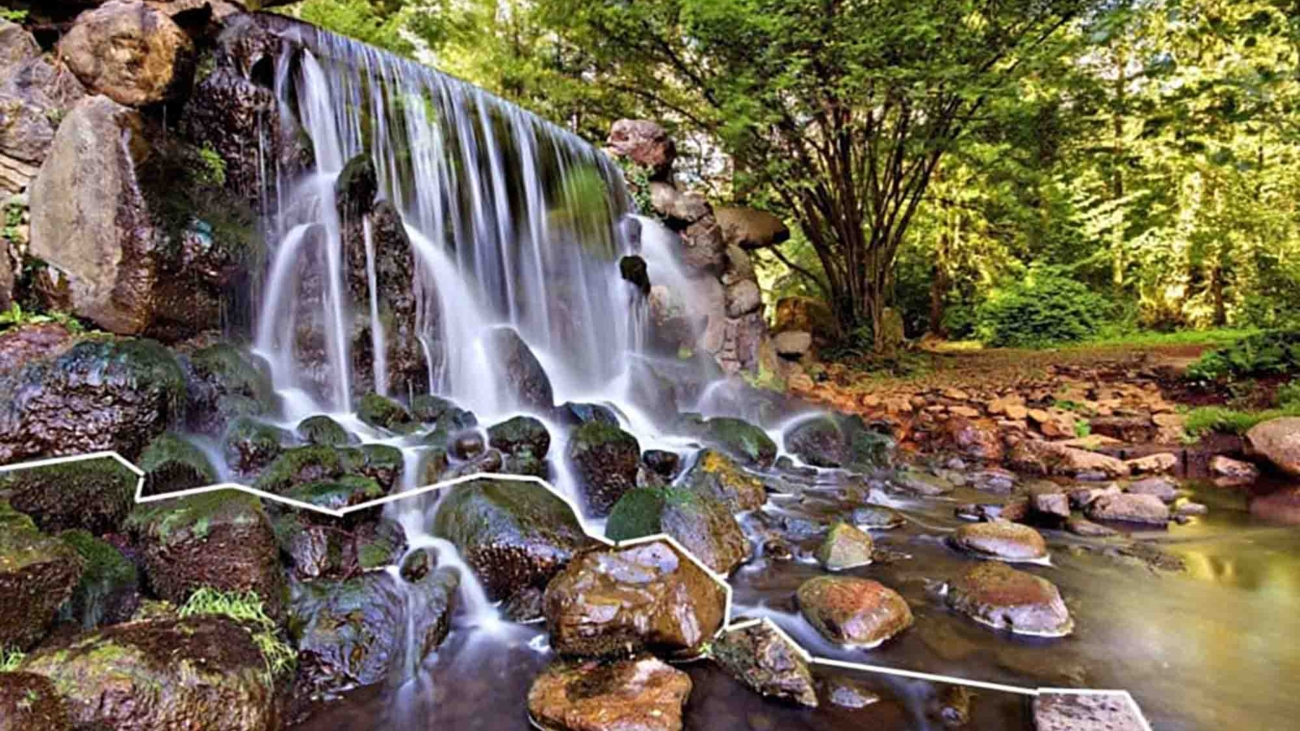
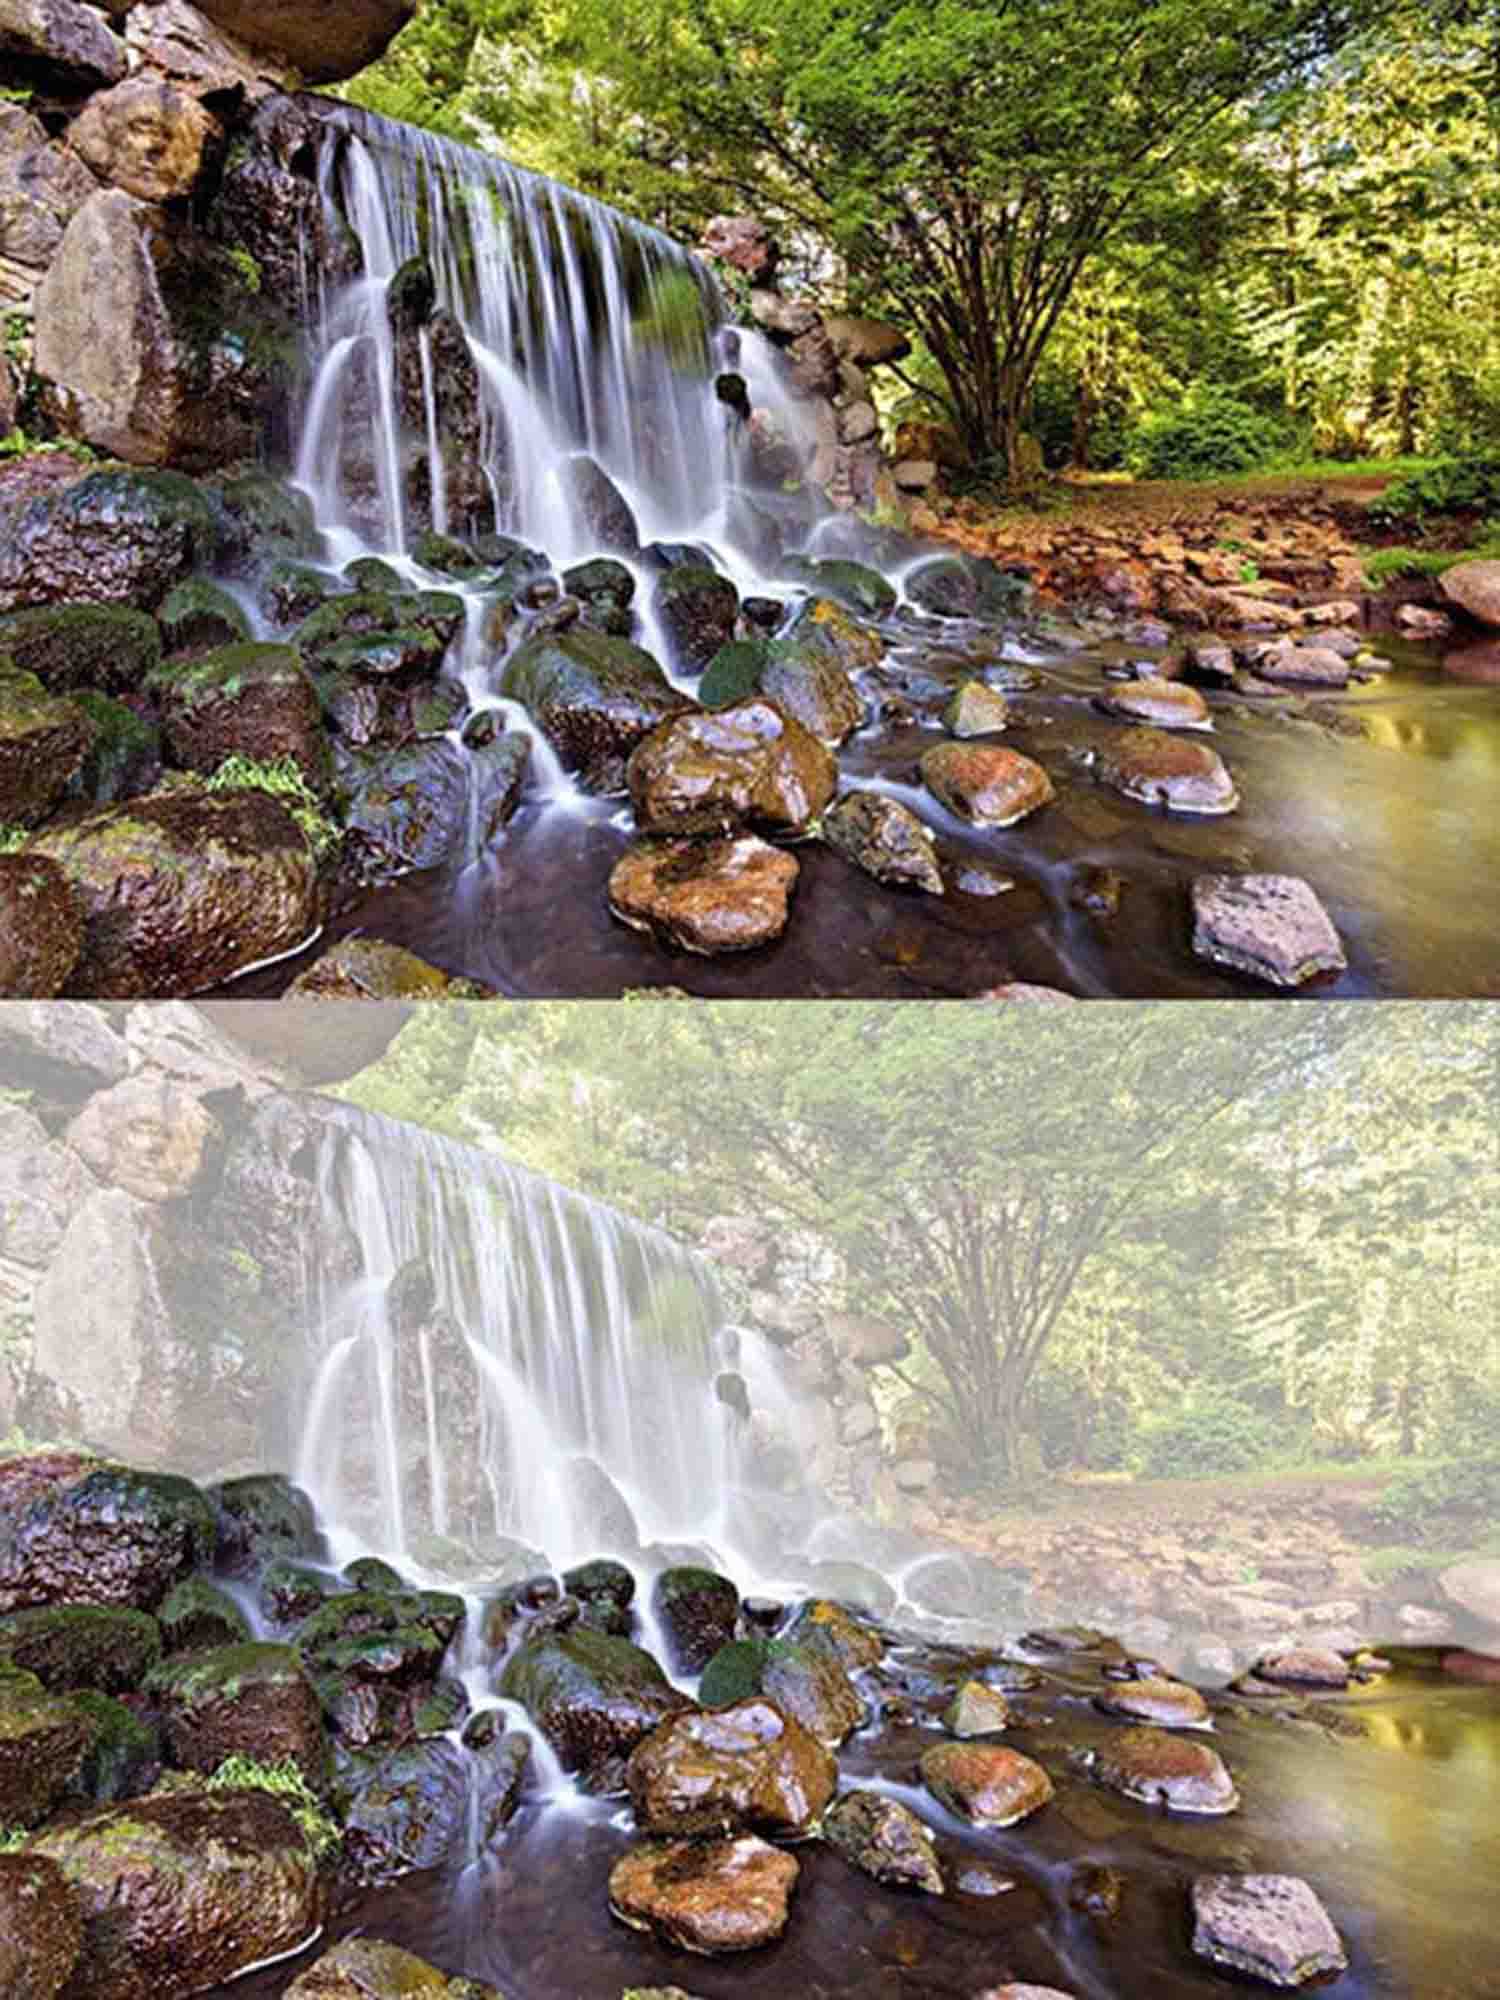
3D effect at Sonsbeek Waterfall, Arnhem.

Foreground Interest and Depth: Mastering the 3D Photography Effect

Introduction: The Magic of Depth in Photography

Foreground interest is a powerful compositional tool in photography that adds depth, leading to more dynamic and engaging images. By incorporating elements in the foreground, photographers can create a sense of three-dimensionality, drawing viewers into the scene. This technique is vital in transforming flat images into vivid, life-like experiences.

Understanding Foreground Interest and Depth

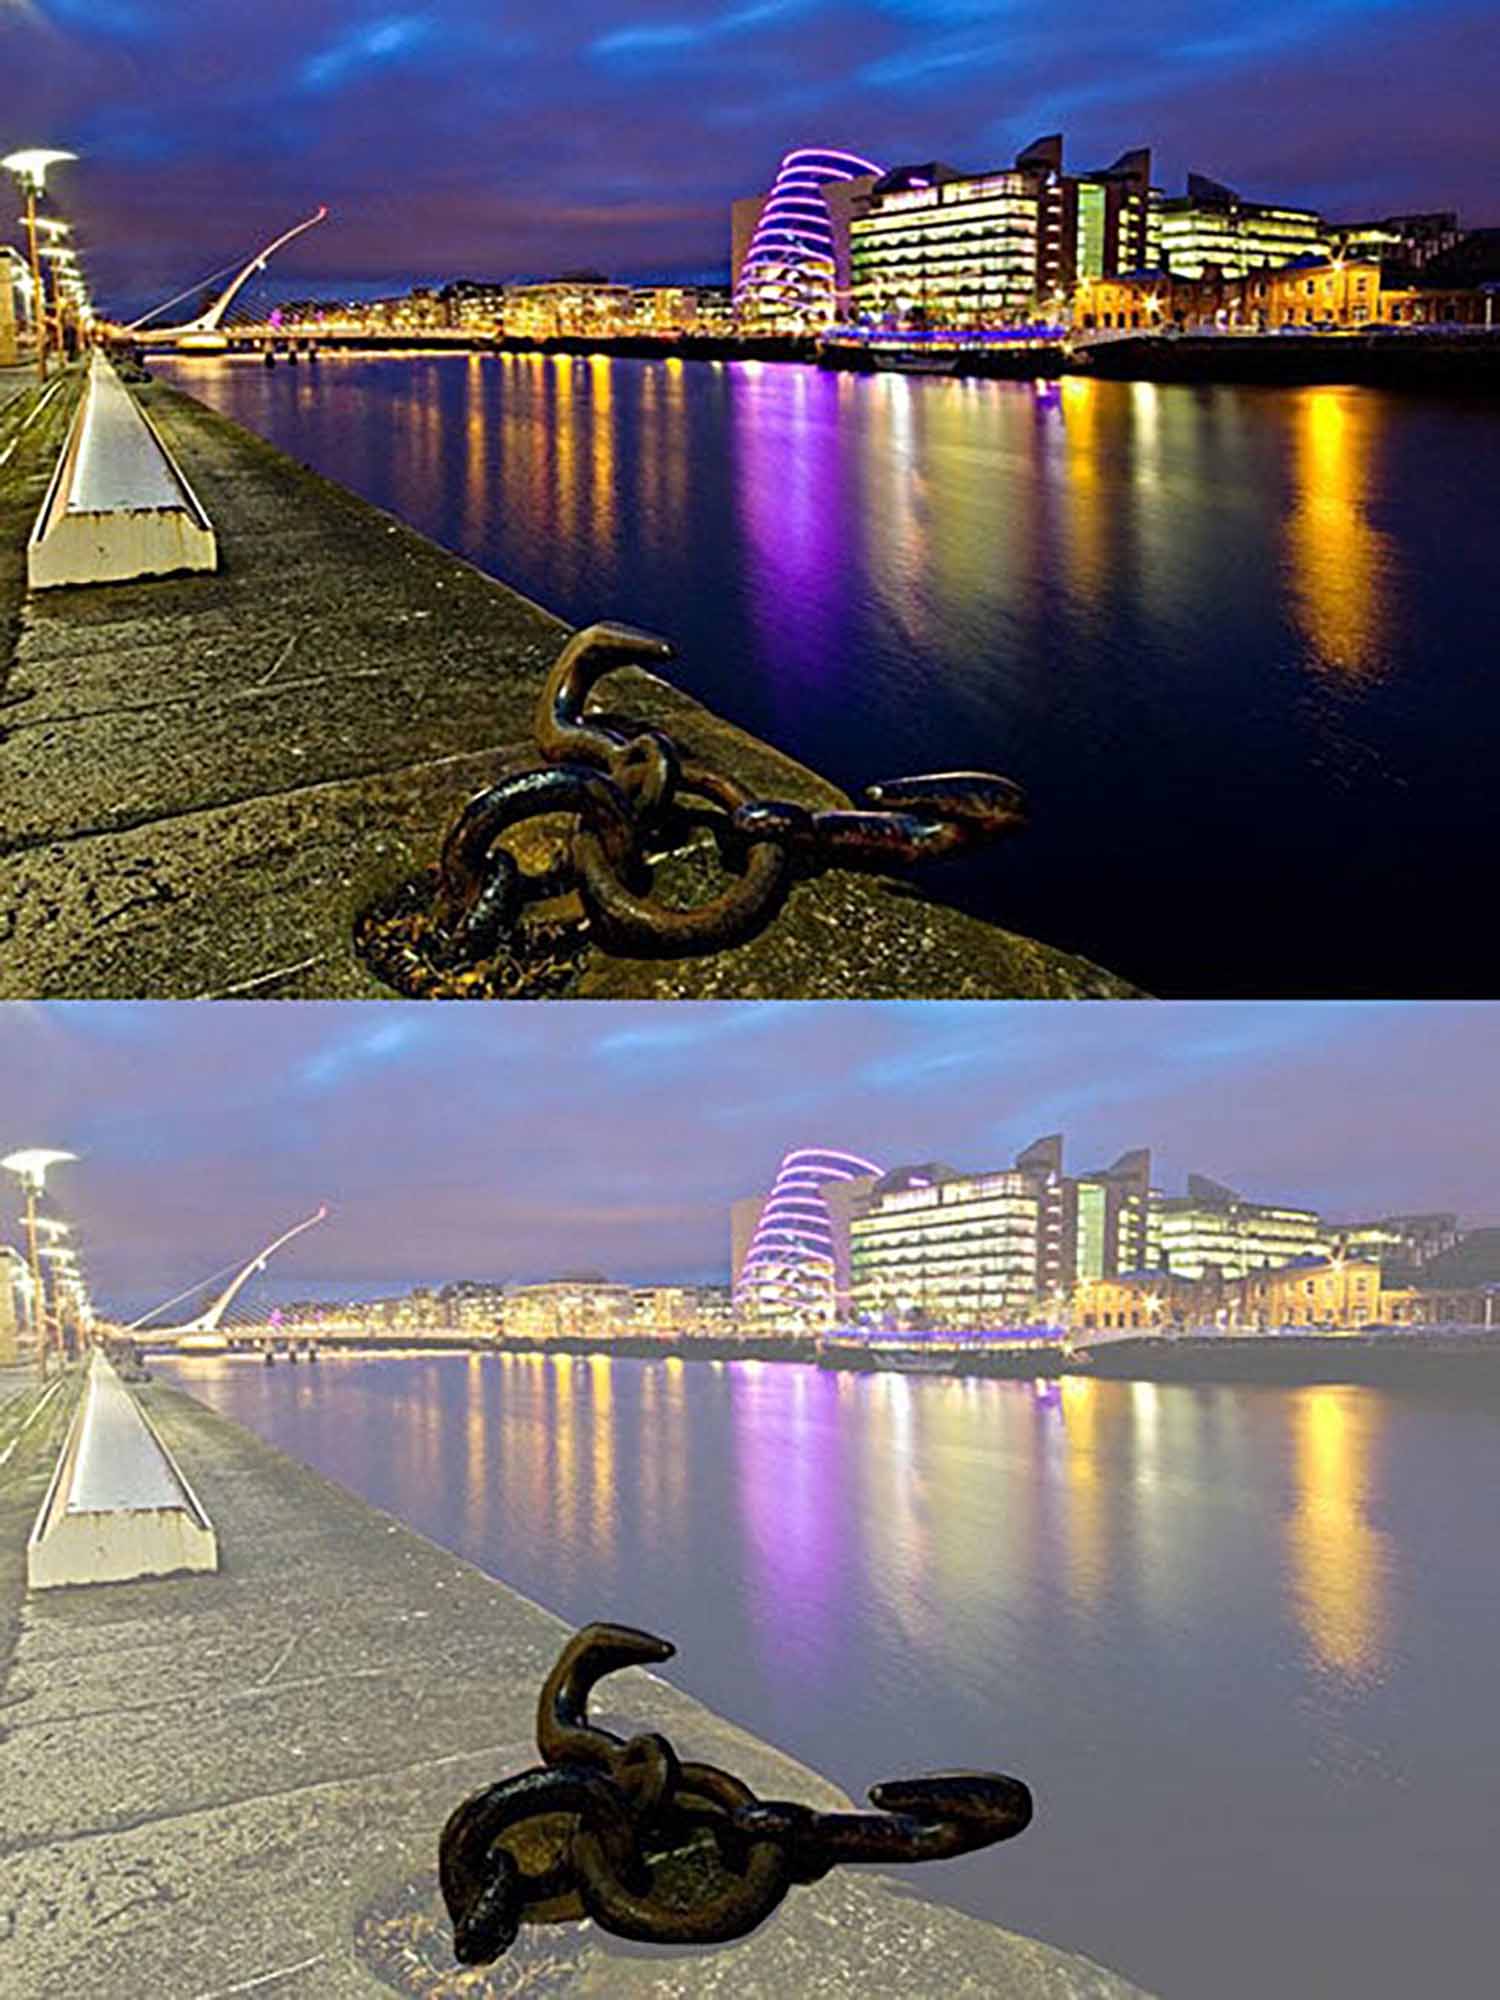
Foreground interest involves strategically placing objects or elements in the lower part of your frame, which are closer to the camera compared to the main subject. This layering technique not only adds depth but also helps in guiding the viewer’s eye through the image, creating a narrative and a sense of space.

3D effect at Sonsbeek Waterfall, Arnhem.

O Carroll, B. (2016). 28 Composition Techniques That Will Improve Your Photos.

Creative Process: Implementing Foreground Interest

  • Identifying Elements: Look for elements that can serve as interesting foreground subjects – rocks, flowers, urban artifacts, or even shadows and light patterns.
  • Composition and Placement: Place these elements in a way that they lead the eye towards the main subject. The placement should feel natural and not forced.
  • Balancing the Scene: Ensure that your foreground interest complements the scene and doesn’t overpower the main subject.

Tips for Photographers

  1. Wide-Angle Lenses: Use wide-angle lenses to exaggerate the sense of depth. They are excellent for capturing both the foreground interest and the background.
  2. Aperture Settings: Experiment with aperture settings. A smaller aperture (higher f-number) keeps both the foreground and background in focus.
  3. Trial and Error: Not every element makes good foreground interest. Experiment with different objects and see how they affect the scene.
  4. Focus Stacking: In landscapes, try focus stacking to keep the foreground and the distant background sharp.

Advanced Techniques in Using Foreground Interest

  • Leading Lines: Use natural or urban leading lines in the foreground to guide the viewer’s eye towards the main subject.
  • Framing the Subject: Elements in the foreground can act as a frame, subtly enclosing the main subject for added depth and focus.
  • Reflections as Foreground: In water bodies, reflections can serve as an interesting foreground, adding symmetry and depth.

Practical Applications in Various Genres

  • Landscape Photography: Use rocks, flowers, or foliage in the foreground to add depth to scenic views.
  • Urban and Street Photography: Urban elements like pavement patterns, street furniture, or even a passerby can serve as engaging foregrounds.
  • Macro Photography: In macro photography, a shallow depth of field can make the foreground elements blur into beautiful bokeh, adding depth.

Conclusion: Elevating Your Photographic Perspective

Incorporating foreground interest is a skill that elevates your photographic perspective, transforming ordinary scenes into captivating stories with depth and dimension. It requires practice, a keen eye for detail, and an understanding of how different elements in a scene interact with each other.

3D depth in Dublin's urban landscape.

O Carroll, B. (2016). 28 Composition Techniques That Will Improve Your Photos.

References

O Carroll, B. (2016). 28 Composition Techniques That Will Improve Your Photos. [online] PetaPixel. Available at:
https://petapixel.com/photography-composition-techniques/

[Accessed 12 Dec. 2023]