Leading lines in photography composition.

Guiding the Viewer’s Eye in Photography with Leading Lines

Introduction: The Power of Leading Lines

Leading lines are a foundational element in the art of photographic composition. They act as visual guides, leading the viewer’s eye through the image and towards the main subject or focal point. This technique is incredibly effective in creating a sense of movement and depth, making your photographs more engaging and dynamic.

Understanding Leading Lines

Leading lines can be anything in your scene that creates a line or path, such as roads, fences, shorelines, or architectural elements. They can be straight, curved, diagonal, or even zigzagged. The key is how these lines guide the viewer’s eye and how they interact with the other elements in your frame.
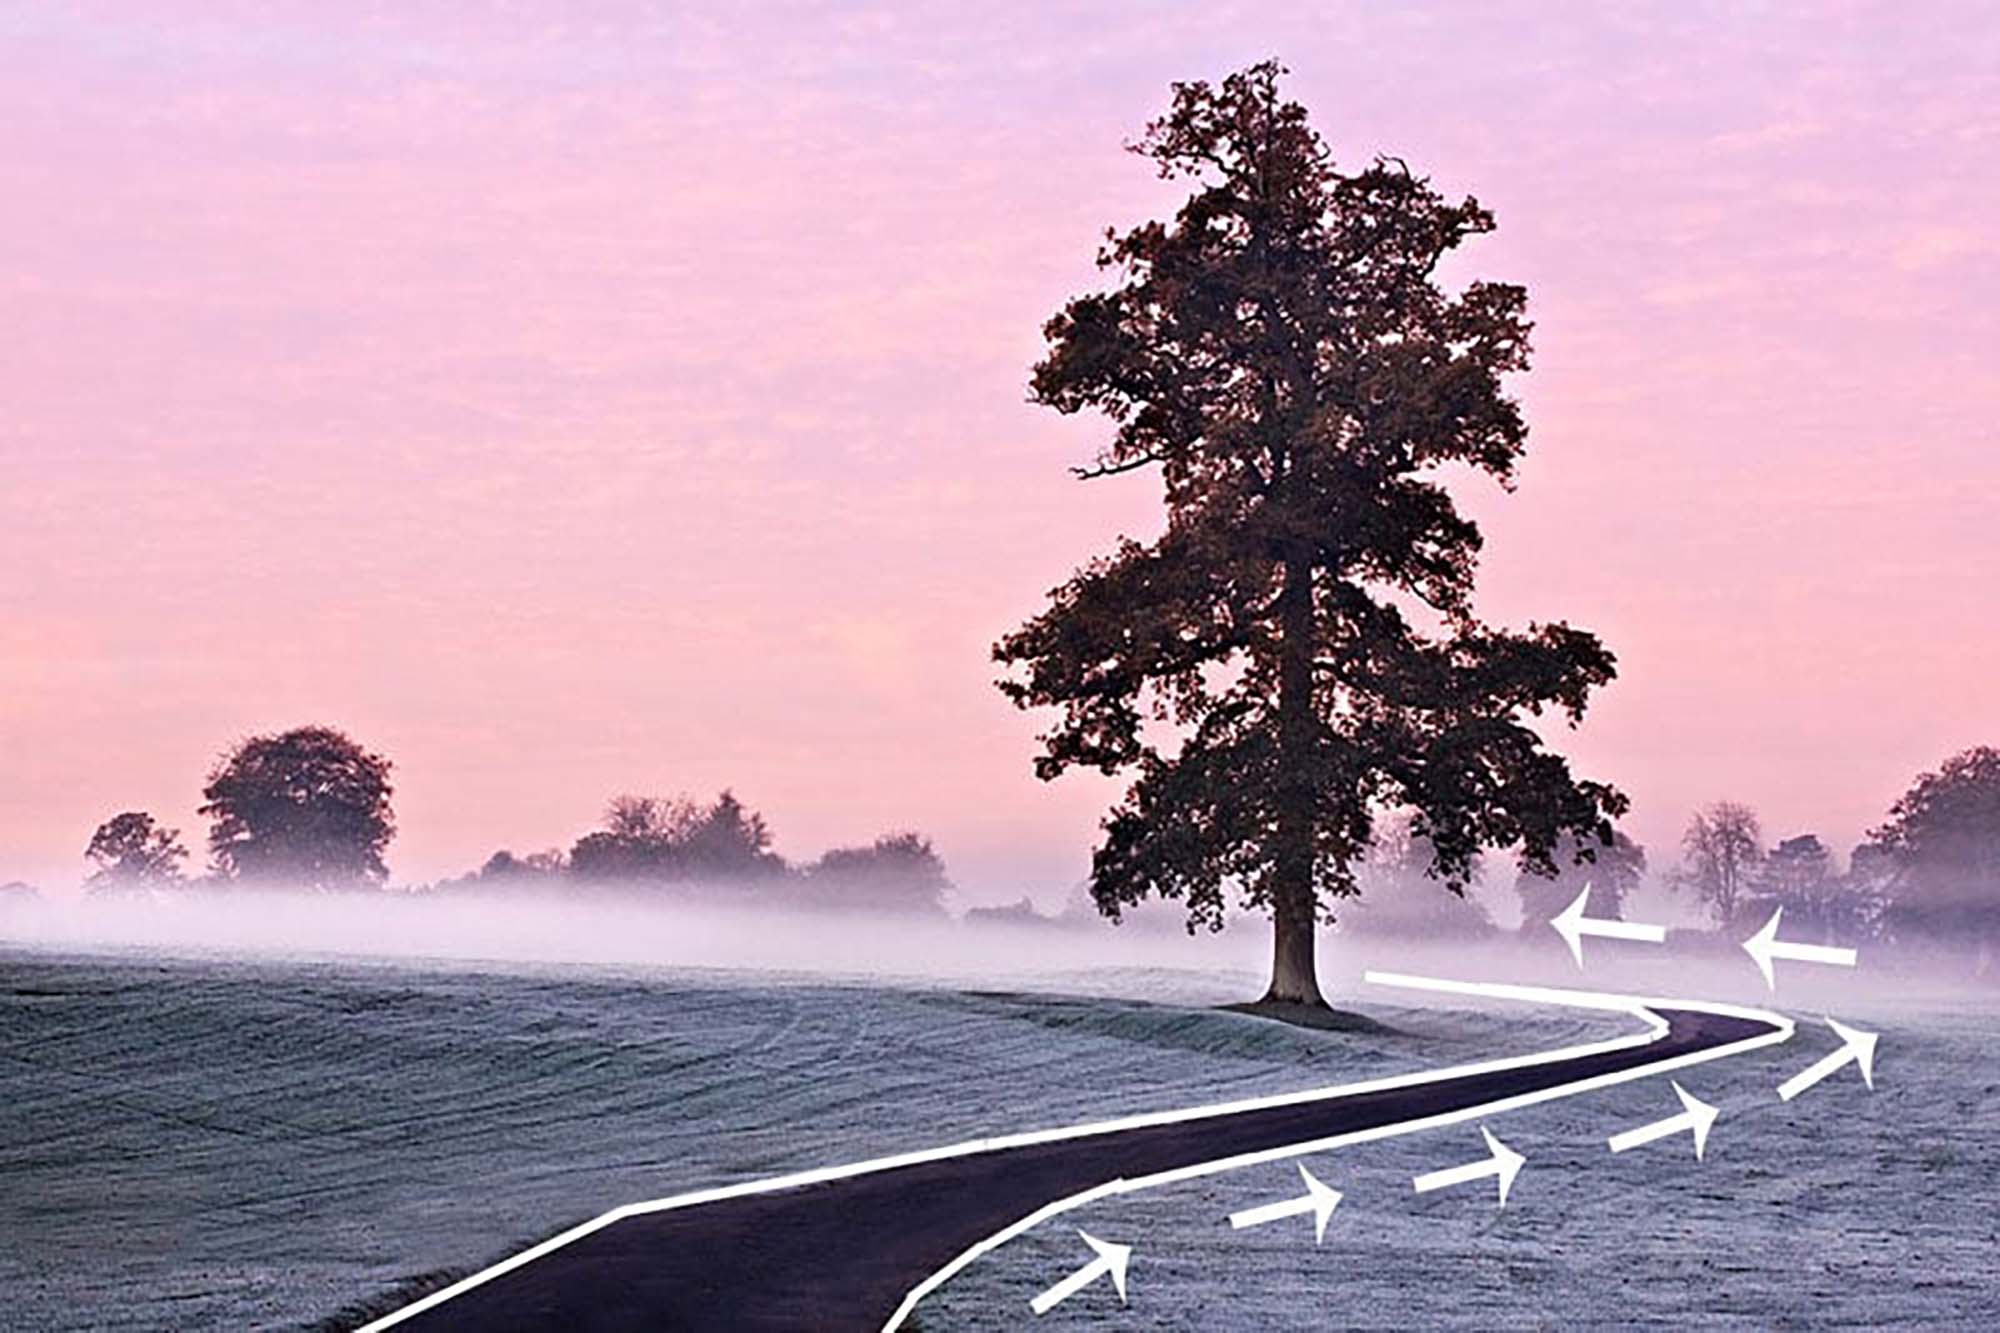
Leading lines in photography composition.

O Carroll, B. (2016). 28 Composition Techniques That Will Improve Your Photos.

Creative Process: Implementing Leading Lines

  • Identifying Lines in Your Environment: Begin by observing your surroundings and identifying potential leading lines. Pay attention to how these lines interact with the scene and your subject.
  • Strategic Placement: Position your camera so that the leading lines start from the edge of your frame and guide towards your main subject. Experiment with different angles and perspectives.
  • Balancing the Composition: Ensure that your leading lines enhance, not overpower, the main subject. The lines should be a part of the story, not the entire story.

Tips for Photographers

  1. Use Lines to Create Depth: Leading lines can add depth to a flat image, creating a more three-dimensional feel.
  2. Experiment with Different Types of Lines: Not all leading lines need to be obvious. Sometimes subtle lines, like a row of trees or a pattern on a floor, can be very effective.
  3. Combine with Other Composition Techniques: Leading lines work well when combined with other composition rules like the Rule of Thirds or Framing.
  4. Pay Attention to Line Direction: The direction of the lines can affect the mood of the image. For example, vertical lines can convey power and strength, while curved lines can create a sense of calm and flow.

Advanced Techniques in Using Leading Lines

  • Leading Lines in Portraits: Use environmental elements to guide the viewer’s eye towards the subject in portrait photography.
  • Urban and Architectural Photography: Urban landscapes are filled with leading lines. Use them to create compelling compositions in cityscapes.
  • Natural Leading Lines: In landscape photography, use natural elements like rivers, coastlines, or rows of trees as leading lines.

Practical Applications in Various Genres

  • Landscape Photography: Use paths, rivers, or mountain ridges to lead the eye through the landscape.
  • Street Photography: Streets, sidewalks, or architectural features can create dynamic leading lines in urban settings.
  • Architectural Photography: Use the lines of buildings, windows, and stairs to guide the viewer’s eye.

Conclusion: Elevating Your Photographic Vision

Understanding and utilizing leading lines can significantly elevate your photographic vision and storytelling. This technique is crucial in engaging the viewer and adding depth and direction to your images.

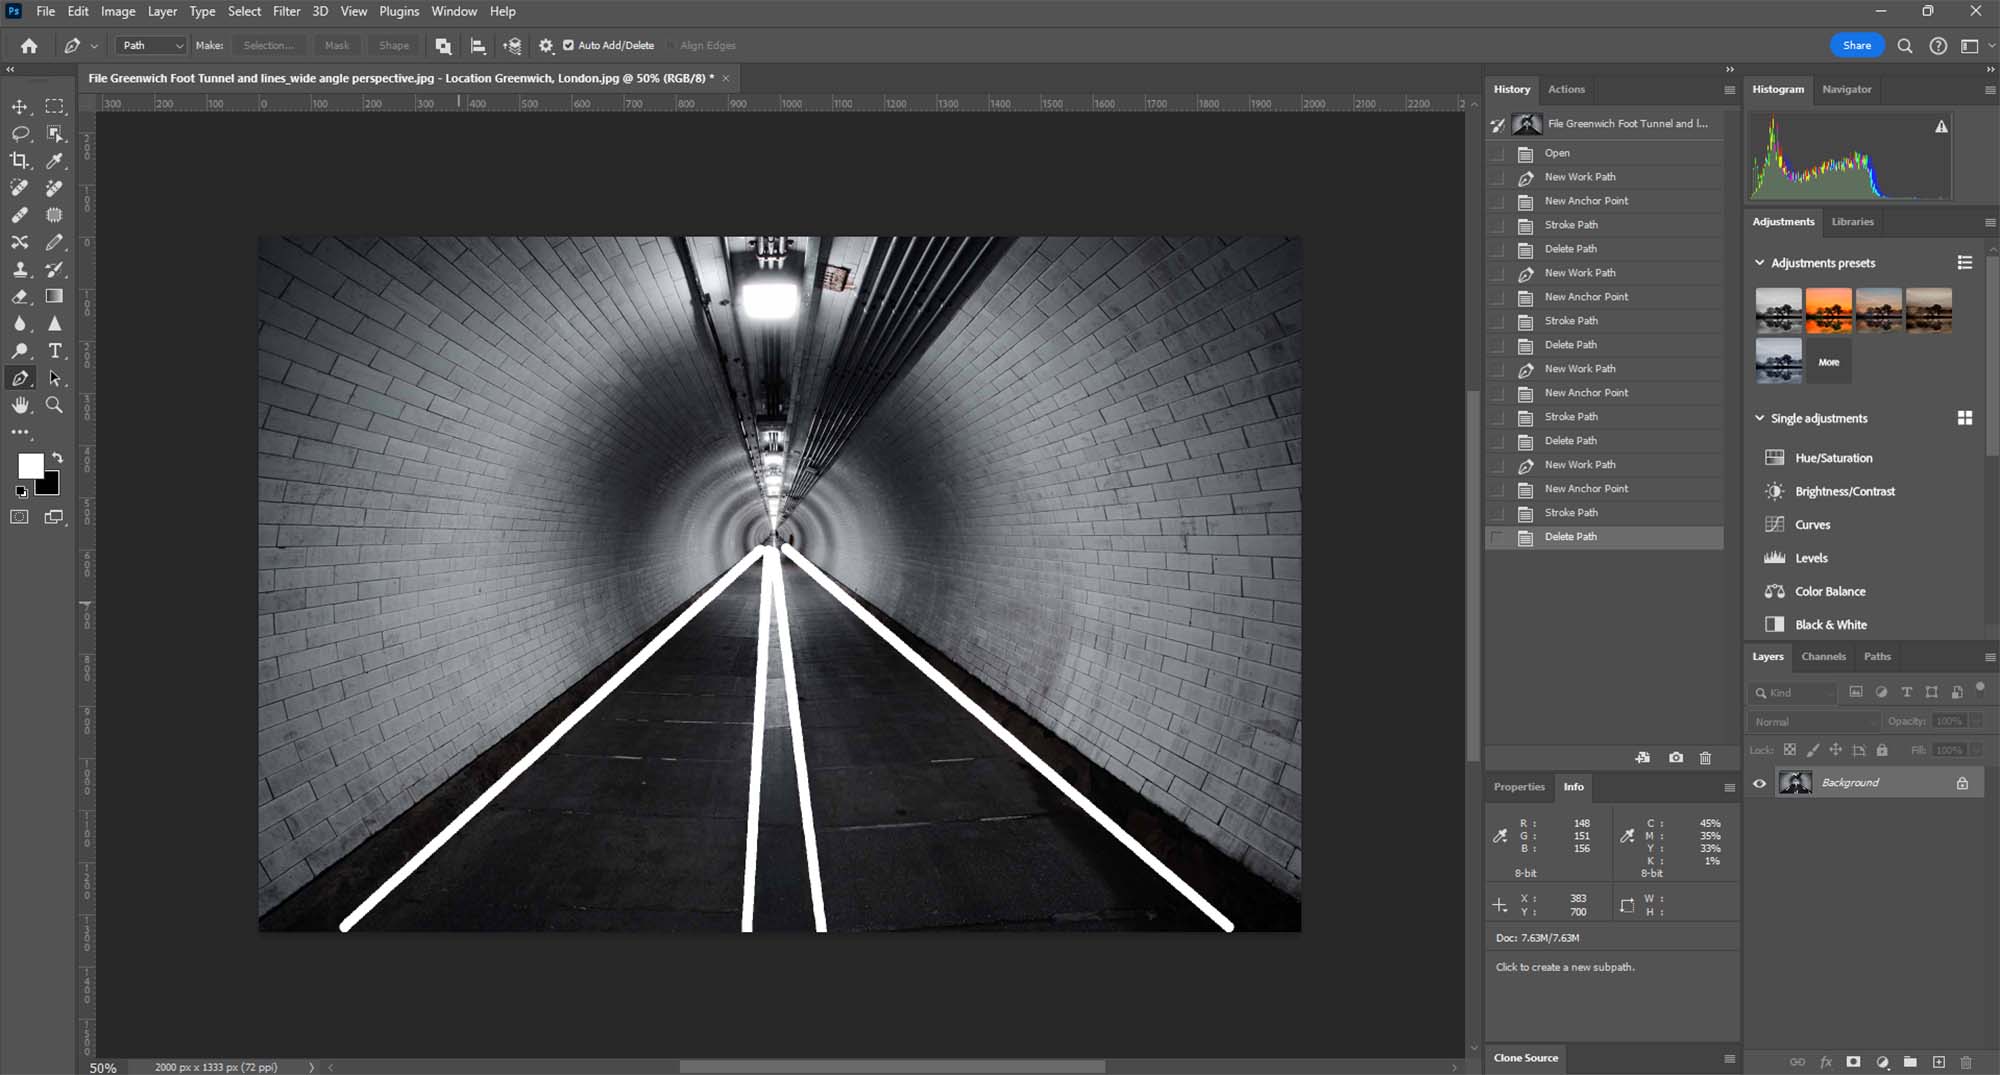
Photoshop demo of leading lines in photography.

Tutorial: Creating Leading Lines Using the Pen Tool in Photoshop

Step 1: Open Your Image

  1. Load the Image: Start by opening the image you wish to edit in Photoshop. Ensure you’re working on the correct layer in case your project has multiple layers.

Step 2: Selecting the Pen Tool

  1. Accessing the Pen Tool: Locate the Pen Tool in Photoshop’s toolbar, typically on the left side of the screen. The icon looks like a fountain pen tip. Click on it or press P on your keyboard to select it.
Urban leading lines in Photoshop demonstration.
Landscape photography leading lines in Photoshop.

Step 3: Drawing with the Pen Tool

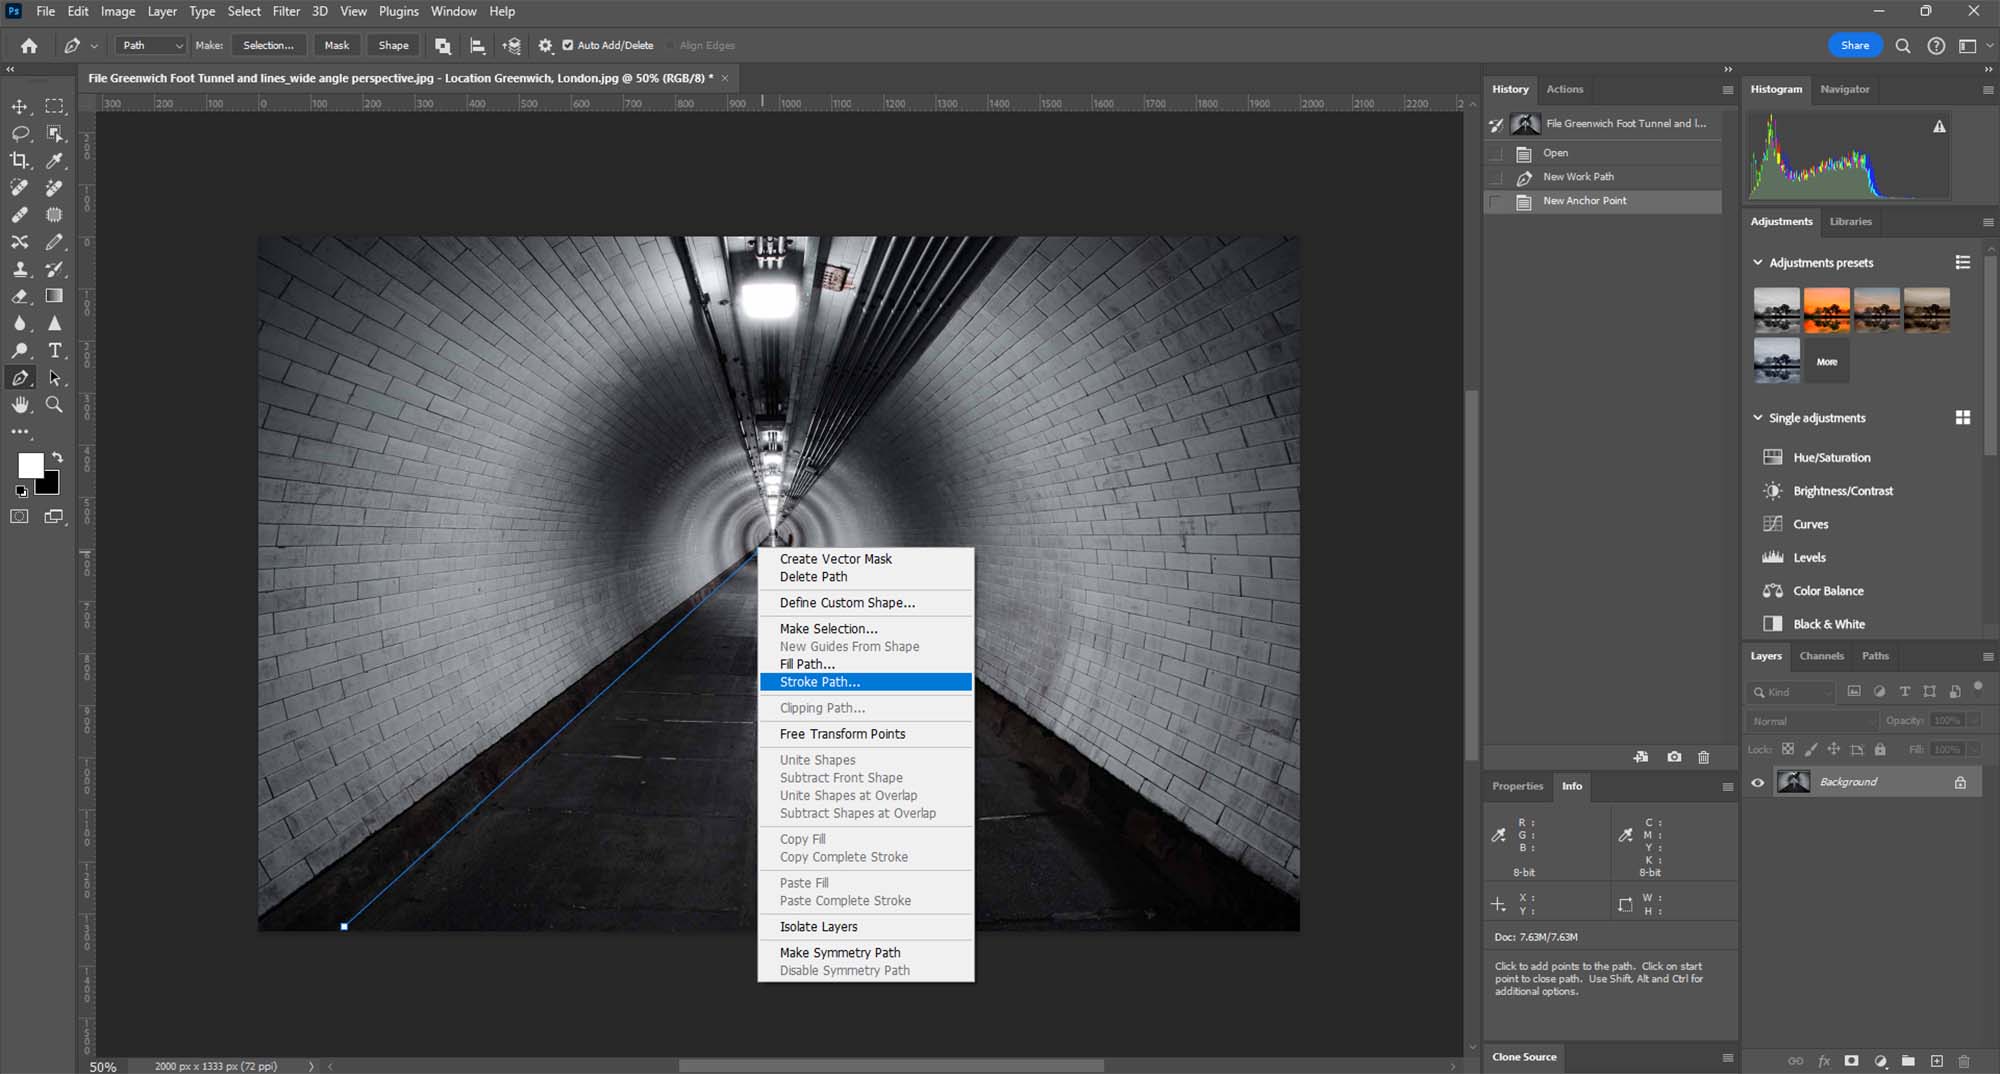
  1. Creating a Path with Anchors: Click on your image where you want your leading line to start. This creates the first anchor point. Click again where you want the line to go, creating a path between the two points. You can click and drag to create curved lines. Continue this process to trace or create leading lines within your image.

Step 4: Stroking the Path

  1. Choosing the Stroke Path Option: Once you have your desired path, it’s time to turn it into a visible line. Right-click (or Control-click on a Mac) on the path and select ‘Stroke Path’ from the context menu.

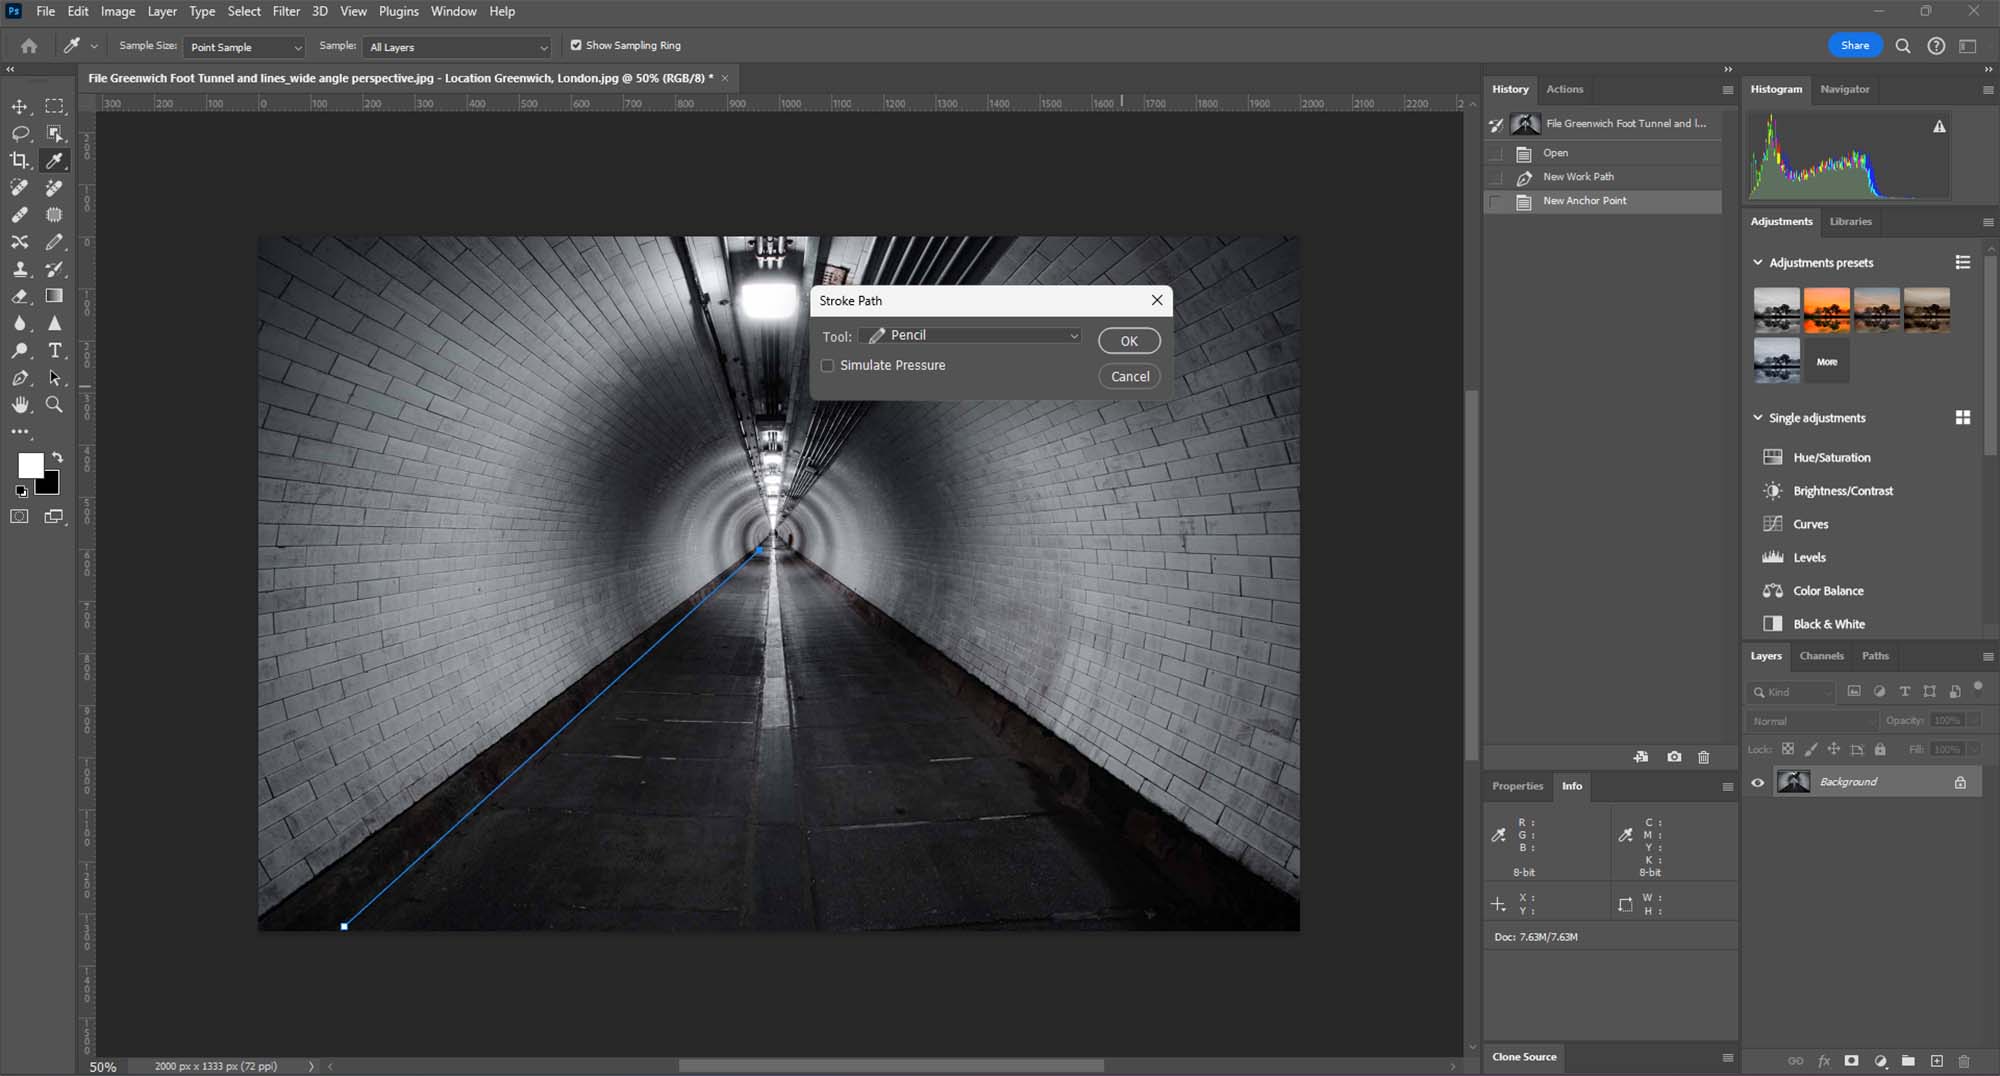
  2. Selecting the Pencil Tool: In the Stroke Path dialog box, choose the Pencil tool. This will create a more defined and solid line. Adjust the size and properties of the Pencil tool beforehand as needed.

  3. Applying the Stroke: After selecting the Pencil tool, click ‘OK’ to apply the stroke to the path. This will render the path as a visible line on your image, creating the effect of leading lines.
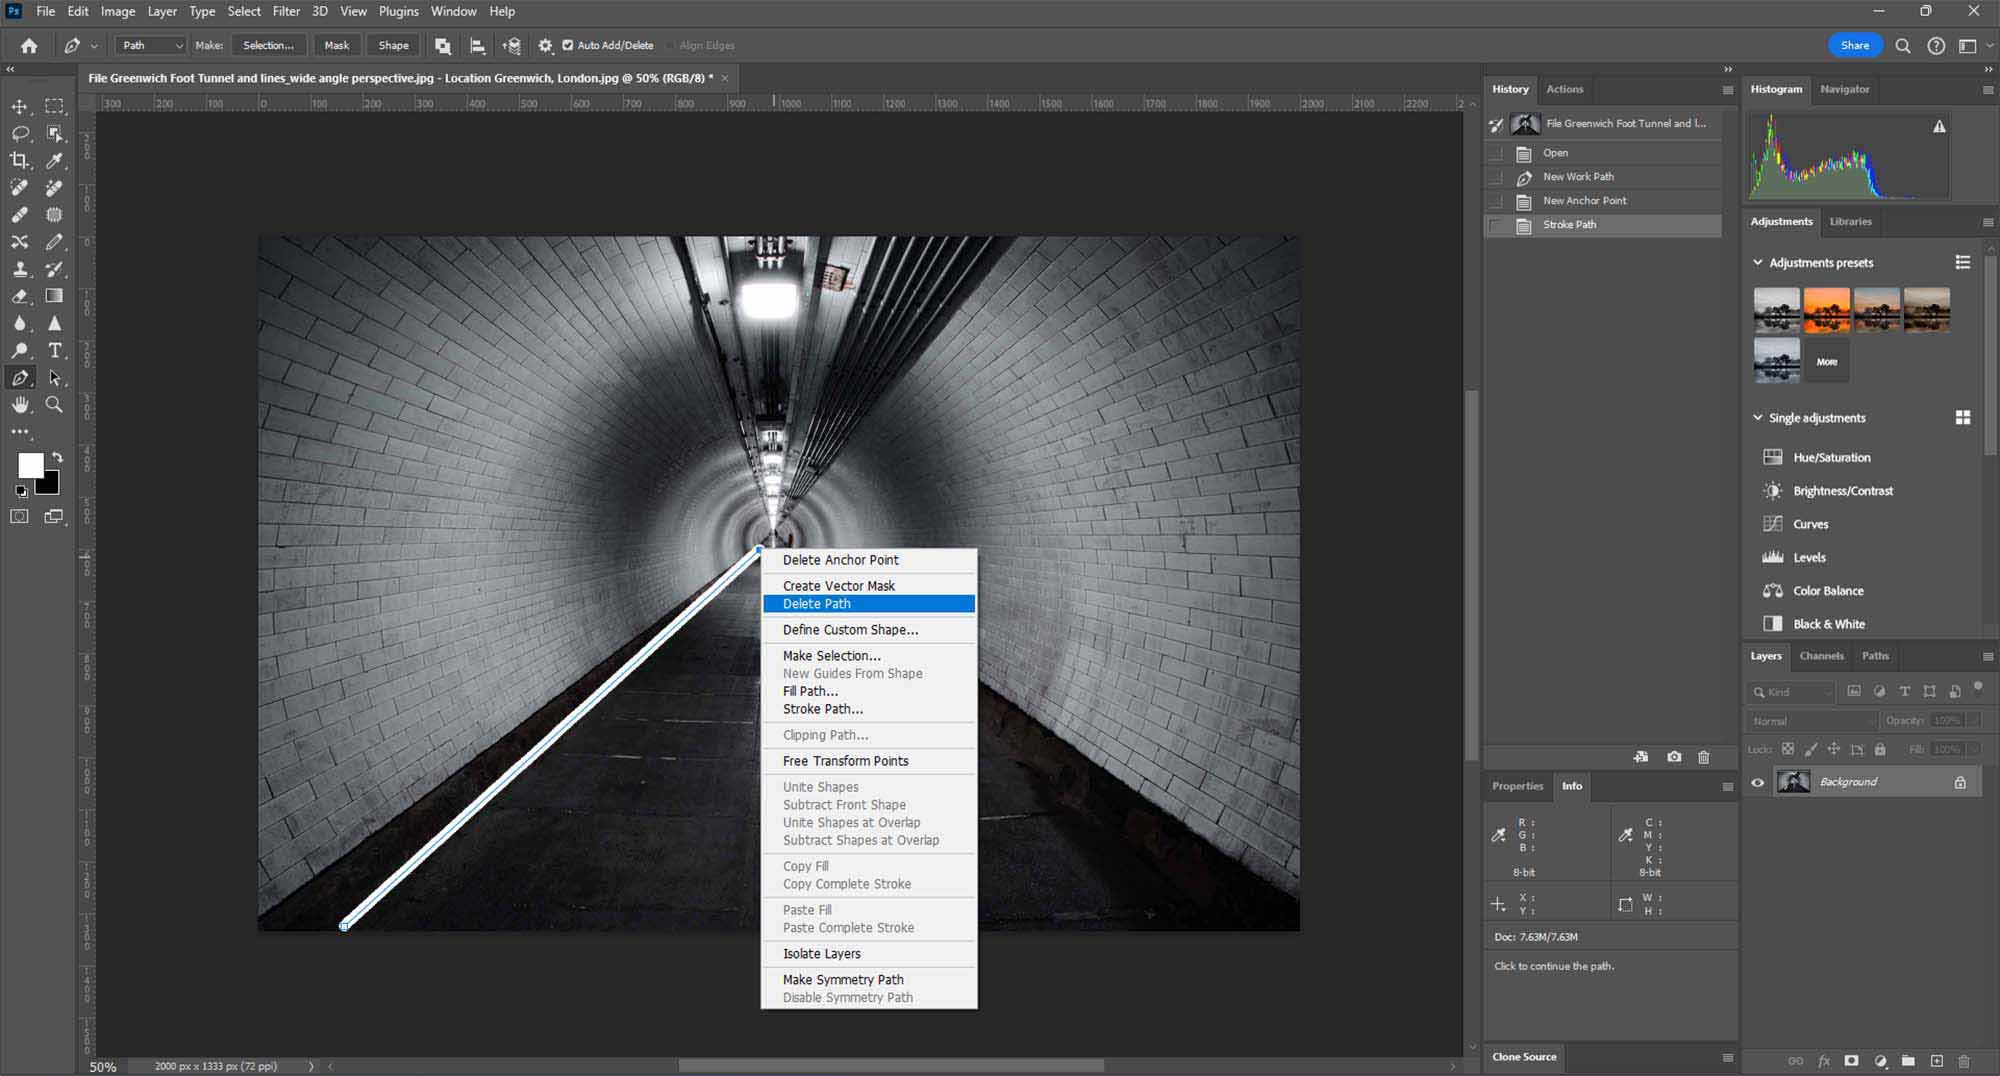
Abstract leading lines in Photoshop.

Step 5: Removing the Path

  1. Deleting the Path: Once the stroke is applied, you don’t need the path anymore. To remove it, either go to the Paths panel and delete the current path or simply hit the ‘Delete’ key while the path is active.
Dynamic sports photography with leading lines.

Conclusion

Leading lines are a powerful compositional tool in photography and art, guiding the viewer’s eye through the image. With Photoshop’s Pen Tool, you can create or enhance these lines, giving your image a stronger sense of direction and focus. This technique is particularly useful for landscape, architectural, and street photography, where lines play a crucial role in the composition.

References

O Carroll, B. (2016). 28 Composition Techniques That Will Improve Your Photos. [online] PetaPixel. Available at:

https://petapixel.com/photography-composition-techniques/

[Accessed 12 Dec. 2023]

Layered framing in Maynooth, Ireland.

Frame Within the Frame: Depth Through Layers in Photography

Introduction: The Art of Framing in Composition

Framing within a frame is a compelling compositional technique that involves using elements within your scene to create a ‘frame’ around your subject. This method adds depth, context, and intrigue to your photographs, turning ordinary scenes into layered stories.

Understanding ‘Frame Within a Frame’

This technique is all about using elements in your environment, such as windows, doorways, arches, or even natural elements like tree branches, to create a secondary frame within your photograph. This inner frame leads the viewer’s eye to the primary subject, enhancing the narrative and depth of the image.

Framed view of St Mark's Square, Venice.

O Carroll, B. (2016). 28 Composition Techniques That Will Improve Your Photos.

Creative Process: Implementing Framing Techniques

  • Identifying Framing Elements: Start by scouting for natural or architectural elements that can act as frames in your composition.
  • Positioning Your Subject: Place your subject in a way that the framing element encapsulates or complements it, creating a focus point.
  • Experimenting with Perspectives: Change your angle and perspective to see how different frames can alter the story or mood of your image.

Tips for Photographers

  1. Look for Unique Frames: Beyond windows and doors, look for unique framing opportunities like gaps in fences, reflections, or shadows.
  2. Play with Light and Shadow: Use light and shadows within your frame to add mood and emphasize your subject.
  3. Depth of Field: Experiment with different apertures to either blur the frame for a subtle effect or keep it sharp for a more pronounced framing.
  4. Balancing Elements: Ensure your frame complements the subject without overpowering it. The frame should lead to the subject, not distract from it.

Advanced Techniques in Framing

  • Multiple Layers: Incorporate multiple layers of framing for a more complex and intriguing composition.
  • Reflections as Frames: Use reflections in water, mirrors, or glass to create a unique framing effect.
  • Contrasting Elements: Combine contrasting elements within your frame and subject for a dramatic effect.

Practical Applications in Various Genres

  • Landscape Photography: Use tree branches or rock formations to frame a stunning vista or a setting sun.
  • Urban Photography: Urban environments are rich with framing opportunities like bridges, tunnels, and building facades.
  • Portrait Photography: Frame your subject with environmental elements to add context and depth to your portraits.

Conclusion: Refining Your Photographic Eye

Mastering the ‘Frame Within a Frame’ technique is a journey towards refining your photographic eye and enhancing your ability to tell stories through images. It requires practice, creativity, and an attentive observation of your surroundings.

References

O Carroll, B. (2016). 28 Composition Techniques That Will Improve Your Photos. [online] PetaPixel. Available at:

https://petapixel.com/photography-composition-techniques/

[Accessed 12 Dec. 2023]

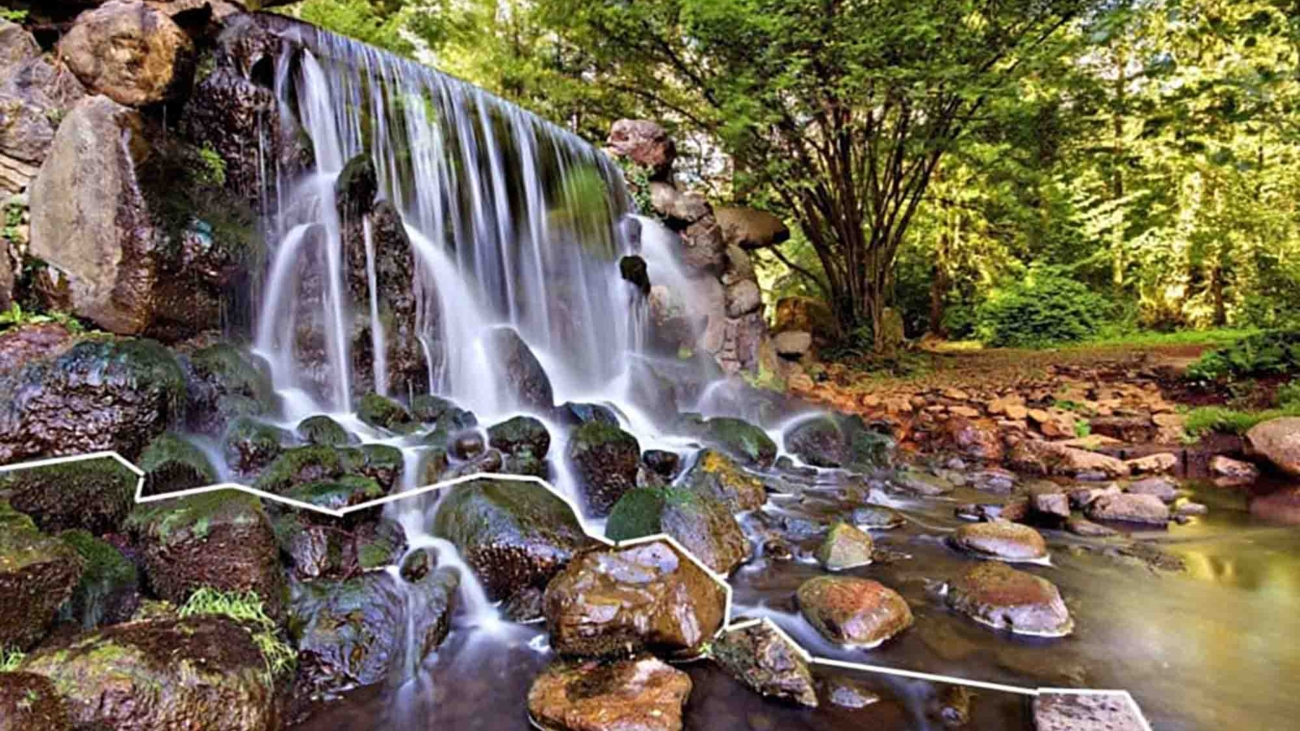
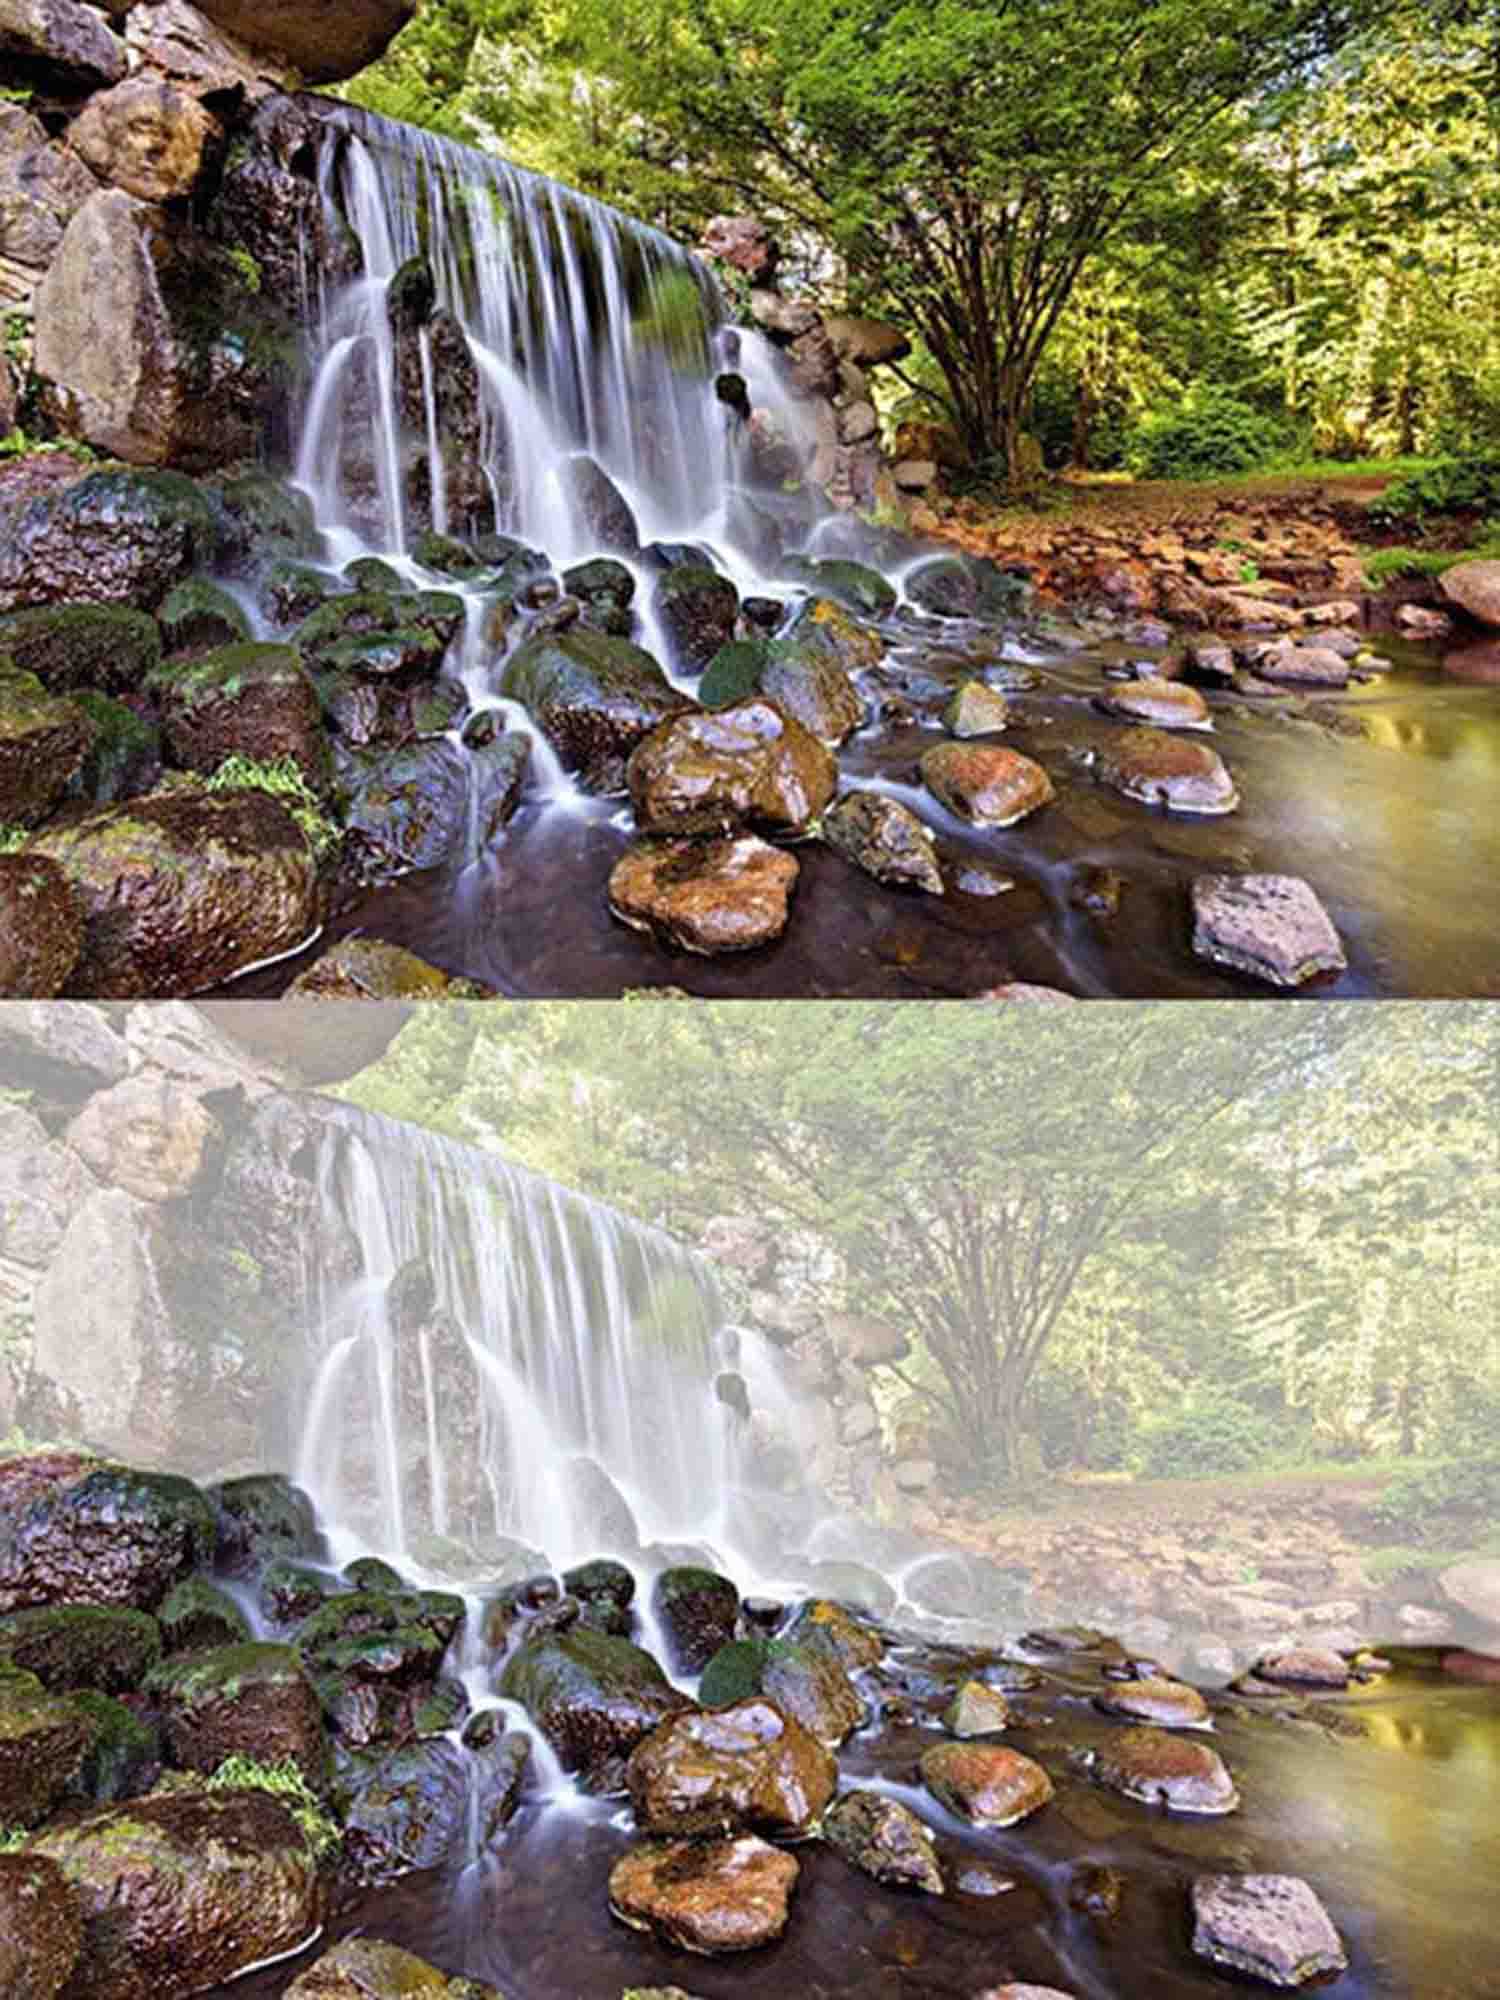
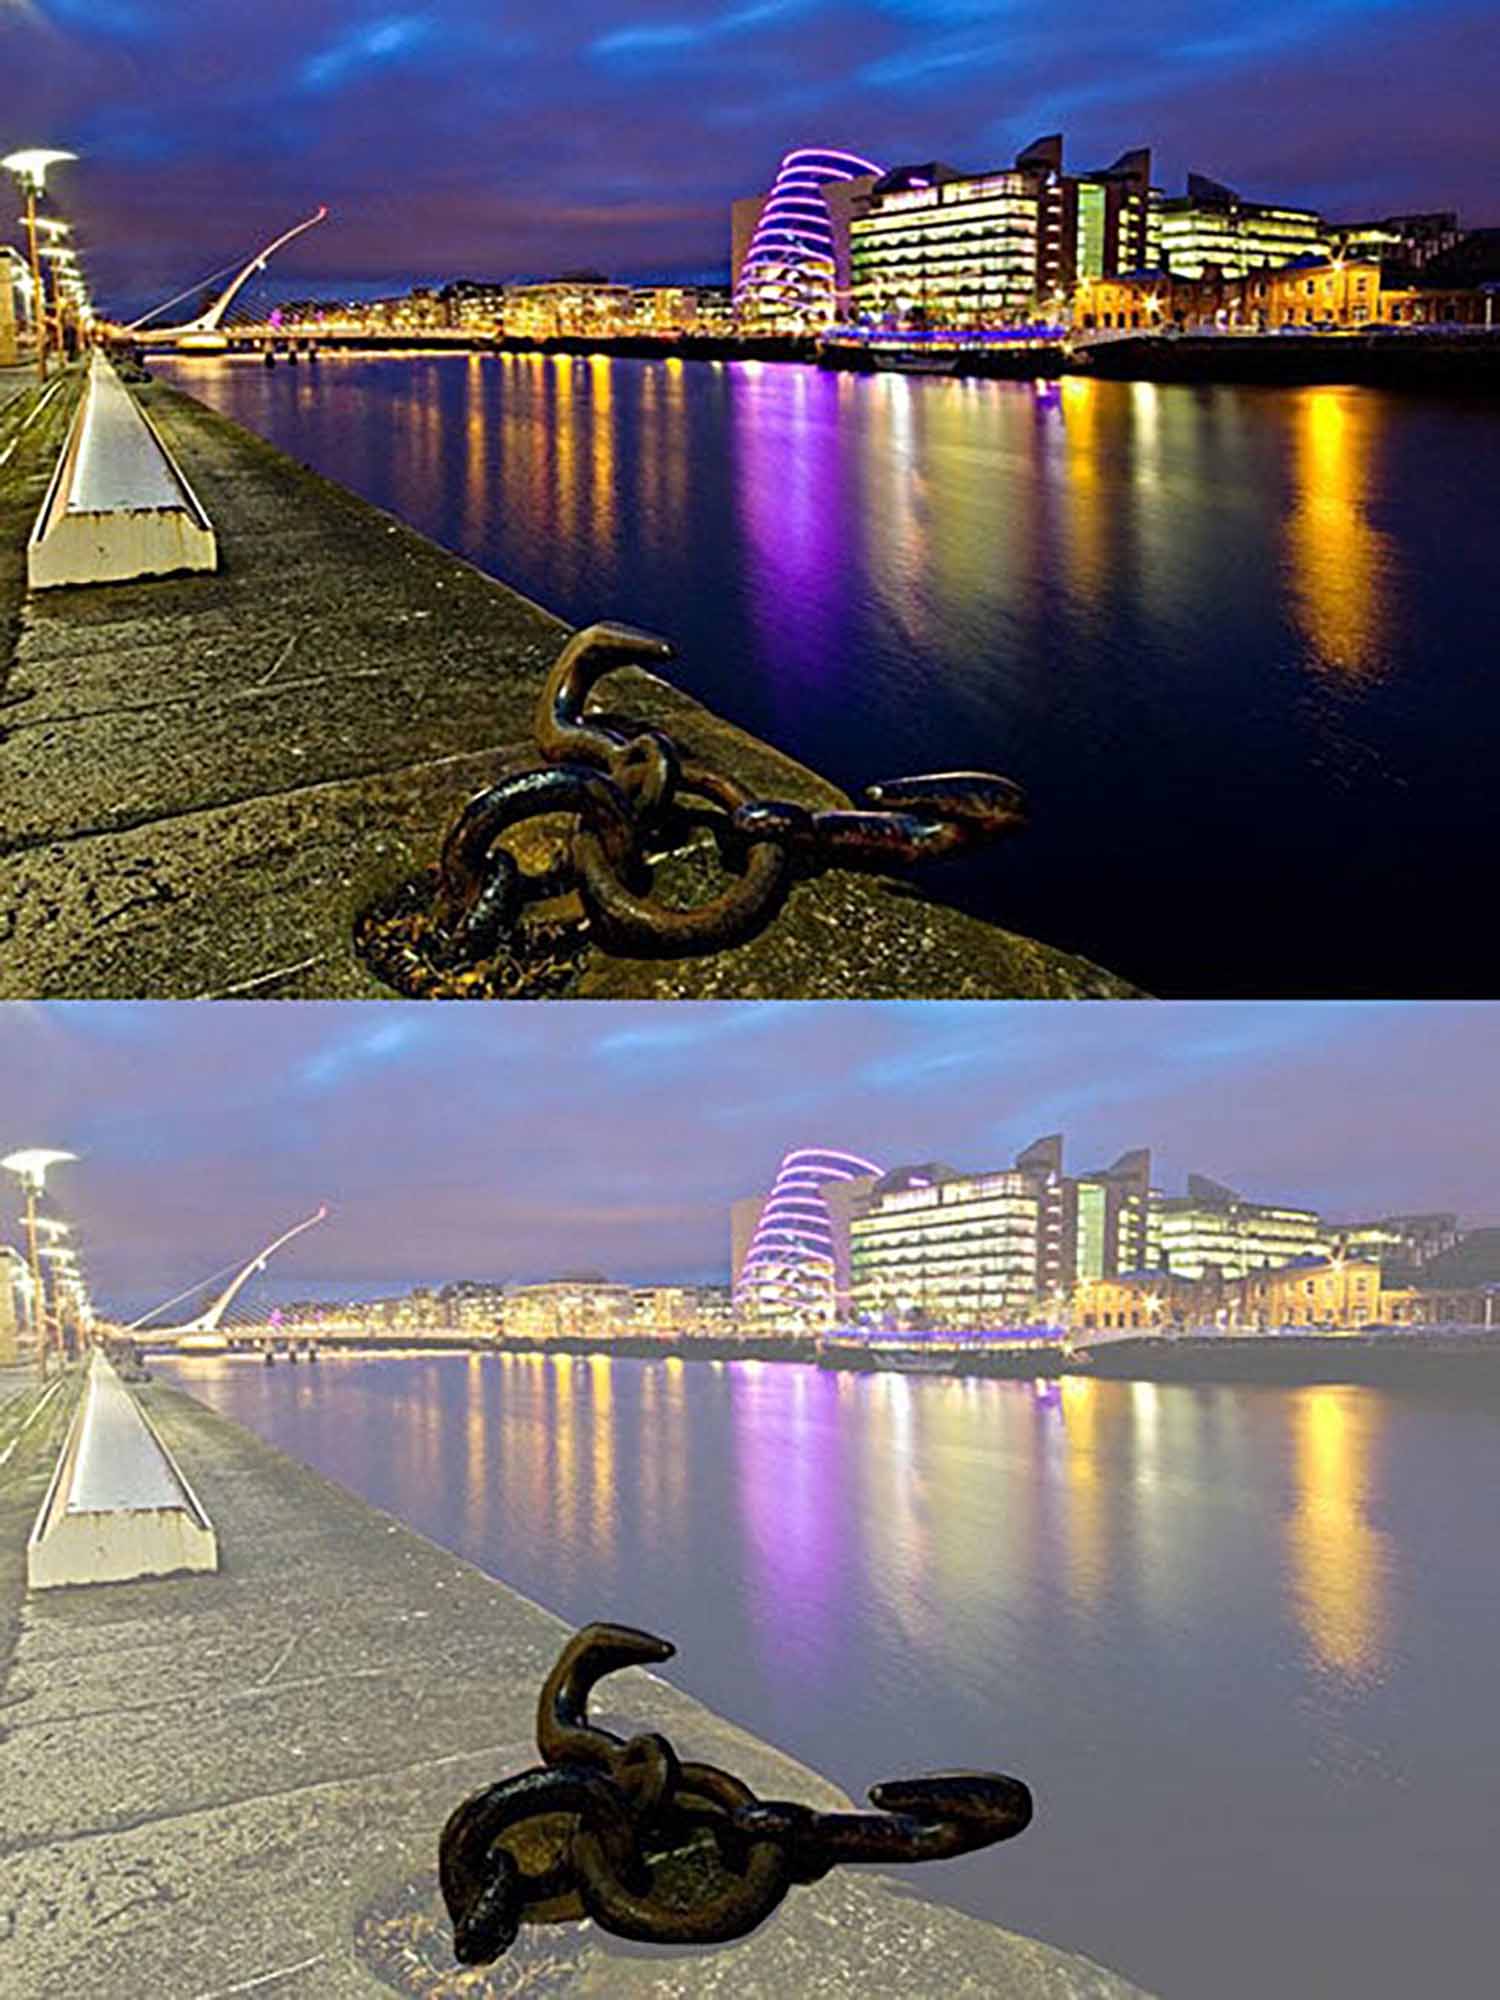
3D effect at Sonsbeek Waterfall, Arnhem.

Foreground Interest and Depth: Mastering the 3D Photography Effect

Introduction: The Magic of Depth in Photography

Foreground interest is a powerful compositional tool in photography that adds depth, leading to more dynamic and engaging images. By incorporating elements in the foreground, photographers can create a sense of three-dimensionality, drawing viewers into the scene. This technique is vital in transforming flat images into vivid, life-like experiences.

Understanding Foreground Interest and Depth

Foreground interest involves strategically placing objects or elements in the lower part of your frame, which are closer to the camera compared to the main subject. This layering technique not only adds depth but also helps in guiding the viewer’s eye through the image, creating a narrative and a sense of space.

3D effect at Sonsbeek Waterfall, Arnhem.

O Carroll, B. (2016). 28 Composition Techniques That Will Improve Your Photos.

Creative Process: Implementing Foreground Interest

  • Identifying Elements: Look for elements that can serve as interesting foreground subjects – rocks, flowers, urban artifacts, or even shadows and light patterns.
  • Composition and Placement: Place these elements in a way that they lead the eye towards the main subject. The placement should feel natural and not forced.
  • Balancing the Scene: Ensure that your foreground interest complements the scene and doesn’t overpower the main subject.

Tips for Photographers

  1. Wide-Angle Lenses: Use wide-angle lenses to exaggerate the sense of depth. They are excellent for capturing both the foreground interest and the background.
  2. Aperture Settings: Experiment with aperture settings. A smaller aperture (higher f-number) keeps both the foreground and background in focus.
  3. Trial and Error: Not every element makes good foreground interest. Experiment with different objects and see how they affect the scene.
  4. Focus Stacking: In landscapes, try focus stacking to keep the foreground and the distant background sharp.

Advanced Techniques in Using Foreground Interest

  • Leading Lines: Use natural or urban leading lines in the foreground to guide the viewer’s eye towards the main subject.
  • Framing the Subject: Elements in the foreground can act as a frame, subtly enclosing the main subject for added depth and focus.
  • Reflections as Foreground: In water bodies, reflections can serve as an interesting foreground, adding symmetry and depth.

Practical Applications in Various Genres

  • Landscape Photography: Use rocks, flowers, or foliage in the foreground to add depth to scenic views.
  • Urban and Street Photography: Urban elements like pavement patterns, street furniture, or even a passerby can serve as engaging foregrounds.
  • Macro Photography: In macro photography, a shallow depth of field can make the foreground elements blur into beautiful bokeh, adding depth.

Conclusion: Elevating Your Photographic Perspective

Incorporating foreground interest is a skill that elevates your photographic perspective, transforming ordinary scenes into captivating stories with depth and dimension. It requires practice, a keen eye for detail, and an understanding of how different elements in a scene interact with each other.

3D depth in Dublin's urban landscape.

O Carroll, B. (2016). 28 Composition Techniques That Will Improve Your Photos.

References

O Carroll, B. (2016). 28 Composition Techniques That Will Improve Your Photos. [online] PetaPixel. Available at:

https://petapixel.com/photography-composition-techniques/

[Accessed 12 Dec. 2023]

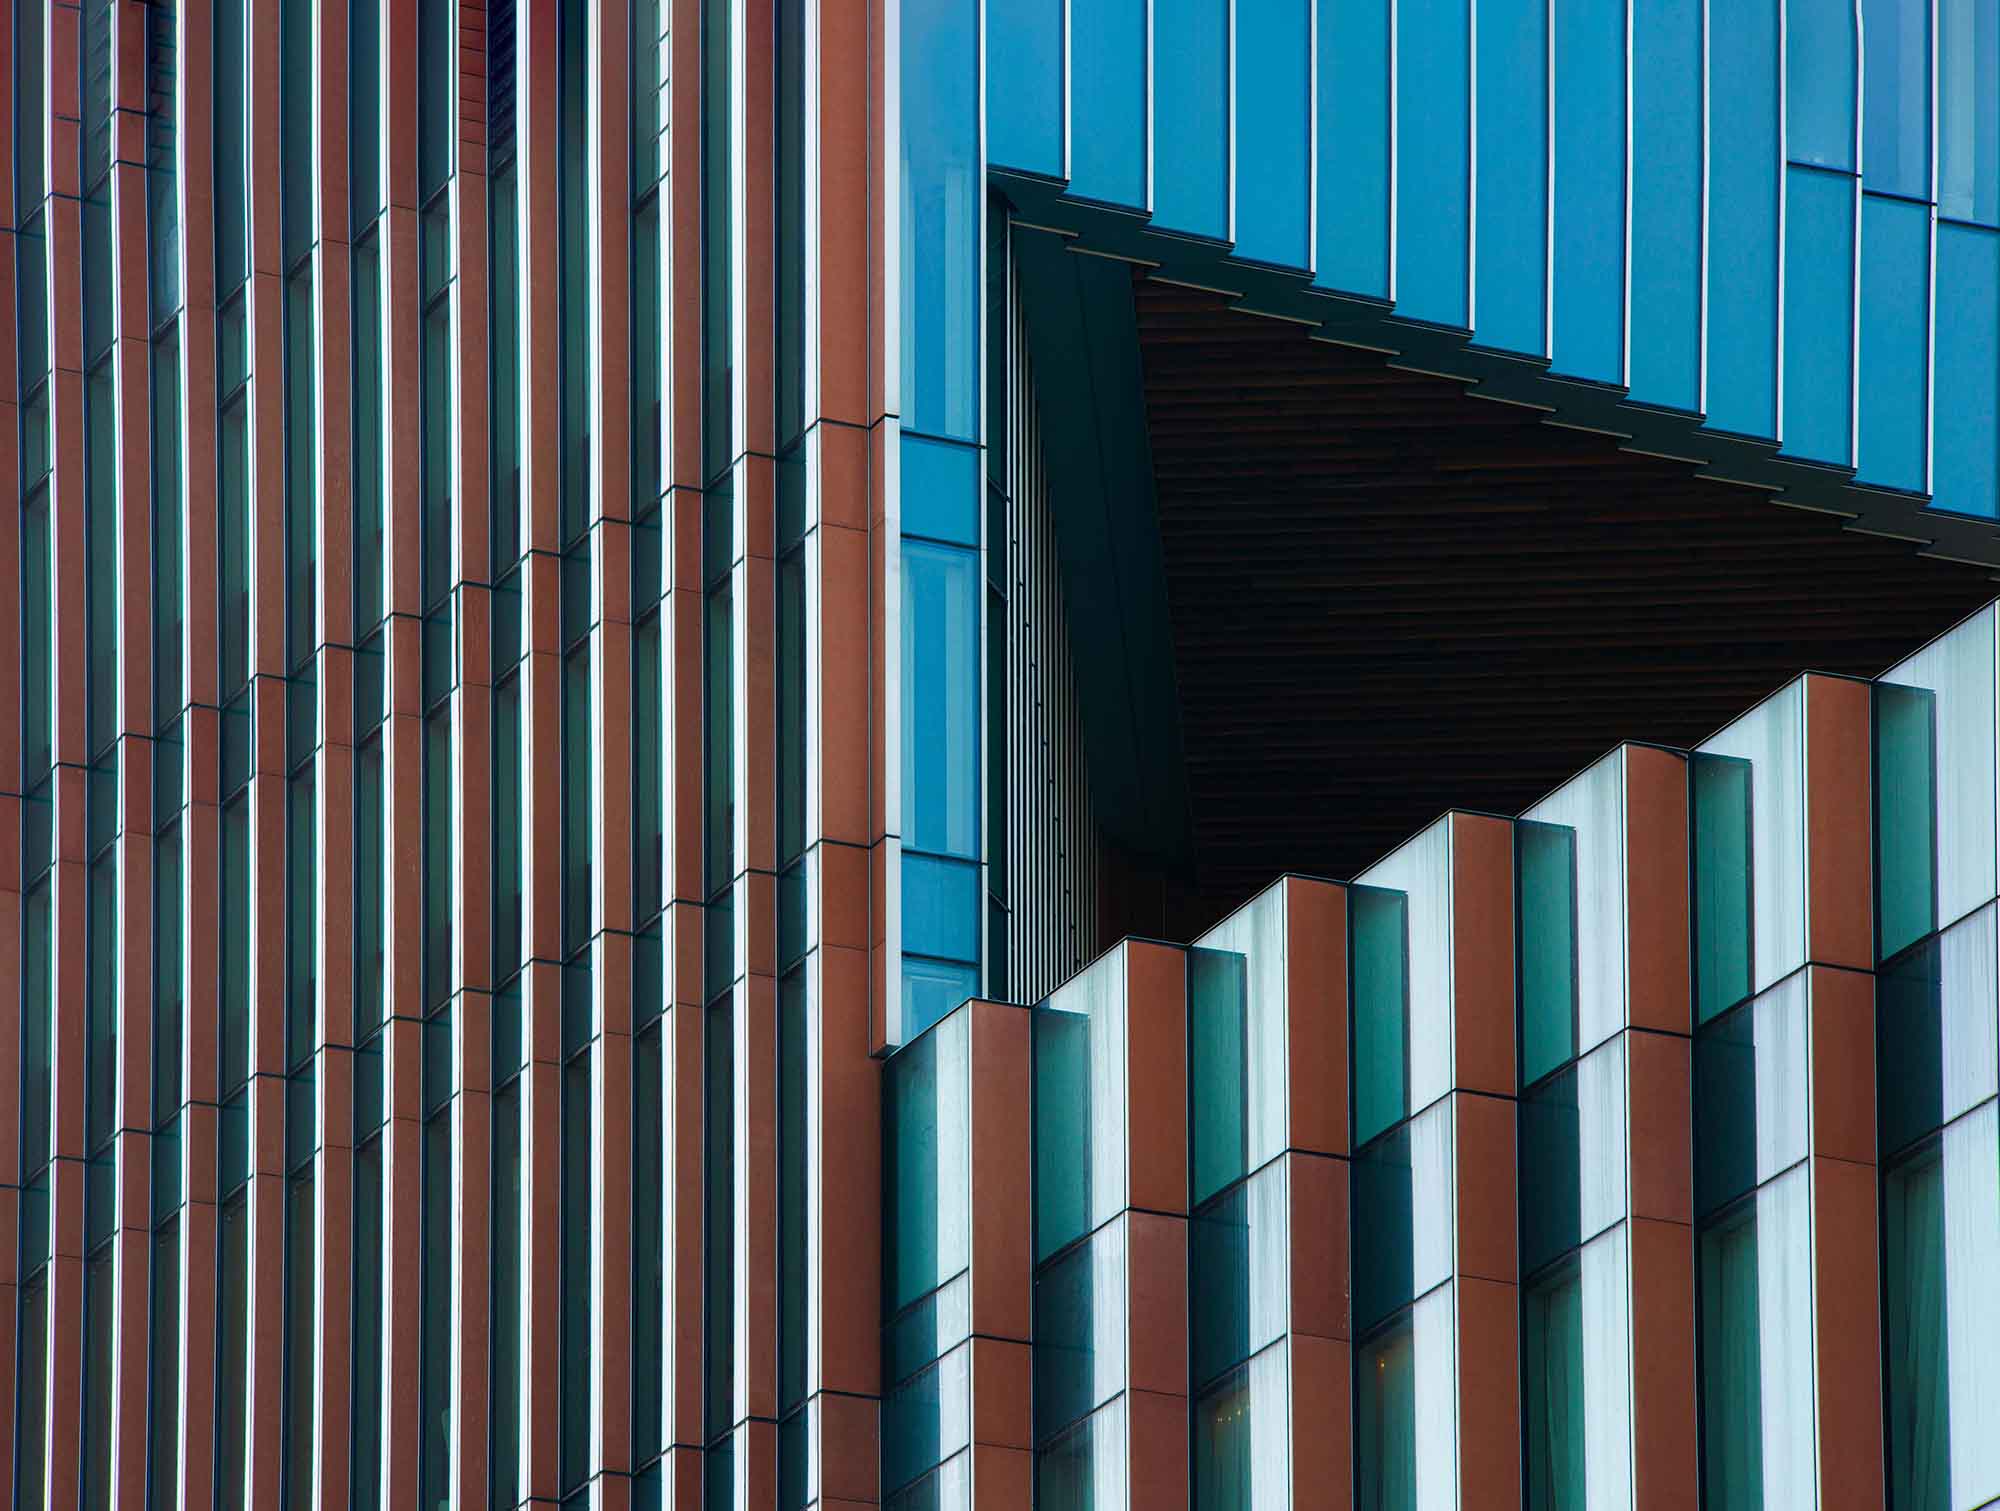
Colorful kaleidoscope of Manhattan Loft Gardens.

Abstraction in Architecture: Unveiling the Geometric Soul

Introduction: Discovering Hidden Dimensions in Architecture

Abstract architectural photography is an artistic genre that brings the hidden beauty of buildings into focus. This transformative approach delves beyond the obvious, offering a unique perspective on the familiar landscapes of urban and rural architecture.

Geometry: The Heartbeat of Architectural Abstraction

At its core, abstract architectural photography is about exploring the basic geometric elements of buildings. Circles, squares, and intricate lines are not mere design components; they are the essence of architectural creativity. By capturing these shapes, photographers invite viewers into a dialogue with the architect’s vision, turning simple forms into a language of aesthetic expression.

Textures and Materials: A Tapestry of Surfaces

Textures and materials play a crucial role in this genre. The interplay of rough concrete, smooth glass, or rustic brickwork transforms structures into canvases rich in tactile narratives. Photographers adept at highlighting these textures bring a building’s personality to life, offering a sensory journey through their images.

The Dance of Light and Shadow

In abstract architectural photography, light and shadow are more than mere natural phenomena; they are the artist’s palette. The way light caresses a surface or shadow conceals a corner can dramatically alter the mood and story of a photograph.

Color: Evoking Emotion through Hues

Color manipulation is an integral part of this photography style. From vivid splashes to subtle shades, color can stir emotions, making each photograph a unique emotional experience.

Architectural patterns of Southwark bridge in B&W.

The Creative Process: Behind the Lens of Abstraction

Creating abstract architectural photographs is a journey of exploration and experimentation. Photographers often spend hours studying their subject, understanding how light interacts with the structure, and experimenting with angles and perspectives. This process is as much about artistic intuition as it is about technical proficiency.

Tips for Aspiring Architectural Photographers

  1. Study Architectural Fundamentals: Understanding basic architectural concepts can provide a deeper appreciation of structures and design elements.
  2. Experiment with Perspectives: Don’t be afraid to explore unusual angles and perspectives. Sometimes, the most compelling images come from the most unexpected viewpoints.
  3. Master Light and Shadow: Learn how different lighting conditions affect the mood and tone of your photographs.
  4. Focus on Details: Pay attention to the small, often overlooked details. They can be the most captivating subjects.
  5. Practice Patience: Great architectural photography often requires waiting for the perfect lighting or moment.
  6. Post-Processing Skills: Develop your skills in photo editing to enhance and bring out the best in your images.

Conclusion: Redefining Architectural Photography

Abstract architectural photography invites us to look at buildings with new eyes, revealing the unseen stories and emotions embedded in concrete, glass, and steel. It’s a journey that transcends traditional architectural appreciation, offering a fresh and profound perspective on the structures that define our spaces.