Balance Elements in the Scene: Creating Visual Equilibrium in Photography

Introduction: The Essence of Balance in Photography

Achieving balance in photography is crucial for creating visually appealing and harmonious images. This guide focuses on the concept of visual equilibrium, where elements in a scene are arranged to create a sense of stability and aesthetic harmony, enhancing the overall impact of the photograph.

Understanding Visual Equilibrium

Visual equilibrium involves strategically placing subjects and objects within the frame to distribute visual weight evenly. This balance can be symmetrical or asymmetrical, with each type offering different aesthetic qualities and emotional impacts.

Creative Process: Crafting Balanced Compositions

  • Identifying the Elements: Start by assessing the elements in your scene that contribute to the visual weight, such as color, size, texture, and position.
  • Symmetry vs. Asymmetry: Decide whether a symmetrical or asymmetrical balance suits your scene better. Symmetry offers a sense of order and calm, while asymmetry can create dynamic tension and interest.
  • Experimenting with Placement: Move around your subject, change your angles, and rearrange elements if possible to find the most balanced composition.

Tips for Photographers

  1. Use the Rule of Thirds: Apply the Rule of Thirds to place key elements at intersection points or along the lines for a balanced composition.
  2. Mind the Negative Space: Pay attention to negative space, as it can significantly affect the balance of your composition.
  3. Color and Contrast: Use contrasting colors and tones to balance lighter and darker areas of your image.
  4. Review and Adjust: Frequently review your composition through your viewfinder or display screen to ensure balance and make necessary adjustments.

Advanced Techniques in Achieving Balance

  • Juxtaposition: Place contrasting elements against each other to achieve balance and create a focal point.
  • Leading Lines: Use leading lines to guide the viewer’s eye across the image, helping to balance the composition.
  • Texture and Patterns: Balance smooth areas with textured ones, or repetitive patterns with plain spaces, to add visual interest.

Practical Applications in Various Genres

  • Landscape Photography: Balance the sky with the land, or a dominant feature with open space.
  • Portrait Photography: Balance the subject with the background, ensuring neither overpowers the other.
  • Street Photography: Find scenes where elements naturally balance each other, like a lone figure against a busy background.

Conclusion: Harmonizing Your Photographic Art

Mastering the balance of elements in photography is key to creating images that are visually pleasing and emotionally engaging. By understanding and practicing visual equilibrium, photographers can enhance the storytelling and impact of their work.

O Carroll, B. (2016). 28 Composition Techniques That Will Improve Your Photos.

References

O Carroll, B. (2016). 28 Composition Techniques That Will Improve Your Photos. [online] PetaPixel. Available at:

https://petapixel.com/photography-composition-techniques/

Isolate the Subject: Clarity in Focus in Photography

Introduction: The Art of Isolating Your Subject

Isolating the subject is a powerful photographic technique that involves focusing on a single element within the frame to draw the viewer’s attention. This method is effective in creating striking images that convey a clear message or emotion, emphasizing the subject with minimal distractions.

Understanding Subject Isolation

Subject isolation is about making your main subject the unmistakable focal point of your photograph. This can be achieved through various means, such as using depth of field, contrast, lighting, or compositional techniques. It’s a way to ‘declutter’ the image and make your subject stand out.

Creative Process: Achieving Clarity in Focus

  • Identifying Your Subject: Clearly define what the main subject of your image is. It could be a person, an object, a landscape feature, etc.
  • Choosing the Right Background: Look for backgrounds that are unobtrusive and don’t compete with your subject for attention. Simple or blurred backgrounds often work best.
  • Utilizing Lighting: Use lighting to illuminate your subject. Side lighting or backlighting can be particularly effective in separating the subject from the background.

Tips for Photographers

  1. Depth of Field Mastery: Use a wide aperture to create a shallow depth of field, blurring the background and foreground to isolate the subject.
  2. Framing Techniques: Frame your subject using natural or architectural elements to draw the viewer’s eye directly to the subject.
  3. Color and Contrast: Utilize color contrasts to make your subject stand out. A brightly colored subject against a muted background can be very effective.
  4. Selective Focus: Use manual focus or selective autofocus points to ensure your subject is the sharpest element in your image.

Advanced Techniques in Subject Isolation

  • Bokeh Effect: Master the art of bokeh – a Japanese term for the aesthetic quality of the blur produced in the out-of-focus parts of an image.
  • Post-Processing: Enhance subject isolation in post-processing by adjusting brightness, contrast, or sharpness around the subject.
  • Use of Negative Space: Incorporate negative space effectively to emphasize isolation and bring focus to your subject.

Practical Applications in Various Genres

  • Portrait Photography: Isolate the subject to capture the essence of their personality and emotions.
  • Wildlife Photography: Use subject isolation to focus on a single animal, highlighting its features or behaviors.
  • Street Photography: Isolate individuals or specific interactions to tell a story or capture a moment in time.

Conclusion: Mastering the Focal Point

Isolating the subject is a skill that elevates the impact of your photography, allowing viewers to connect more deeply with the focal point of your image. It requires a combination of technical knowledge and creative vision to execute effectively.

Monochrome tones in Casablanca architecture.

Use Black and White: Simplifying Amazing Composition in Photography

Introduction: The Timeless Elegance of Black and White

Black and white photography is more than just an absence of color; it’s a different perspective on the world. This guide explores how black and white can simplify compositions, direct focus to the subject, and create a strong emotional impact.

Understanding Black and White Composition

Black and white photography strips away the distraction of color, allowing viewers to focus on other aspects of the photo, such as texture, shape, light, and shadow. It brings out the raw essence of the scene or subject, emphasizing contrasts and subtleties.

Color and black & white comparison in Casablanca.

Creative Process: Crafting Black and White Images

  • Visualizing in Monochrome: Train your eye to see the world in gradients of gray. Look for scenes with strong contrasts or interesting textures that would translate well into black and white.
  • Focus on Lighting: Lighting plays a crucial role in black and white photography. High contrast lighting can create dramatic images, while soft, even lighting can convey subtlety and nuance.
  • Composition and Framing: Pay attention to the composition, using elements like lines, shapes, and textures to guide the viewer’s eye.

Tips for Photographers

  1. Shoot in Color: Capture your images in color and convert them to black and white during post-processing for greater control over tones and contrasts.
  2. Play with Contrast: Experiment with different levels of contrast to create depth and drama in your images.
  3. Use Filters: When shooting, use red or yellow filters to enhance contrasts in the sky and landscapes.
  4. Mind the Grays: Pay attention to the gray tones in your image. They should vary to create a dynamic range in your photo.

Advanced Techniques in Black and White Photography

  • High-Key and Low-Key Photography: Explore high-key (predominantly light tones) and low-key (predominantly dark tones) photography for artistic effects.
  • Texture Emphasis: Use black and white to emphasize textures, bringing out details that might go unnoticed in color.
  • Silhouettes and Shadows: Create striking silhouettes and shadow play, which are particularly compelling in black and white.

Practical Applications in Various Genres

  • Portrait Photography: Capture the expressions and emotions of subjects, focusing on the play of light and shadow on their features.
  • Landscape Photography: Convey the drama of landscapes, from the starkness of barren fields to the intricacy of urban architecture.
  • Street Photography: Document the rawness and authenticity of everyday life, highlighting the stark realities of urban environments.

Conclusion: The Power of Monochrome

Black and white photography is a powerful tool for simplifying compositions and conveying stories in a more focused and emotionally charged manner. It challenges photographers to look beyond color and explore the fundamental aspects of light, shadow, and form.

Simplicity and Minimalism in Photography: Less Is More

Introduction: The Beauty of Minimalism

Minimalism in photography is an art form that focuses on simplicity and the deliberate use of space to convey a message or emotion. This guide explores how embracing minimalism can lead to powerful, thought-provoking images that resonate with viewers through their uncluttered and impactful compositions.

Understanding Simplicity and Minimalism

At its heart, minimalism is about stripping away the non-essential elements to highlight the beauty and uniqueness of the subject. It’s about finding strength in subtlety and conveying a narrative through the simplest of compositions.

Creative Process: Crafting Minimalist Photographs

  • Subject Selection: Choose subjects that stand out in their simplicity. Look for strong shapes, bold colors, or interesting textures.
  • Composition: Emphasize your subject by composing with plenty of negative space. Be intentional about what you include in the frame.
  • Lighting: Use lighting to enhance the mood. Minimalist photos often benefit from soft, natural light or dramatic contrasts.

Tips for Photographers

  1. Keep It Simple: Focus on one subject and remove any distracting elements from your frame.
  2. Pay Attention to Backgrounds: Choose backgrounds that are clean and unobtrusive to keep the focus on your subject.
  3. Experiment with Colors and Shapes: Use bold colors and simple shapes to create visually striking images.
  4. Practice Patience: Minimalist photography often requires patience to find the perfect subject or waiting for the right lighting conditions.

Advanced Techniques in Minimalist Photography

  • Abstract Minimalism: Create abstract compositions that focus on shapes, colors, and textures rather than specific subjects.
  • Monochromatic Themes: Experiment with monochromatic color schemes to enhance simplicity and focus.
  • Reflections and Shadows: Use reflections and shadows creatively to add depth and interest to minimalist compositions.

Practical Applications in Various Genres

  • Portrait Photography: Capture close-ups with simple backdrops or use the subject’s features as the main focal point.
  • Landscape Photography: Find simplicity in vast, open spaces or focus on a single natural element.
  • Architectural Photography: Look for clean lines, geometric shapes, and contrasting textures in buildings and structures.

Conclusion: Embracing the Minimalist Approach

Minimalism in photography is about more than just taking pictures with few elements. It’s a mindset that values the beauty of simplicity and the power of understatement. By adopting a minimalist approach, photographers can create images that are both visually appealing and emotionally resonant.

O Carroll, B. (2016). 28 Composition Techniques That Will Improve Your Photos.

References

O Carroll, B. (2016). 28 Composition Techniques That Will Improve Your Photos. [online] PetaPixel. Available at:

https://petapixel.com/photography-composition-techniques/

[Accessed 13 December]

Fill the Frame: Focusing on Amazing Photographic Details

Introduction: Embracing Detail with ‘Fill the Frame’

‘Filling the frame’ is a powerful photographic technique that involves using your camera frame to enclose a significant portion or all of a subject. This method is excellent for highlighting details, textures, and patterns, allowing the viewer to focus solely on the subject without distractions from the background or surrounding environment.

The Impact of Filling the Frame

This technique is particularly effective in drawing the viewer’s attention to specific details, creating a more intimate and immersive experience. It’s about isolating the subject, making it the undisputed focal point of your composition.

Creative Process: Mastering ‘Fill the Frame’

  • Choosing Your Subject: Look for subjects that have interesting details, textures, or patterns. These could range from the intricate lines on a leaf to the architectural details of a building.
  • Getting Close: Move closer to your subject or use a zoom lens to fill the frame with your subject. The goal is to eliminate as much of the background as possible.
  • Composition Considerations: Pay attention to the composition within your frame. The placement of your subject and how it interacts with the edges of your frame is crucial.

Tips for Photographers

  1. Use Macro Lenses for Close-Ups: Macro lenses are perfect for extreme close-up shots, allowing you to capture intricate details.
  2. Experiment with Aperture: Play with different aperture settings. A wide aperture can blur the background, while a narrow aperture can keep everything in focus.
  3. Mind the Edges: Be cautious of the edges of your frame. Clipping part of your subject can be a powerful tool but use it thoughtfully.
  4. Simplify: Avoid clutter in your frame. The more simplified and focused the composition, the more powerful the image.

Advanced Techniques in ‘Fill the Frame’

  • Selective Focusing: Use selective focus to emphasize a particular part of the subject while gently blurring the rest.
  • Creative Cropping: Don’t be afraid to crop your images in post-processing to achieve the desired ‘fill the frame’ effect.
  • Playing with Light: Use light and shadows creatively to add depth and dimension to your subject.

Practical Applications in Various Genres

  • Portrait Photography: Use ‘fill the frame’ to capture facial expressions or details like the eyes or lips.
  • Nature and Wildlife Photography: Fill the frame with a single animal or plant, highlighting its textures and features.
  • Urban and Street Photography: Capture the essence of street life or architectural details by filling the frame with your urban subject.

Conclusion: The Art of Detail in Photography

Filling the frame is more than just a technique; it’s an artistic approach to drawing the viewer’s eye into the heart of the subject. It’s about celebrating details, textures, and the essence of the subject itself.

Rule of Odds: Enhancing Aesthetic Appeal in Photography

Introduction: Understanding the Rule of Odds

The Rule of Odds is a fascinating compositional concept in photography that suggests images are more visually appealing when they contain an odd number of elements. This principle is based on the idea that odd-numbered groupings are more natural and less forced than even-numbered groupings, creating a sense of balance and harmony in a photograph.

The Essence of the Rule of Odds

This rule is grounded in the psychological perception that odd numbers, especially the number three, are more interesting and pleasing to the human eye. They create a sense of natural balance and make the composition more dynamic. When applied correctly, the Rule of Odds can transform a simple photograph into a captivating visual story.

Creative Process: Implementing the Rule of Odds

  • Identifying Opportunities: Look for scenes where you can naturally apply the Rule of Odds. This could be three birds on a branch, five stones in a riverbed, or a single person framed by two trees.
  • Composition and Framing: When composing your shot, place the odd elements in a way that is aesthetically pleasing and balanced. Consider using the Rule of Thirds in conjunction with the Rule of Odds for a more compelling composition.
  • Creating Focus: Use the odd elements to guide the viewer’s eye. The odd-numbered elements should lead to the main subject or create a pathway through the image.

Tips for Photographers

  1. Create Odd Groupings: If you can’t find a natural odd grouping, try creating one. This can be done by adjusting your position or perspective.
  2. Balance and Symmetry: Use the Rule of Odds to break symmetry in a way that is visually interesting and creates a focal point.
  3. Depth of Field: Utilize depth of field to emphasize the odd elements in your composition, making them stand out against a blurred background.
  4. Simplicity is Key: Keep the composition simple. Too many elements, even if odd-numbered, can overwhelm the viewer.

Advanced Techniques in Using the Rule of Odds

  • Foreground and Background: Incorporate odd elements both in the foreground and background to add depth to your composition.
  • Color and Light: Use color and light contrasts to highlight the odd elements, making them more pronounced.
  • Juxtaposition: Position the odd elements against a contrasting background to enhance their impact.

Practical Applications in Various Genres

  • Portrait Photography: Arrange group portraits with an odd number of people to create a more dynamic composition.
  • Landscape Photography: Find or create odd-numbered elements in a landscape, such as rocks, trees, or hills.
  • Street Photography: Capture candid moments where individuals or objects form an odd grouping, adding interest to everyday scenes.

Conclusion: Mastering the Art of Odd Numbers

The Rule of Odds is a simple yet powerful tool that can significantly enhance the visual appeal of your photographs. By understanding and applying this rule, photographers can create images that are not only aesthetically pleasing but also intriguing and balanced.

O Carroll, B. (2016). 28 Composition Techniques That Will Improve Your Photos.

References

O Carroll, B. (2016). 28 Composition Techniques That Will Improve Your Photos. [online] PetaPixel. Available at:

https://petapixel.com/photography-composition-techniques/

[Accessed 13 December]

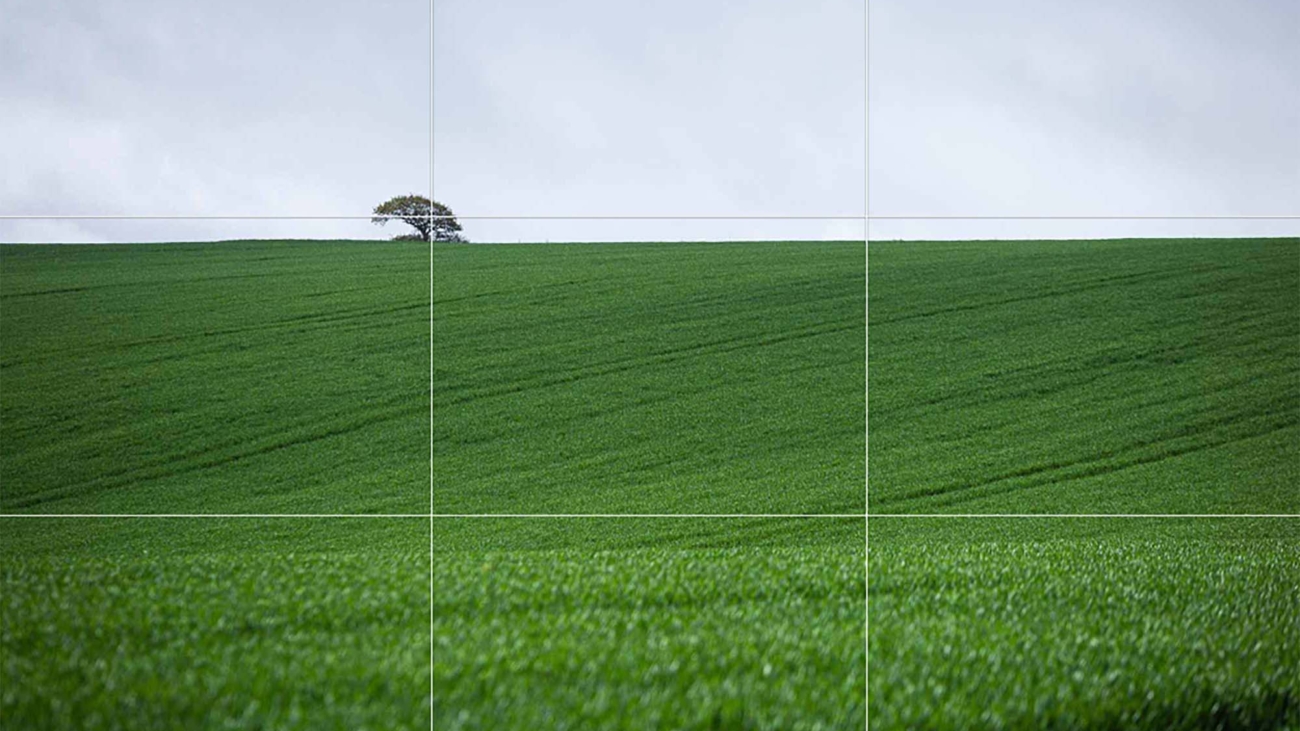
Rule of Thirds in England landscape.

Rule of Thirds: Master a Powerful Compositional Skill

Introduction: Embracing the Rule of Thirds

The Rule of Thirds is more than a basic composition guideline; it’s a foundational tool that can transform your photography. It involves envisioning your frame divided into nine equal parts and strategically placing your subject along these lines or their intersections. This technique brings balance, interest, and a professional touch to your photographs, whether you’re capturing a serene landscape or a dynamic urban scene.

Understanding the Rule of Thirds

Imagine your camera’s viewfinder overlaid with a grid of two horizontal and two vertical lines, creating nine equal rectangles. The power of this rule lies in placing key elements of your composition along these lines or at their intersections. This simple act can dramatically enhance the visual impact of your image.

Creative Process: Implementing the Rule

  • Seeing the Grid: Train your eye to visualize the grid in every scene. Whether looking through your viewfinder or framing a shot in your mind, imagine this grid overlaying your subject.
  • Subject Placement: Place your main subject at one of the intersections, known as power points. This placement naturally draws the viewer’s eye and creates a more engaging photograph.
  • Balancing Elements: Use the grid to balance different elements in your scene. A well-composed photograph often has a main subject offset by a smaller element, creating a visually appealing balance.

Tips for Photographers

  1. Experiment with Placement: Don’t be afraid to experiment with placing different elements at various power points.
  2. Use Grid Display: Many cameras have a grid display feature. Use it to your advantage to align your shots according to the Rule of Thirds.
  3. Balance with Negative Space: Utilize negative space by placing your subject off-center, creating a more intriguing and balanced composition.
  4. Breaking the Rule: Once you’re comfortable with the Rule of Thirds, don’t hesitate to break it creatively to achieve unique and compelling compositions.

Advanced Techniques and Considerations

  • Dynamic Tension: Use the grid lines to create dynamic tension in your images. Place moving subjects so they have more space in front of them, suggesting motion.
  • Horizontal and Vertical Lines: Align horizons, buildings, and other elements with the horizontal and vertical lines for a polished look.
  • Portrait Photography: In portraiture, align your subject’s eyes with the top horizontal line for a natural and engaging composition.

Practical Applications in Various Genres

  • Landscape Photography: Use the horizontal lines to align the horizon and the vertical lines for trees or other vertical elements.
  • Urban and Street Photography: Apply the rule to balance architectural elements and human subjects within the urban landscape.
  • Wildlife Photography: Place the animal’s eye at an intersection point to create a strong focal point.

Conclusion: Beyond the Basics

Mastering the Rule of Thirds is a journey of understanding balance, harmony, and the subtle nuances of composition. It’s a skill that will elevate your photographic practice, enabling you to capture not just images, but stories and emotions.

Rule of Thirds demonstration in Photoshop.

Tutorial: Applying the Rule of Thirds in Photoshop

Step 1: Selecting the Crop Tool

  1. Open Your Image: Start by opening the photo you wish to edit in Photoshop. Ensure you’re working on the right layer if your project has multiple layers.

  2. Accessing the Crop Tool: Look towards the left side of Photoshop’s toolbar. This toolbar is usually located on the left-hand side of the Photoshop window. You will find various tools here.

  3. Select the Crop Tool: Move your cursor over the toolbar and locate the Crop Tool. It typically resembles two intersecting right angles or a diagonal line with two perpendicular lines at each end. Hover over the icons if you’re unsure; Photoshop displays the name of each tool. Once you find it, click on the Crop Tool or simply press the ‘C’ key on your keyboard as a shortcut

Advanced Rule of Thirds application in Photoshop.

Step 2: Applying the Rule of Thirds

  1. Enabling the Rule of Thirds Grid: With the Crop Tool active, you will notice a grid overlay appear on your image. This grid divides the image into nine equal parts with two horizontal and two vertical lines. This is the Rule of Thirds grid. If you don’t see it, look for an option in the toolbar at the top of the screen (while the Crop Tool is selected) to enable the ‘Rule of Thirds’ grid.

  2. Adjusting Your Composition: Click and drag the edges or corners of the crop border to include or exclude parts of the image. As you do this, consider the points of intersection on the grid. These are the ‘power points’ according to the Rule of Thirds. Position key elements of your photo, like the subject or horizon, along these lines or at their intersections for a more aesthetically pleasing composition.

  3. Finalizing the Crop: Once you are satisfied with the new composition, press Enter or click the checkmark at the top of the window to apply the crop. This will remove the parts of the image outside the crop border.

Conclusion

The Rule of Thirds is a fundamental principle in photography that helps create balanced and engaging compositions. By utilizing Photoshop’s Crop Tool and the built-in Rule of Thirds grid, you can easily reframe your photos to adhere to this rule, enhancing their visual appeal.